- HR:+91-879-9184-787
- Sales:+91-832-0329-068

How will your first Android app perform? Mobile apps have become a big part of our lives, and making apps for Android is still a hot topic in 2024. So questions like how to create an app for Android keep growing. Whether you’re new to app development or a pro, there’s always something new to learn. In this guide, we’ll walk you through the process of creating an Android app step by step, from planning and design to coding and launching. We’ll keep things straightforward, focusing on practical tips and the latest tools you’ll need to get started.
Mobile apps have become a necessity for businesses and individuals alike, offering convenience, entertainment, and productivity at our fingertips. With the Android OS continuing to dominate the global market, there’s no better time to explore app creation for this platform. Whether you’re looking to build a personal project, launch a startup, or enhance your Android app development agency‘s digital presence, creating an Android app opens doors to a vast audience of smartphone users worldwide.
By following the steps outlined in this guide and staying informed about the latest trends and best practices, you’ll be well-equipped with the Android app development journey and turn your ideas into reality.
So, let’s dive in and get your app idea off the ground!
Before diving into the development process, it’s crucial to understand the basics of Android app development. Familiarize yourself with the Android operating system, programming languages like Java or Kotlin, and the overall structure of mobile applications.
Android app development refers to the process of creating applications specifically designed to run on devices powered by the Android operating system. This involves designing, coding, testing, and deploying software that provides various functionalities and services to users through their Android devices, such as smartphones, tablets, and wearable devices. Android app development typically involves using programming languages such as Java or Kotlin, along with development tools like Android Studio, to build user-friendly and feature-rich applications that cater to a wide range of user needs and preferences.
Now, let’s dive into the steps you must follow in Android Development.
A beginner’s first question in development is how to build apps? This is the first step that answers this question. Setting up a development environment for Android app development in 2024 involves several steps to ensure you have the necessary tools and configurations. Here’s a basic guide:
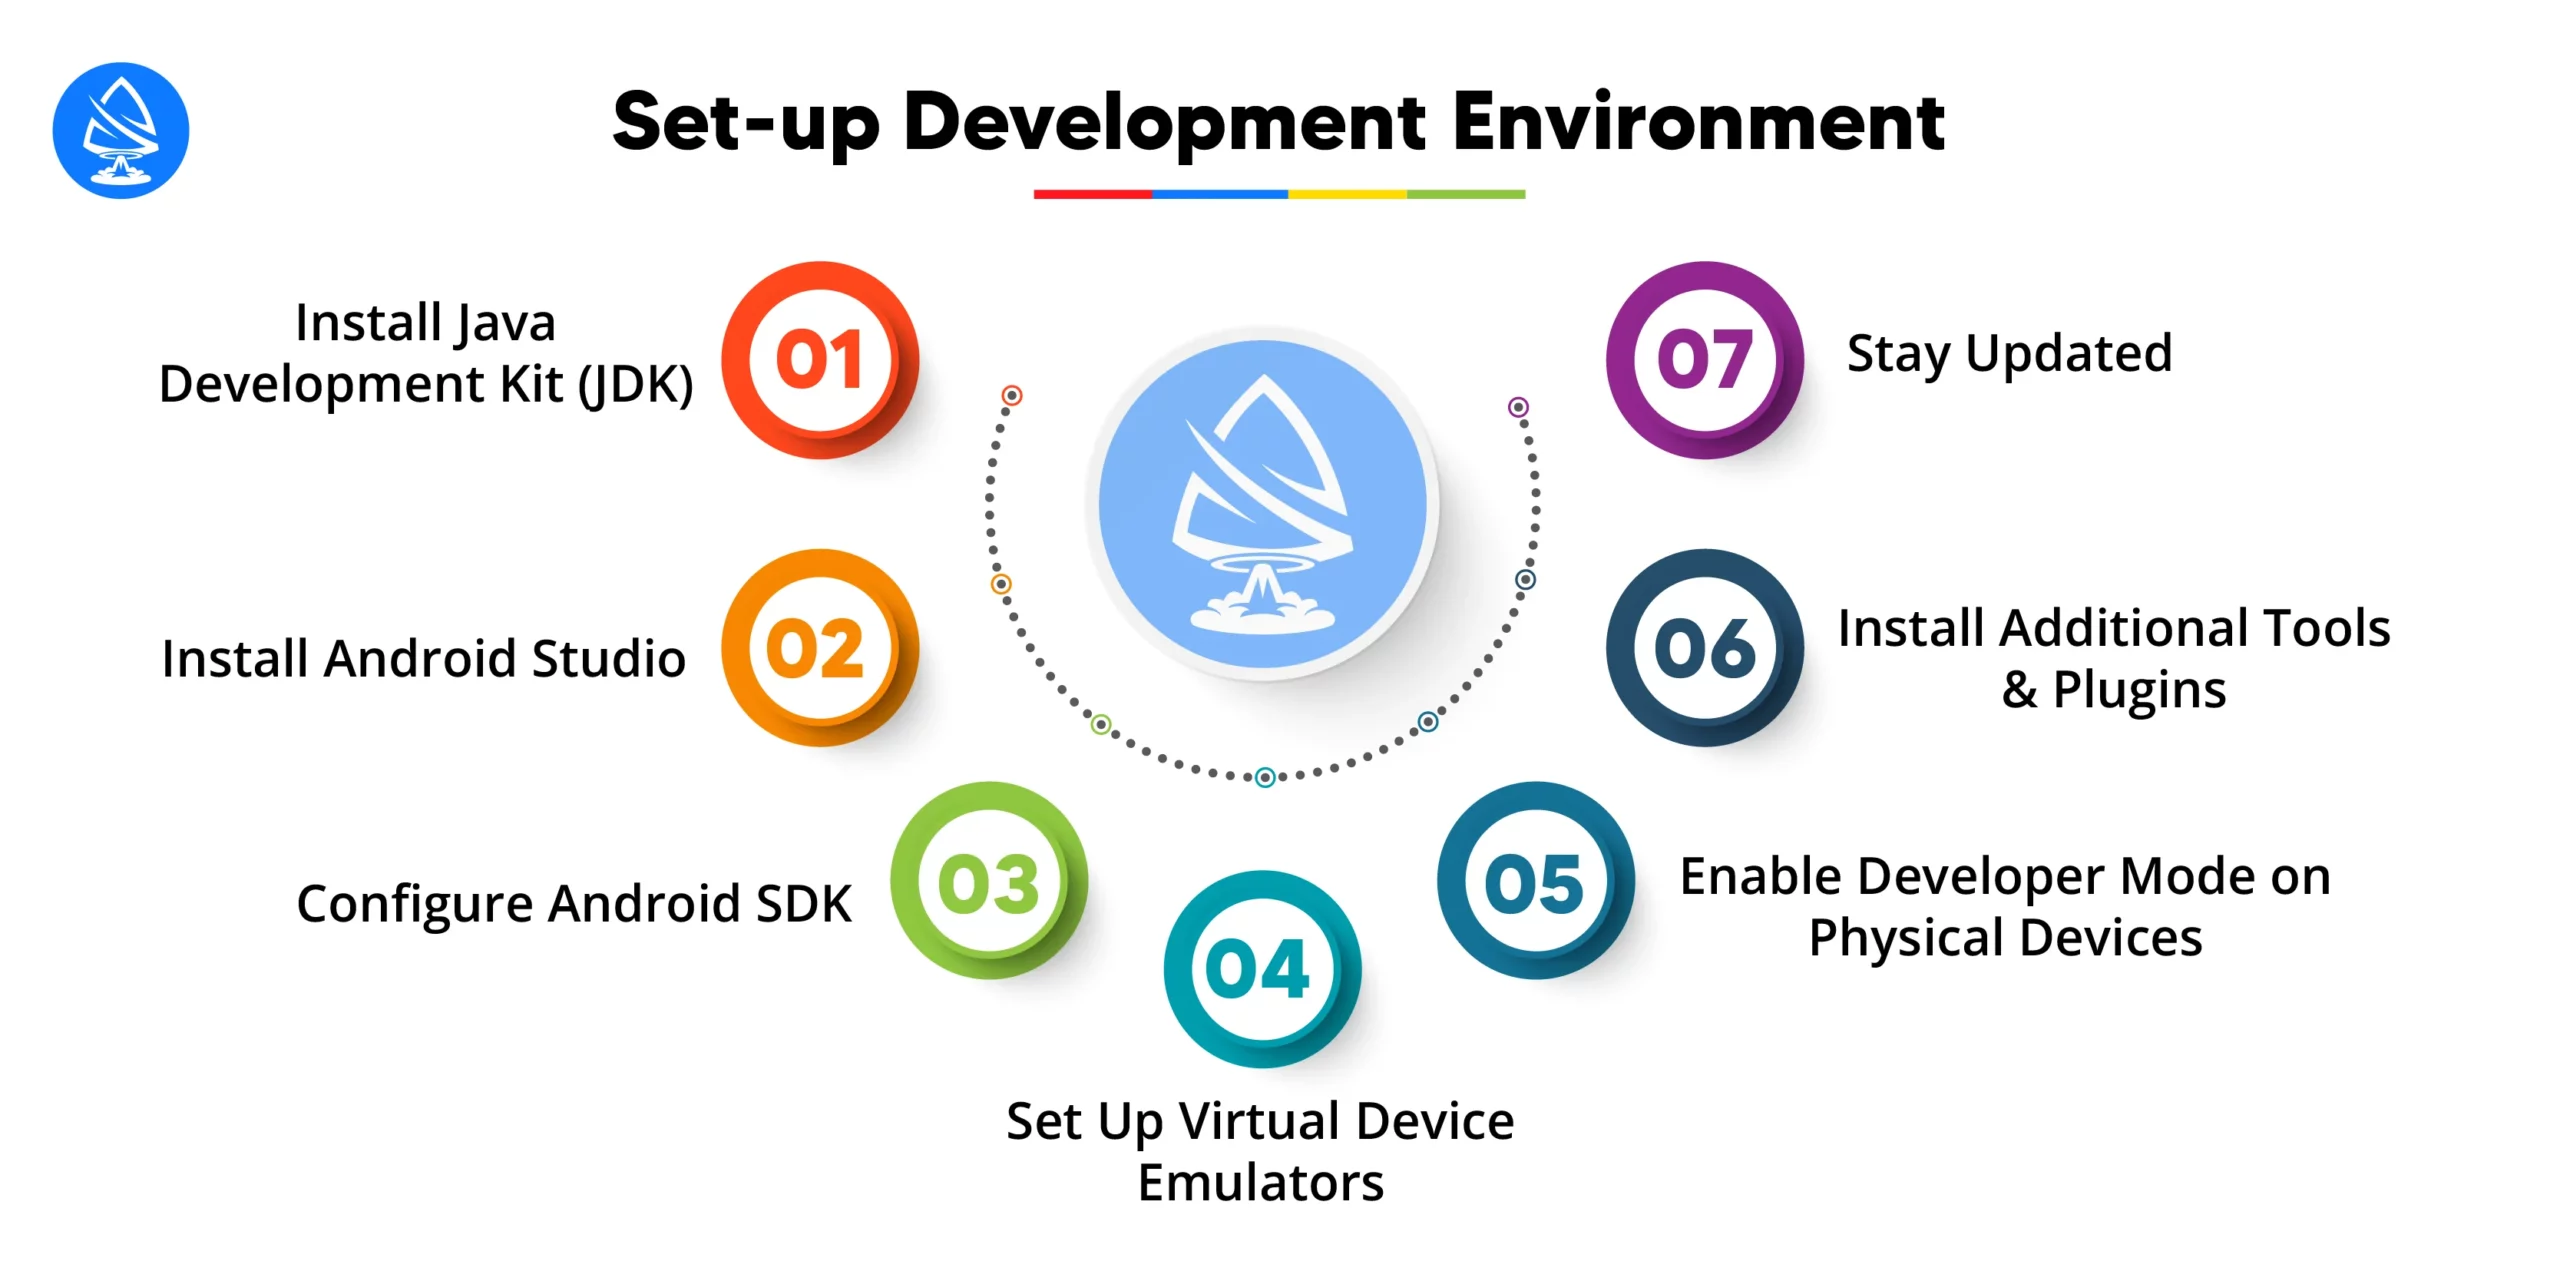
Ensure you have the latest version of the Java Development Kit (JDK) installed on your system. Android development typically requires JDK 8 or later.
Android Studio is the official Integrated Development Environment (IDE) for Android app development. Download Android Studio and install the latest version of it from the official website.
Android Studio comes bundled with the Android SDK, but you may need to configure additional SDK components and platforms. Use the SDK Manager within the Android Studio window to download the necessary SDK platforms, build tools, and system images for testing.
Android Studio provides a built-in Android Emulator for testing apps on virtual devices. Configure virtual device emulators with different Android versions and device configurations to test your app across various environments.
If you plan to test your app on physical Android devices, enable Developer Mode on each device by following the device-specific instructions. This allows you to enable USB debugging and deploy apps directly from Android Studio.
Depending on your specific requirements and workflow preferences, you may need to install additional tools and plugins in Android Studio. This could include third-party libraries, version control systems (e.g., Git), or code analysis tools.
Keep your development environment up-to-date by regularly checking for updates to Android Studio, SDK tools, and dependencies. Updates often include bug fixes, performance improvements, and support for new features.
You can set up a robust development environment for Android app development in 2024 by following these steps. It ensures you have the necessary tools and configurations to build, test, and deploy your applications effectively.
Choosing the right tools to create an Android app is crucial for ensuring efficiency, productivity, and the overall success of your project. Here’s a brief overview of some key tools and their importance:
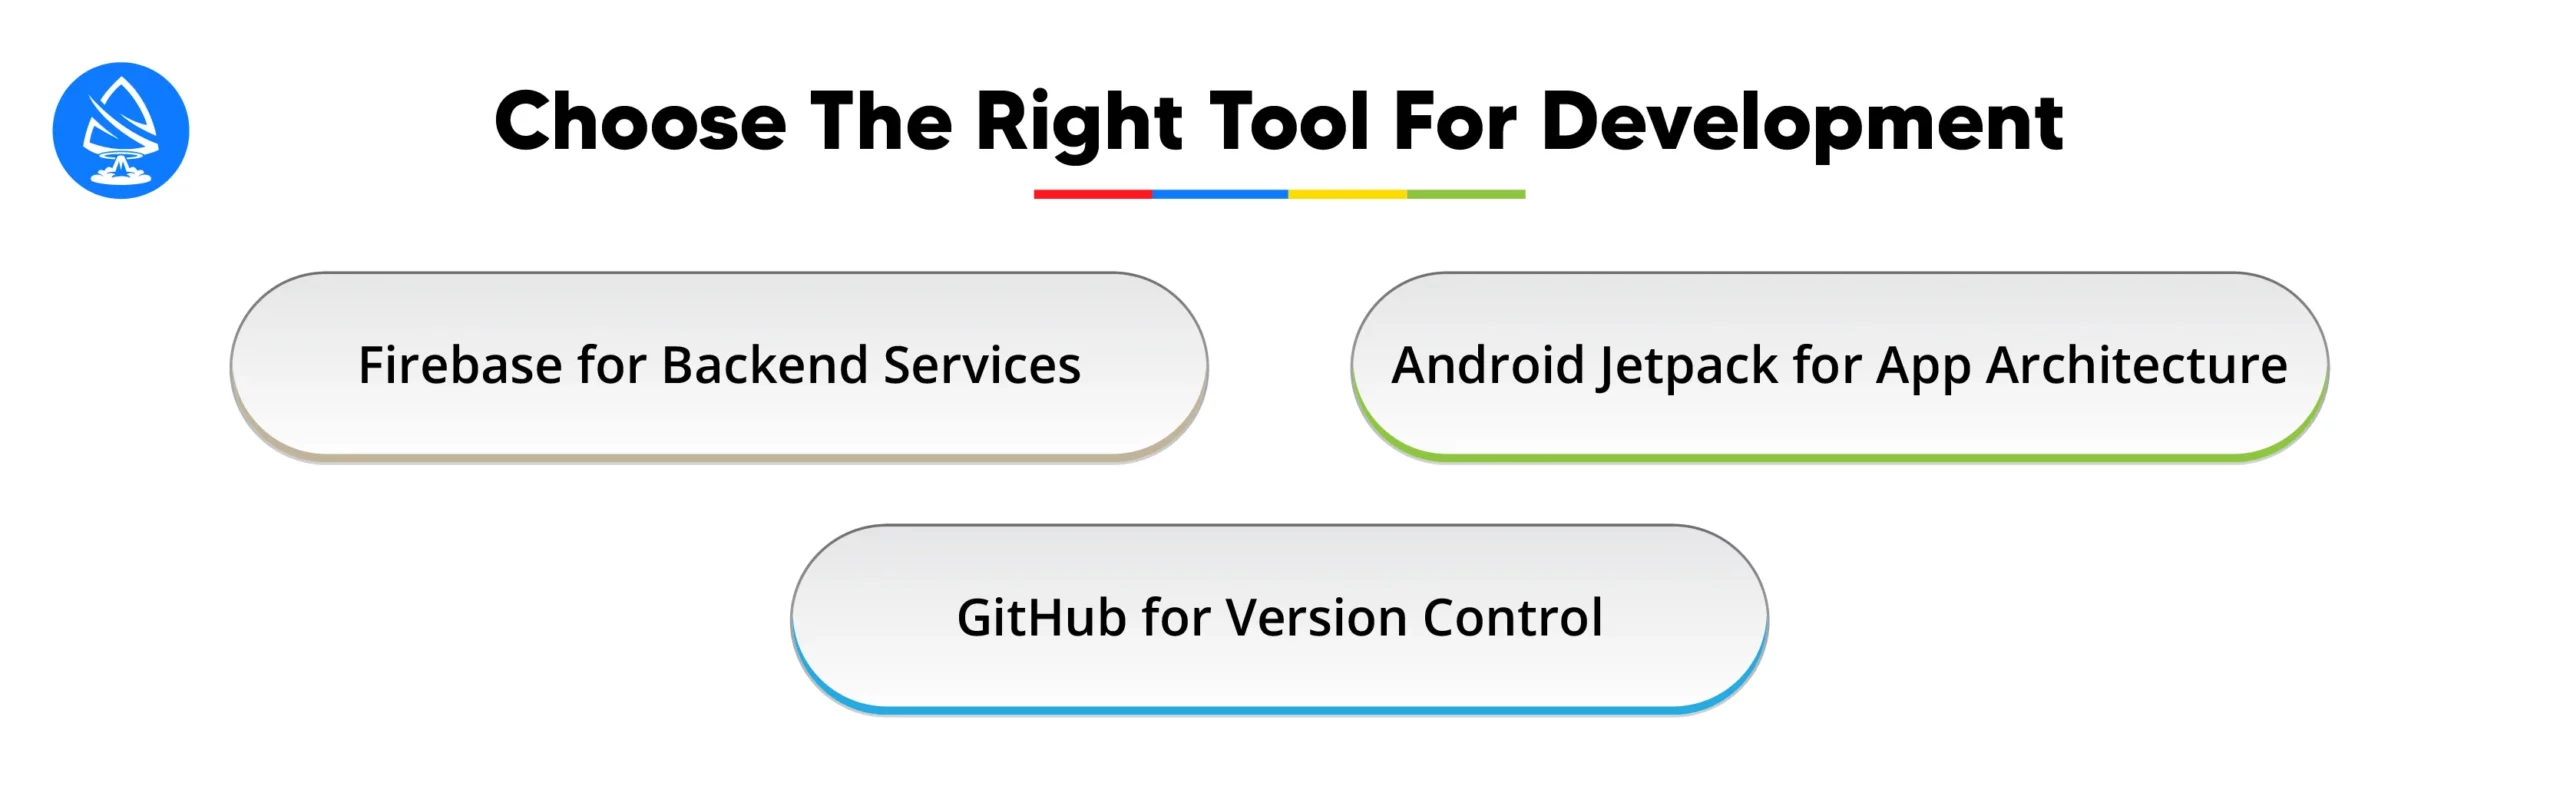
Firebase is a comprehensive platform offered by Google that provides a wide range of backend services tailored for mobile devices and web applications. It offers features such as real-time database, authentication, cloud storage, hosting, and more, allowing developers to quickly build and scale backend infrastructure without managing servers.
Firebase simplifies tasks like user authentication, data storage, and push notifications, enabling developers to focus more on building the front end of their Android apps. Its real-time database and cloud functions facilitate seamless synchronization and interaction between client and server, making it an essential tool for modern Android app development.
Android Jetpack is a set of libraries, tools, and architectural components provided by Google to help developers build high-quality Android apps more easily. It includes libraries for common tasks such as UI design, navigation, data storage, and more, along with best practices and recommended app architecture patterns.
Jetpack components like ViewModel, LiveData, Room, and Navigation simplify the development process by promoting a modular, lifecycle-aware, and MVVM (Model-View-ViewModel) architecture. By adopting Jetpack, developers can create apps that are more maintainable, testable, and scalable, while also benefiting from the latest Android features and updates.
GitHub is a popular platform for version control and collaboration, widely used by developers for managing code repositories and coordinating team projects. In Android app development, GitHub plays a crucial role in facilitating collaboration, code review, and version control. Developers can use Git, a distributed version control system, to track changes, manage branches, and merge code changes seamlessly.
GitHub provides features like pull requests, issues tracking, code review, and continuous integration (CI) tools, enabling teams to work together efficiently and maintain code quality. By leveraging GitHub for version control, developers can ensure code consistency, traceability, and collaboration across the entire development lifecycle, from initial development to deployment and maintenance.
Designing an App Interface in Android app development refers to the process of creating the visual and interactive elements of the user interface (UI) for Best Android applications. This involves designing layouts, screens, navigation flows, and user interactions that are intuitive, visually appealing, and aligned with the app’s functionality and branding.
The app interface design plays a crucial role in shaping the user experience (UX) and determining how users interact with and perceive the app. It encompasses various aspects such as typography, color schemes, iconography, layout structure, and user interaction patterns, all aimed at delivering a seamless and engaging user experience.
Adobe XD and Figma are popular design tools used by UI/UX designers and developers for creating app interfaces, prototypes, and interactive mockups. These tools offer a range of features and capabilities that streamline the design process and facilitate collaboration between designers, developers, and stakeholders.

Adobe XD is a comprehensive design tool that allows designers to create UI designs, wireframes, prototypes, and interactive mockups for web and mobile applications. It offers a user-friendly interface, powerful design tools, and seamless integration with other Adobe Creative Cloud products. With features like responsive resize, component states, and real-time collaboration, Adobe XD enables designers to create high-fidelity designs and prototypes that accurately reflect the intended user experience.
Figma is a cloud-based design tool that enables collaborative and iterative design processes. It allows multiple designers and stakeholders to work on the same project simultaneously, making real-time updates and providing feedback in a shared environment. Figma offers robust design and prototyping features, including vector editing tools, prototyping animations, and version history tracking. Its cross-platform compatibility and browser-based interface make it accessible from any device, facilitating seamless collaboration and communication among team members.
Initiate Coding in Android app development marks the transition from the design phase to the implementation phase, where developers start writing code to build the actual functionality of the app. Create a new Android Studio project and start the coding part. This stage involves translating the design specifications, wireframes, and user interface layouts into executable code that runs on Android devices. Here’s a detailed explanation of the steps involved in initiating coding and adding key features and functionalities to an Android app:
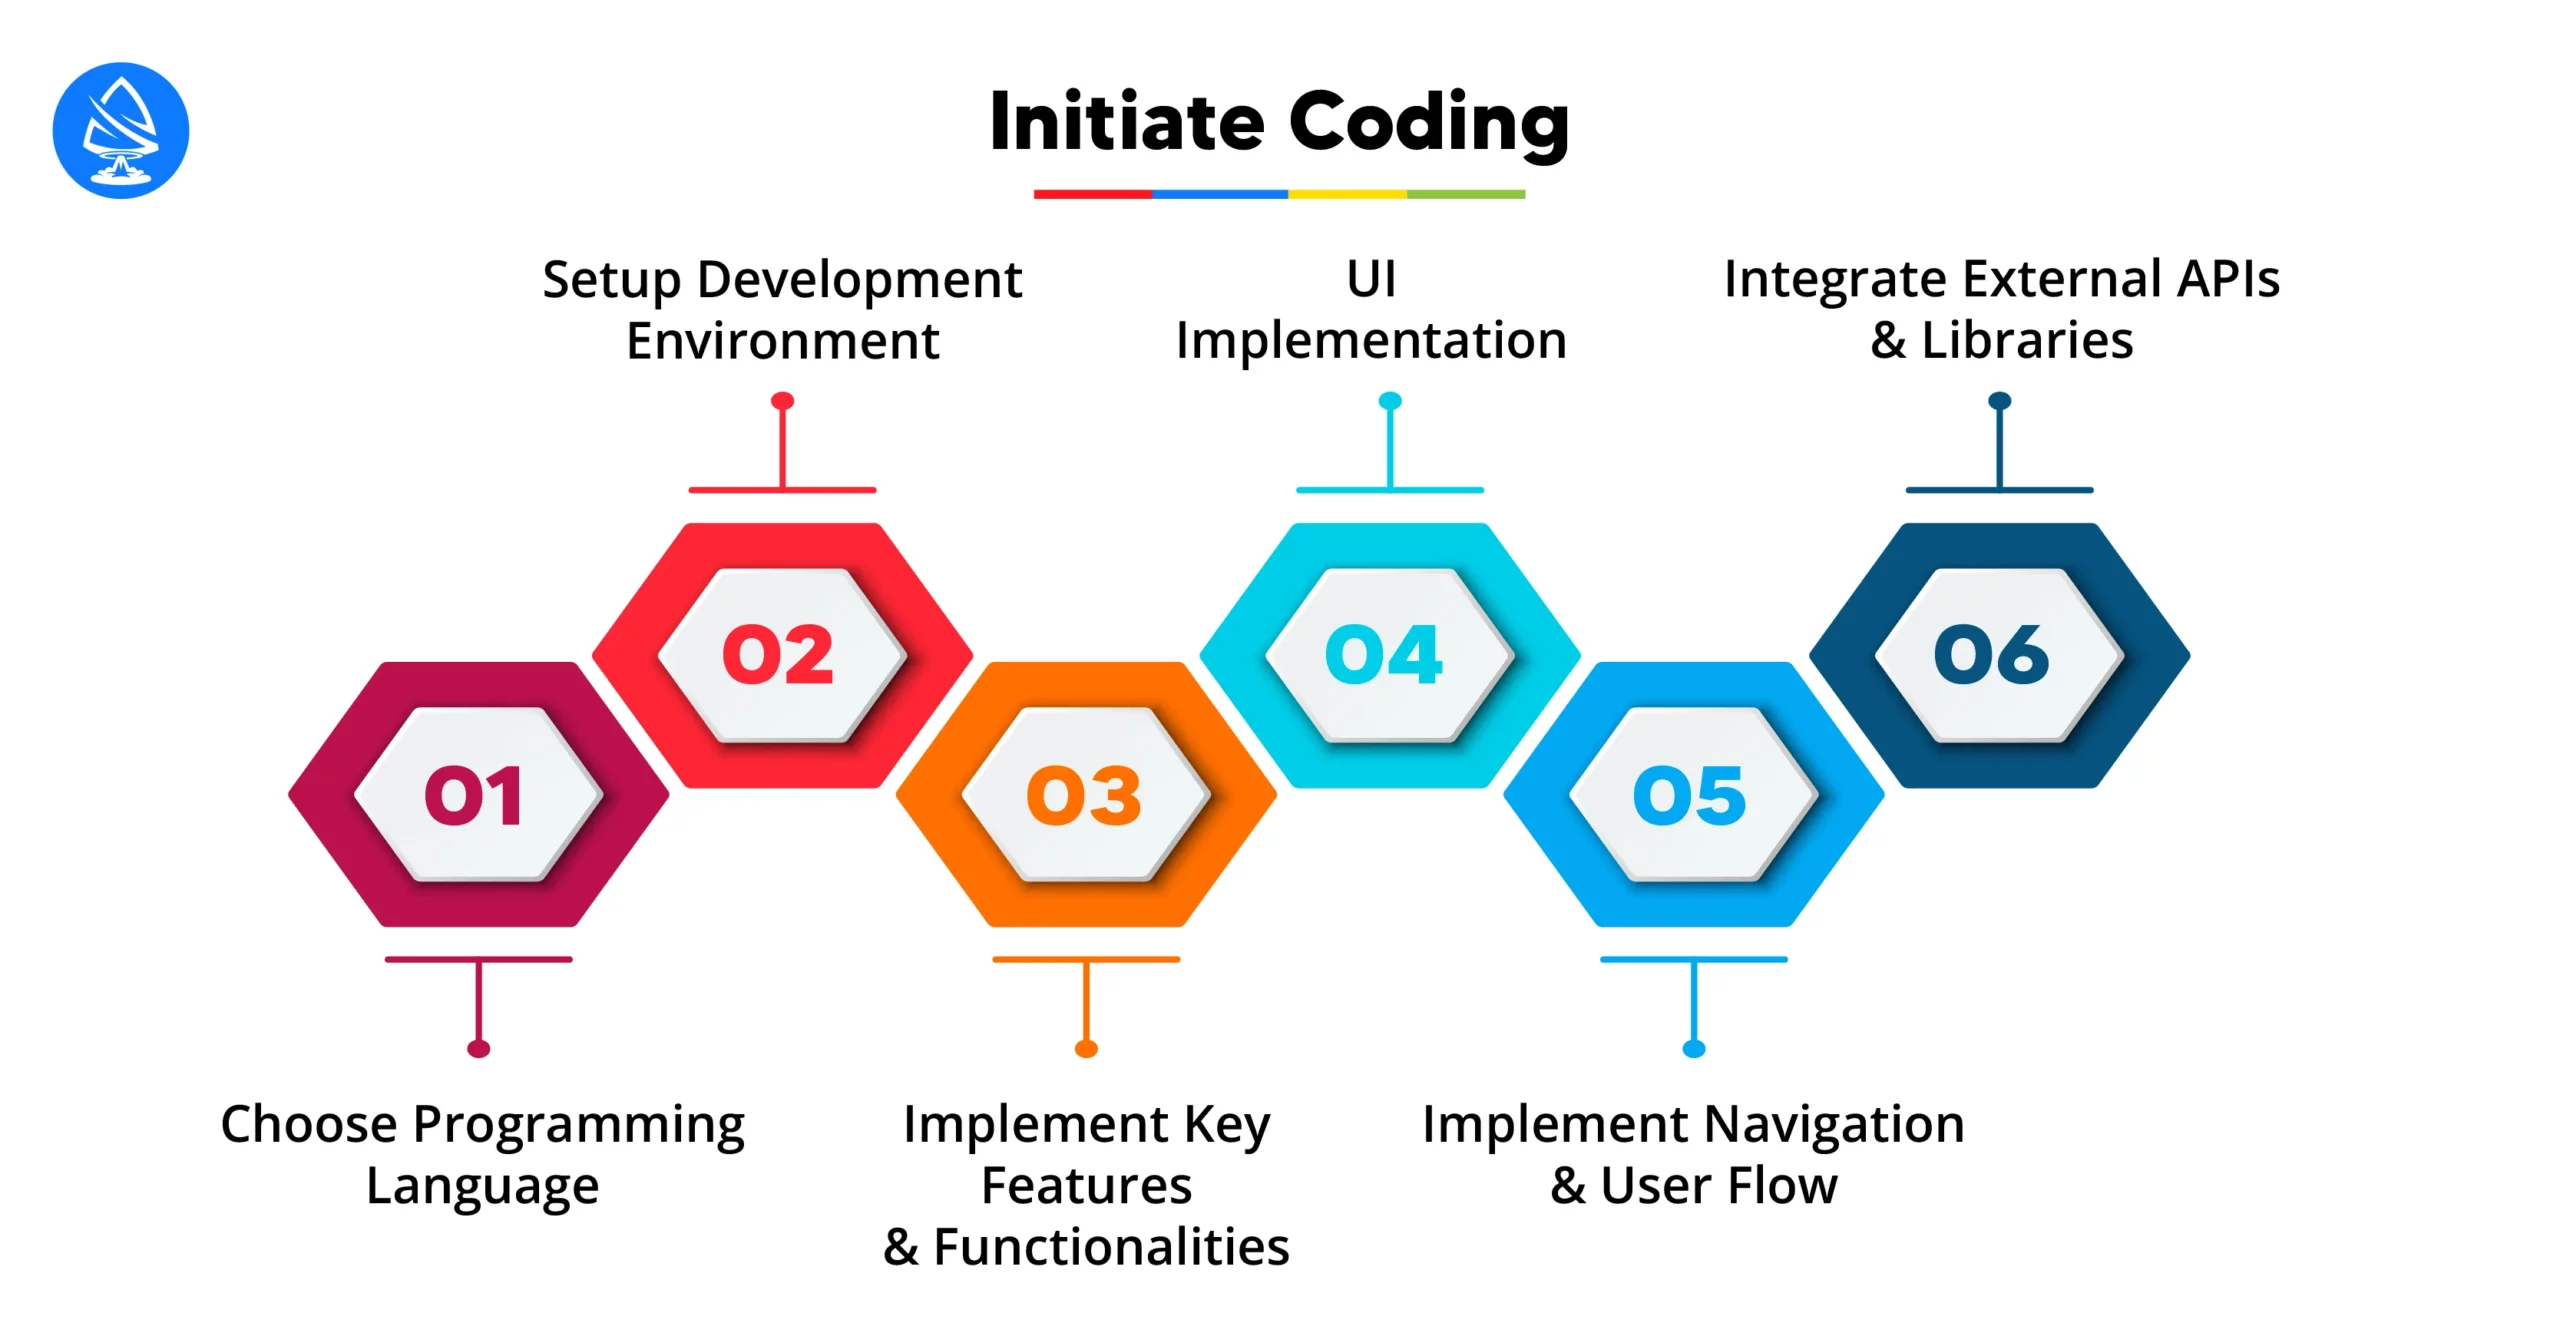
Android app development traditionally relied on Java as the primary programming language. However, Kotlin has gained popularity in recent years as a modern, concise, and expressive language for Android development. Android application Developers can choose between Java and Kotlin based on their familiarity, project requirements, and personal preferences. Kotlin offers several advantages over Java, including null safety, concise syntax, interoperability with existing Java code, and support for modern language features.
Before starting coding, ensure you have a properly configured development environment, including Android Studio, the official IDE for Android development. Android Studio provides all the necessary tools, libraries, and emulators for building and testing Android apps. Install any required SDKs, build tools, and dependencies using the SDK Manager within Android Studio.
Identify the key features and functionalities outlined in the app’s design specifications and begin implementing them in code. This involves writing classes, methods, and functions to handle user interactions, data processing, and business logic. Break down the app’s functionality into smaller, manageable tasks, and implement them incrementally, following best practices and design patterns such as Model-View-ViewModel (MVVM) or Clean Architecture.
Translate the UI designs and layouts from the design phase into XML layout files using Android’s XML-based layout system. Utilize View elements such as TextViews, Buttons, ImageViews, RecyclerViews, etc., to create the desired user interface. Leverage Android’s layout managers to arrange UI components effectively on different screen sizes and orientations, ensuring a consistent and responsive user experience across devices.
Define the app’s navigation structure and user flow by configuring navigation components or manually managing fragment transactions and activity transitions. Use navigation graphs to define navigation paths between screens, handle back stack management, and support deep linking within the app.
Integrate external APIs, SDKs, or third-party libraries to add additional functionality or access external services. For example, you might integrate Firebase for authentication, cloud storage, or real-time database services, or use libraries like Retrofit for making network requests, Glide for image loading, or Room for local database storage.
Testing and debugging are critical stages in the Android app development lifecycle aimed at ensuring the reliability, functionality, and performance of the application. Here’s a detailed explanation of testing and debugging in Android app development:
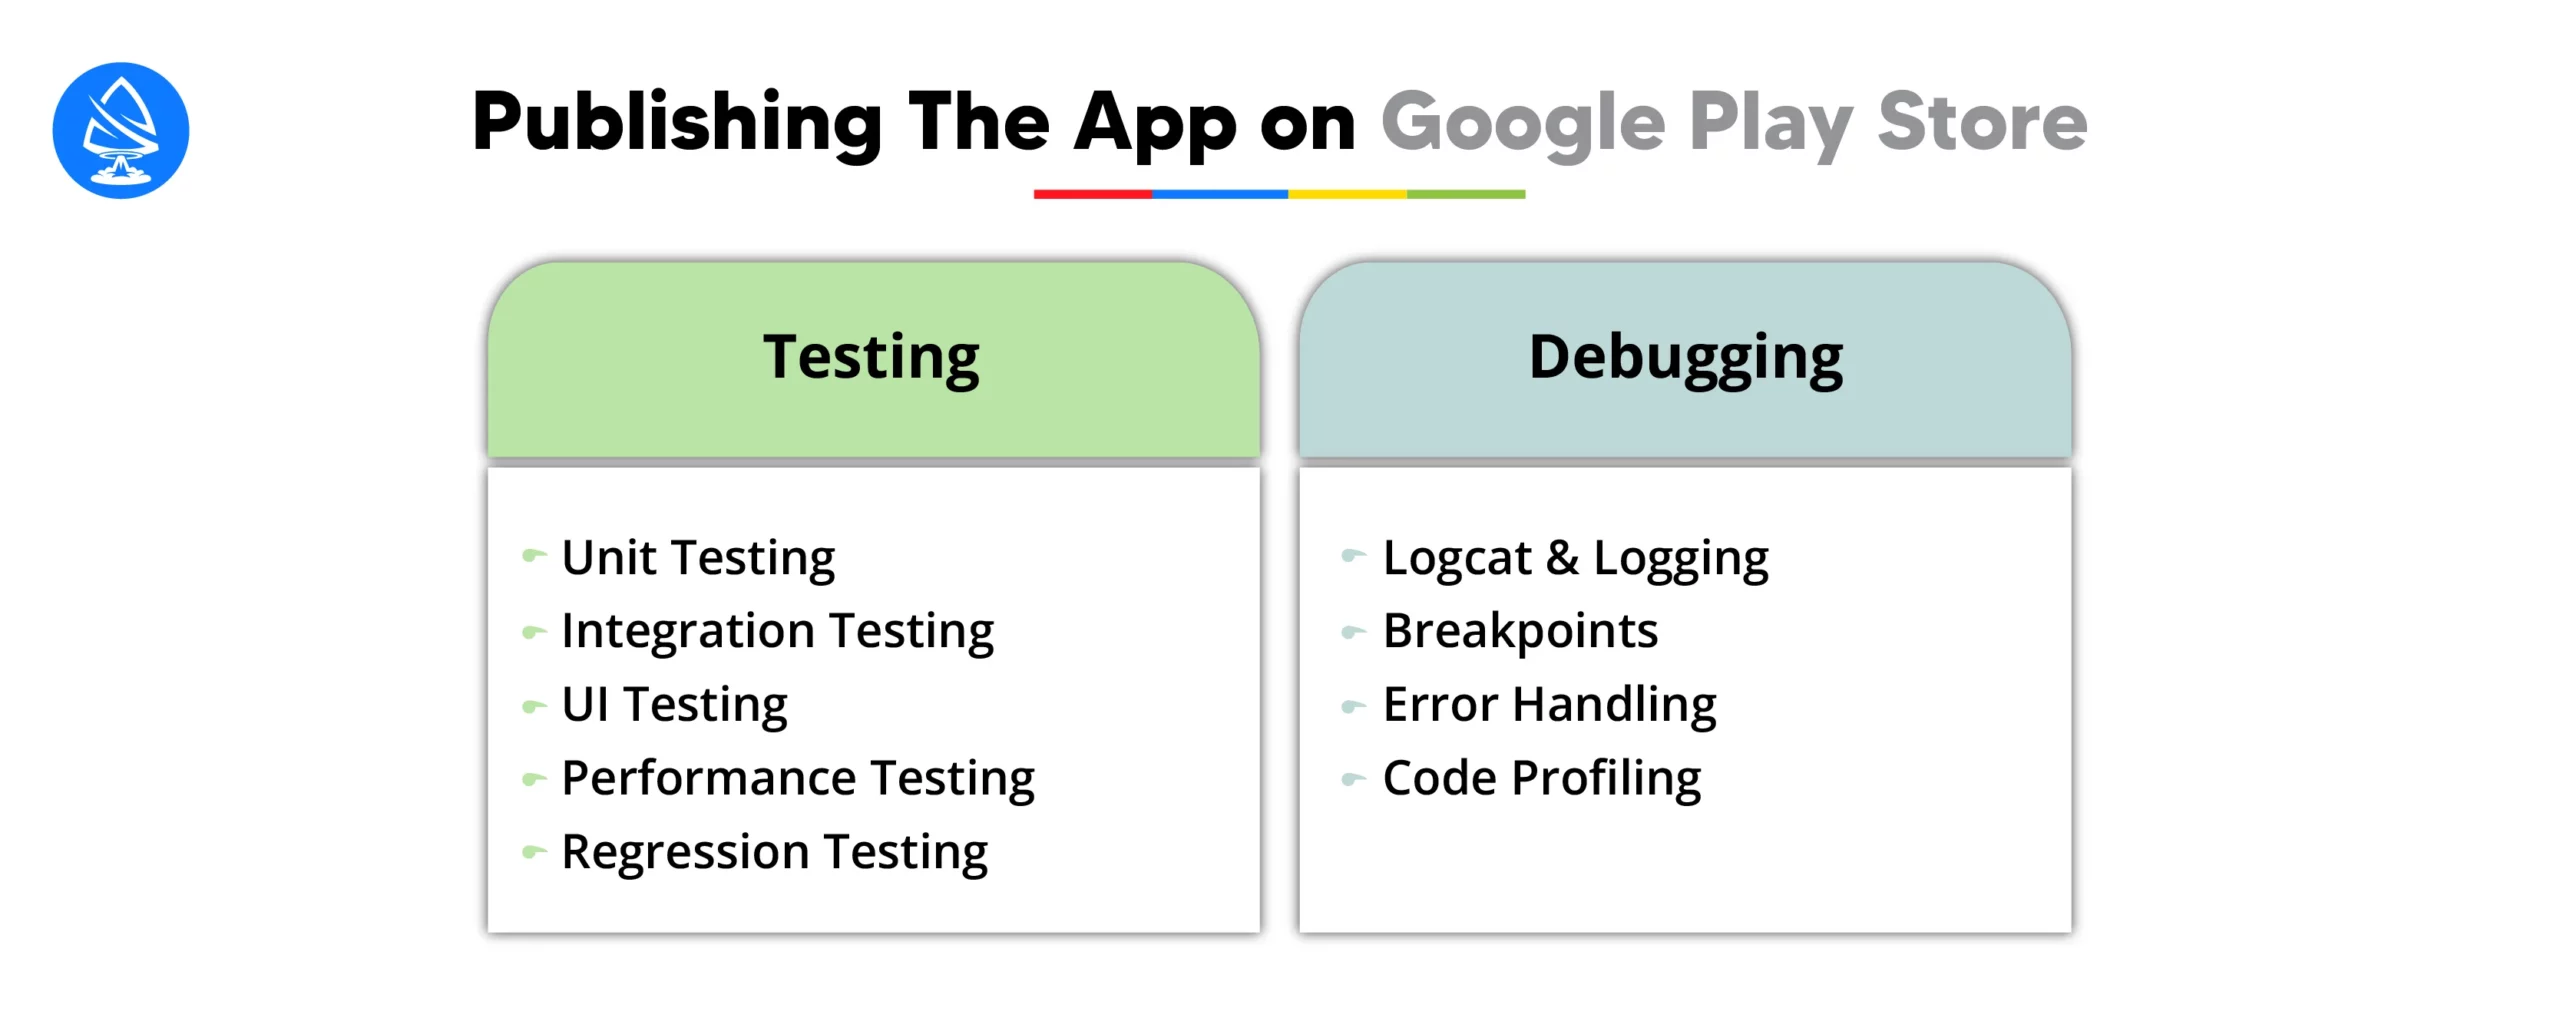
Testing involves systematically verifying and validating various aspects of the app to ensure it meets quality standards and performs as expected. There are several types of testing commonly performed during Android app development:
Unit testing involves testing individual components, such as classes or methods, in isolation to ensure they behave as intended. Developers write unit tests using frameworks like JUnit to validate the correctness of the app’s business logic and functionality.
Integration testing verifies that different components of the app work together seamlessly. It tests interactions between various modules, services, and APIs to ensure they integrate properly and produce the expected outcomes.
UI testing, also known as end-to-end testing, involves testing the app’s user interface and interactions to ensure a smooth and consistent user experience. Developers use tools like Espresso or UI Automator to write UI tests that simulate user interactions and verify UI elements’ behavior.
Performance testing evaluates the app’s responsiveness, speed, and resource usage under various conditions, such as different device configurations, network speeds, and user loads. It helps identify bottlenecks, memory leaks, and other performance issues that could impact the app’s usability and user satisfaction.
Regression testing ensures that new changes or updates to the app do not introduce unintended side effects or break existing functionality. Developers rerun existing tests and verify that previously working features still function correctly after making changes to the codebase.
Debugging is the process of identifying, diagnosing, and resolving issues or errors in the app’s codebase. It involves analyzing the app’s behavior, identifying the root cause of problems, and applying fixes to resolve them. Key aspects of debugging in Android app development include:
Logcat is a tool provided by the Android SDK that displays logs generated by the app during runtime. Developers use logging statements strategically placed throughout the codebase to output diagnostic information, error messages, and variable values, helping them understand the app’s behavior and identify issues.
Breakpoints are markers placed in the codebase that pause the app’s execution when reached, allowing developers to inspect variables, step through code lines, and analyze program flow. Debuggers provided by IDEs like Android Studio enable developers to set breakpoints, debug the app, and interactively diagnose issues.
Proper error handling mechanisms, such as try-catch blocks and exception handling, help developers anticipate and handle runtime errors gracefully. By detecting and handling exceptions effectively, developers can prevent crashes, improve app stability, and provide better error messages to users.
Code profiling tools, such as Android Profiler in Android Studio, help developers analyze the app’s CPU, memory, and network usage in real time. Profiling helps identify performance bottlenecks, memory leaks, and inefficient code patterns that could impact the app’s performance and responsiveness.
Publishing an Android app on the Google Play Store involves several steps to ensure that your app meets the store’s guidelines and requirements. Here’s a step-by-step detail on how to publish an Android app on the Google Play Store.
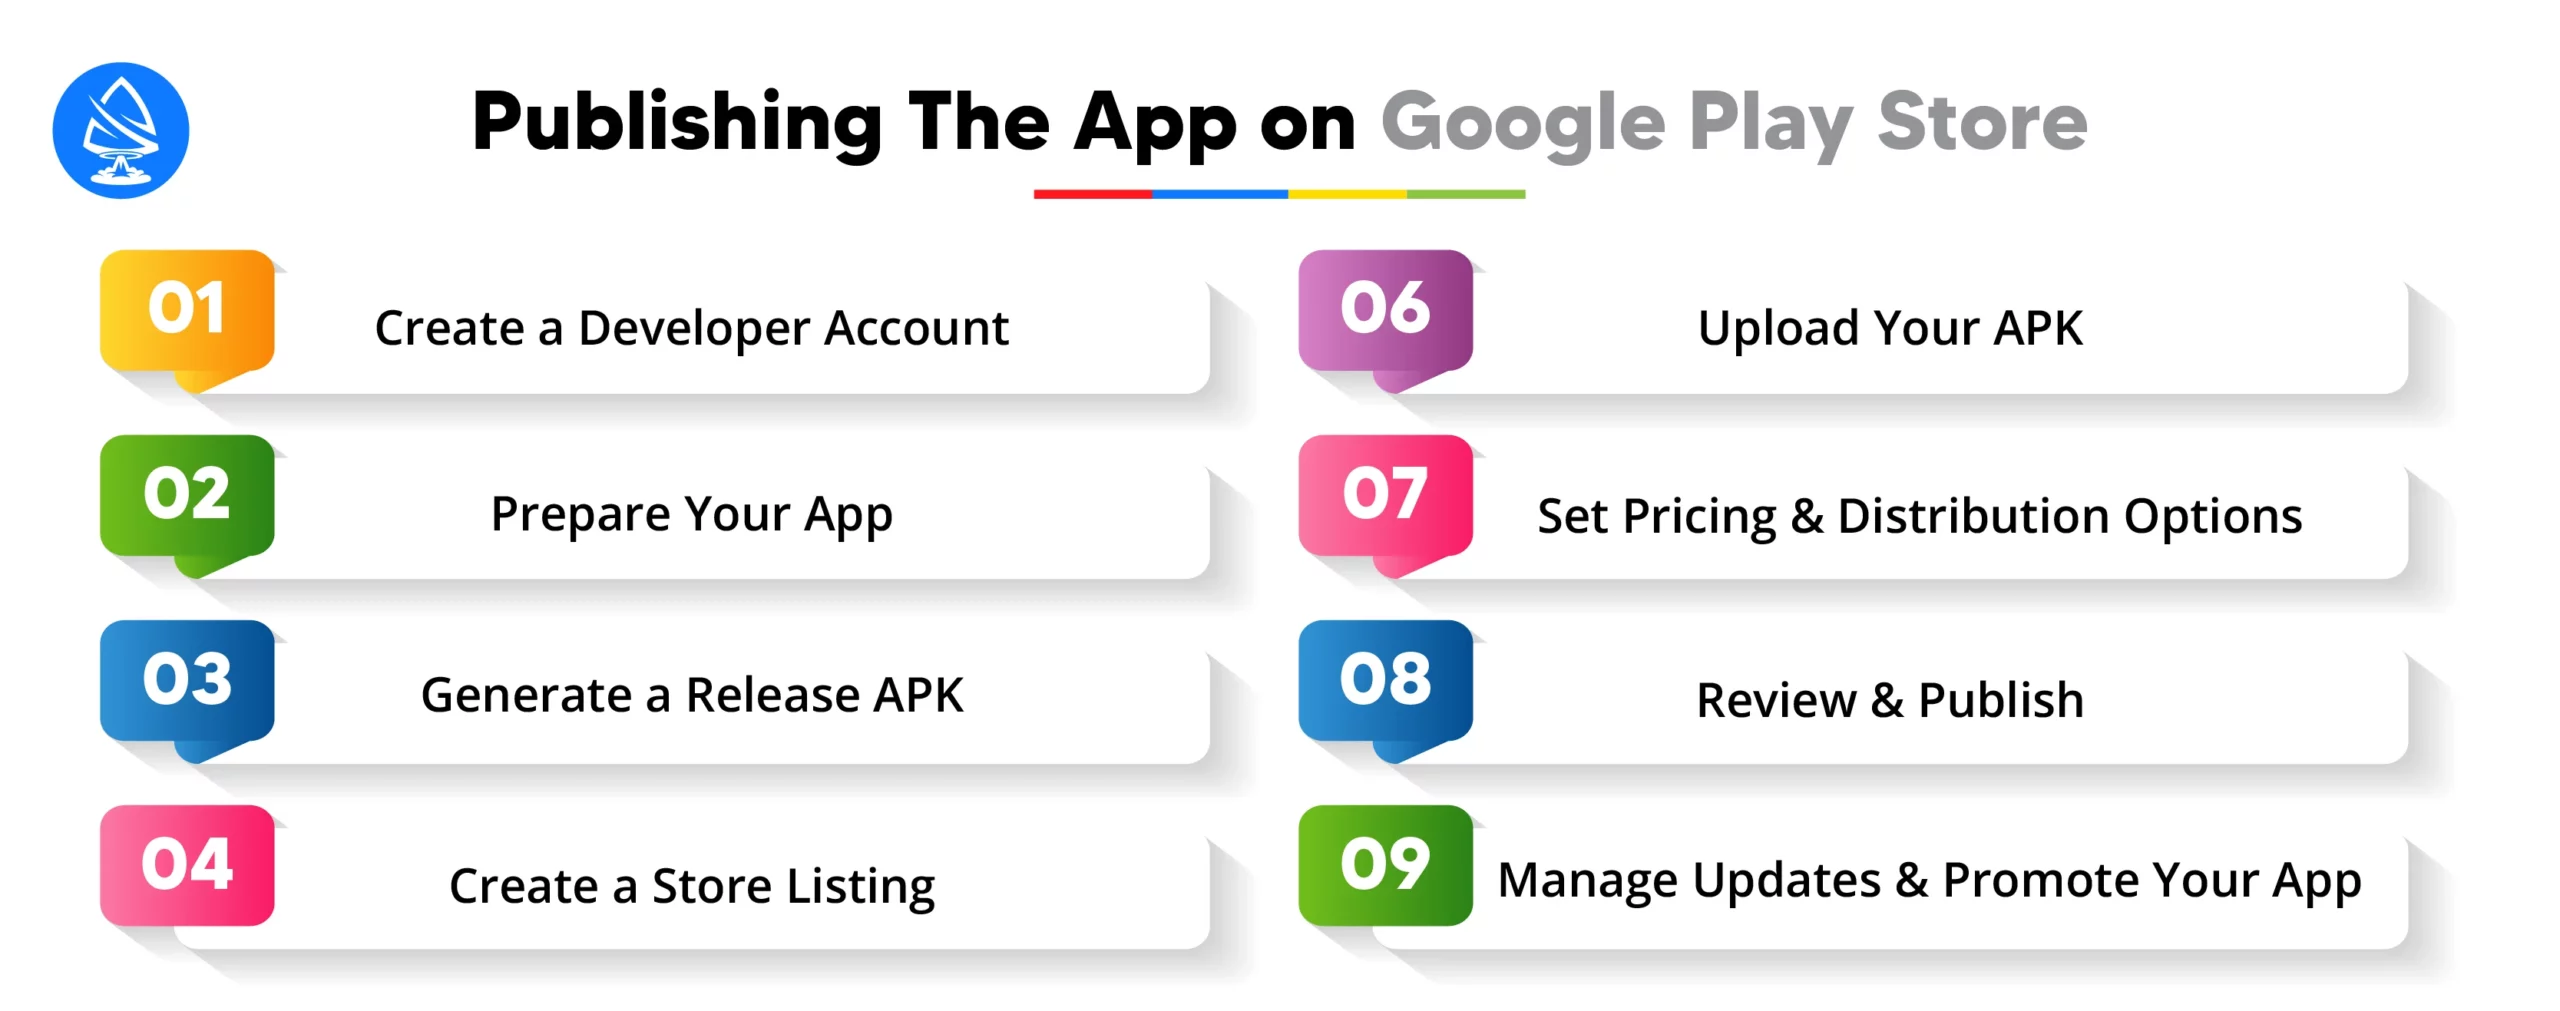
Before you can publish an app on the Google Play Store, you need to create a developer account. Visit the Google Play Console website and sign in with your Google account. Follow the instructions to create a developer account and agree to the terms and conditions.
Before you can upload your app to the Play Store, you need to prepare it for release. This includes ensuring that your app meets all the requirements, such as having a unique package name, signing your app with a release key, optimizing your app’s performance, and complying with Google Play policies and guidelines.
Build a release version of your app by generating a signed APK (Android Package). Use Android Studio’s Generate Signed Bundle/APK wizard to generate a signed APK file. Make sure to select the appropriate keystore and key alias for signing the APK. The signed APK is what you will upload to the Google Play Console.
Once you have a signed APK ready, log in to the Google Play Console and create a new app listing. Provide details about your app, including its title, description, screenshots, feature graphics, categorization, and contact information. Make sure to accurately describe your app’s features and functionality to attract potential users.
In the Google Play Console, navigate to the “Release Management” section and select “App releases.” Click on “Manage production” and then “Create release.” Upload your signed APK file to the production track. You can also use the “App bundles” option if you have generated an Android App Bundle instead of a standalone APK.
Choose whether you want to offer your app for free or set a price for it. You can also select the countries and regions where you want your app to be available for download. Additionally, you can specify whether you want your app to be available to all users or only to specific audiences, such as beta testers or testers in a closed track.
Before you can publish your app, Google will review it to ensure that it complies with their policies and guidelines. Once your app passes the review process, you can click on the “Publish” button to make it available on the Google Play Store. It may take a few hours for your app to appear in the store after publishing.
After your app is published, you can manage updates, track its performance, and promote it to attract more users. Use the Google Play Console’s analytics tools to monitor your app’s downloads, ratings, and reviews, and make improvements based on user feedback.
Promoting your Android app is essential for increasing its visibility and attracting users in the highly competitive app market. Here’s a detailed explanation of how you can effectively promote your app:

Social media platforms such as Facebook, Twitter, Instagram, and LinkedIn offer powerful channels for promoting your app. Create dedicated profiles or pages for your app and regularly post engaging content, such as app updates, feature highlights, user testimonials, and behind-the-scenes glimpses of your development process.
Implement paid advertising options on social media platforms to reach a wider audience and target users based on demographics, interests, and behavior. Encourage users to share your app with their networks and participate in discussions related to your app’s niche or industry to increase visibility and engagement.
App review websites and blogs cater to users interested in discovering new apps and games. Research and identify reputable app review websites relevant to your app’s category or genre, and reach out to them to request reviews or features of your app.
Provide them with press kits, screenshots, demo videos, and promo codes to help them evaluate and showcase your app. Positive reviews and endorsements from trusted app review websites can significantly boost your app’s credibility and attract more users to download and try your app.
App Store Optimization (ASO) involves optimizing various elements of your app’s listing on app stores, such as the app title, description, keywords, icon, screenshots, and promotional videos, to improve its visibility and ranking in search results. Conduct keyword research to identify relevant and high-volume keywords related to your app’s features, functionality, and target audience, and incorporate them strategically into your app’s metadata.
A compelling app title, informative description, eye-catching icon, and high-quality screenshots and videos can entice users to click on your app’s listing and download it. Regularly monitor your app’s performance and experiment with different ASO strategies to optimize its visibility and conversion rate over time.
Implementing monetization strategies in Android app development involves incorporating features and techniques that allow you to generate revenue from your app. Here are several monetization strategies commonly used in Android app development:
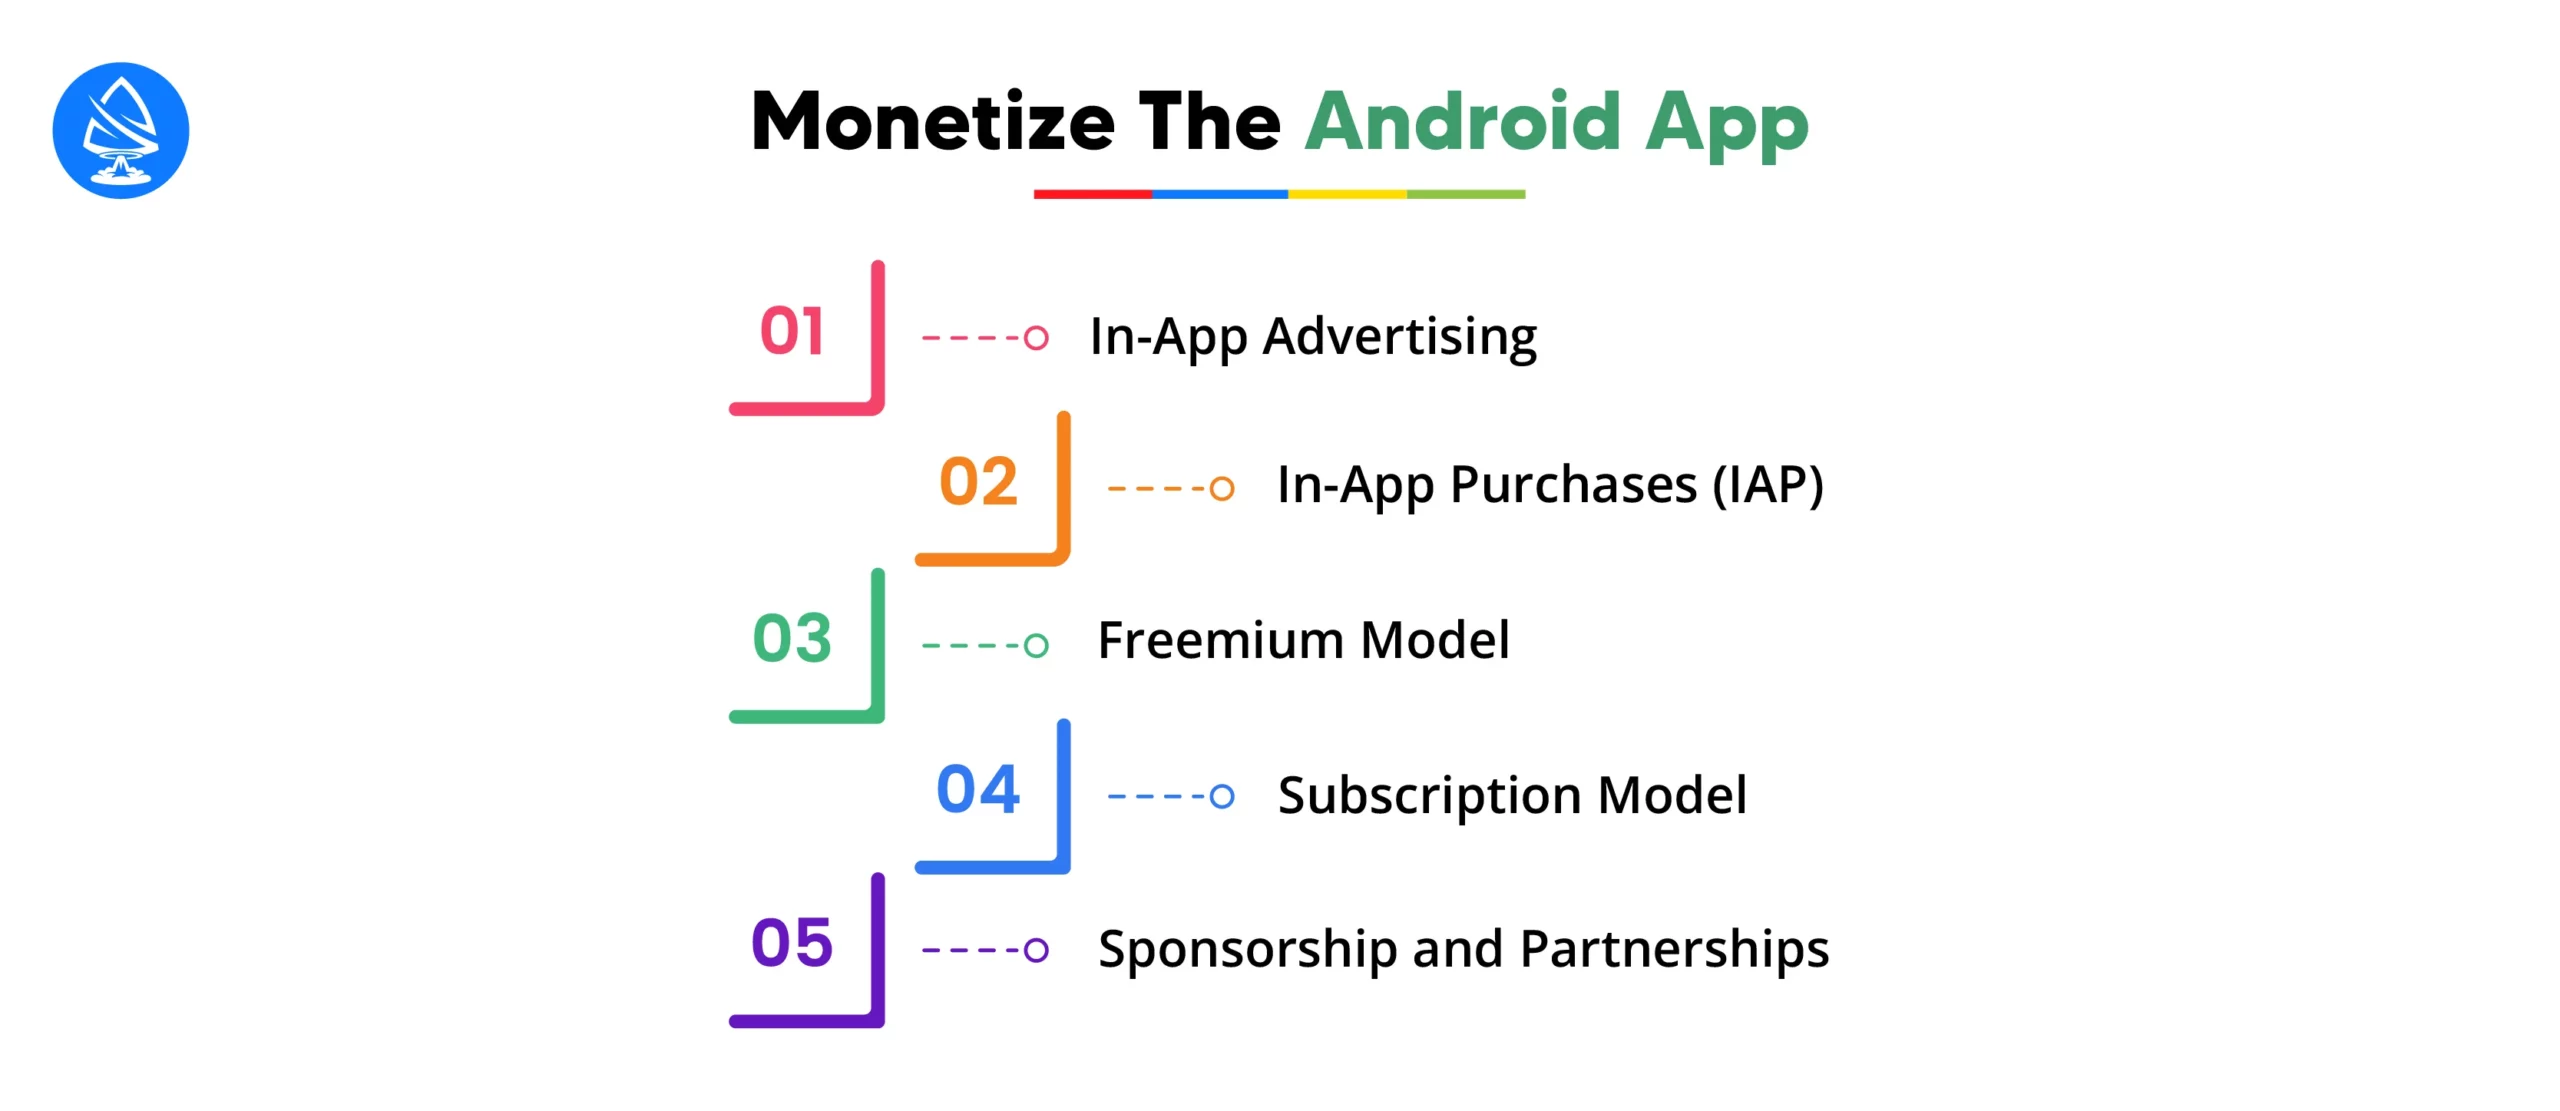
Implementing in-app advertising involves displaying ads within your app to generate revenue. You can integrate various ad networks, such as Google AdMob, Facebook Audience Network, or MoPub, to serve ads based on user demographics, interests, and behavior. Common ad formats include banner ads, interstitial ads, native ads, and rewarded videos. Ensure that ads are displayed in a non-intrusive manner to maintain a positive user experience while maximizing revenue.
In-app purchases allow users to buy digital content, virtual goods, or premium features within your app. You can offer a range of items for purchase, such as premium content, additional levels, virtual currency, or subscription plans. Implement a secure payment gateway, such as Google Play Billing, or third-party payment processors like Stripe or PayPal, to handle transactions securely. Design your app’s user interface to promote and encourage in-app purchases effectively, while providing clear value propositions for users.
The freemium model offers basic features or content for free while charging users for premium features or advanced functionality. This approach allows users to download and use your app without any upfront cost, encouraging widespread adoption, while offering additional benefits to users who choose to upgrade or make in-app purchases. Design your app to provide a compelling free experience that motivates users to upgrade to premium versions for enhanced features, additional content, or an ad-free experience.
Implementing a subscription model involves offering users access to your app’s content or features regularly in exchange for a subscription fee. You can offer different subscription tiers with varying levels of access, such as basic, premium, or VIP memberships. Provide users with valuable and exclusive content, regular updates, and incentives to encourage them to subscribe and maintain their subscriptions over time. Ensure that your app complies with Google Play’s subscription guidelines and offers transparent pricing and billing practices to users.
Explore sponsorship and partnership opportunities with brands, advertisers, or other businesses to monetize your app. You can collaborate with relevant partners to integrate branded content, sponsored features, or promotional campaigns within your app. Develop mutually beneficial partnerships that align with your app’s audience and value proposition, while providing added value to users through exclusive offers, discounts, or rewards.
Here are some common mistakes to avoid in Android app development:
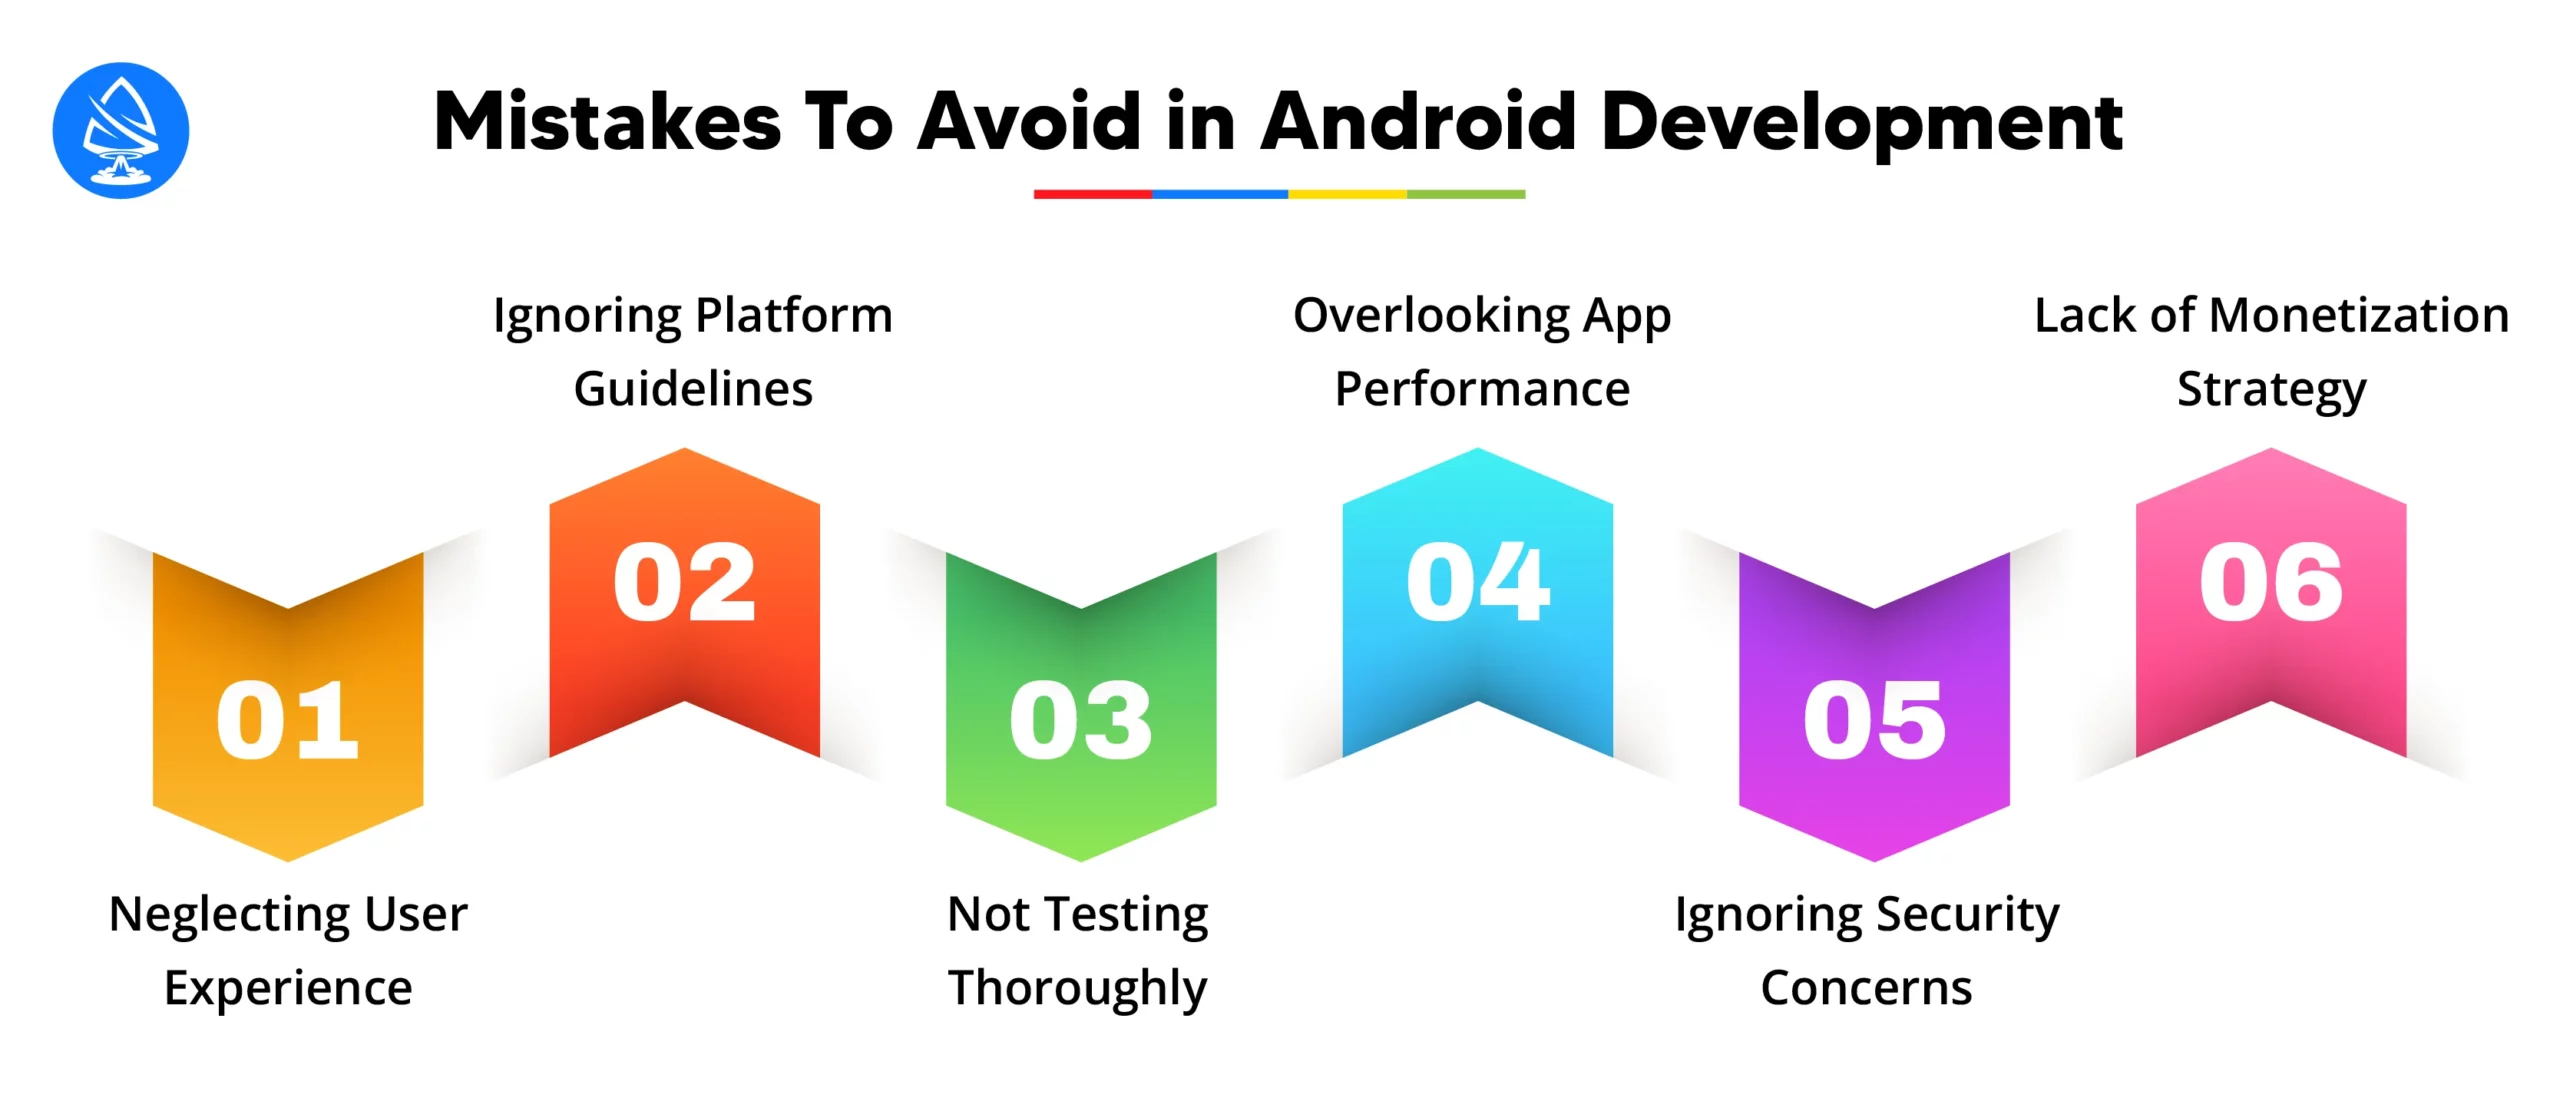
Failing to prioritize user experience for your app can lead to poor app usability and low user retention. Avoid cluttered interfaces, complex navigation, and slow performance that can frustrate users.
Neglecting Android platform guidelines can result in non-compliance issues and inconsistencies in user experience across devices. Adhere to Material Design principles and follow Android best practices to ensure consistency and compatibility.
Inadequate testing can lead to bugs, crashes, and compatibility issues on different devices and Android versions.
Perform thorough testing across various devices, screen sizes, and OS versions, including functional testing, usability testing, and performance testing.
Poor app performance, such as slow loading times and high resource consumption, can lead to negative user reviews and uninstallation. Optimize app performance by minimizing resource usage, optimizing code, and utilizing background processing judiciously.
Neglecting security measures can expose your app to vulnerabilities, data breaches, and privacy concerns.
Implement proper data encryption, secure authentication mechanisms, and adhere to best practices for handling sensitive user data.
Not updating your app regularly can result in missing out on bug fixes, performance improvements, and new features. Maintain regular updates to address user feedback, introduce new features, and stay competitive in the market.
Excessive battery drain and data consumption can lead to poor user experience and dissatisfaction.
Optimize app behavior to minimize battery usage, reduce data consumption, and provide users with control over background activities and data usage.
Not having a clear monetization strategy can limit revenue opportunities and hinder the app’s long-term sustainability. Explore various monetization options, such as in-app advertising, in-app purchases, subscriptions, or sponsorship, to generate revenue and support ongoing development efforts.
Disregarding user feedback and failing to address user concerns can lead to negative reviews, decreased user satisfaction, and loss of credibility. Actively solicit user feedback, respond to user reviews promptly, and incorporate user suggestions and requests into future updates to enhance user engagement and loyalty.
Rushing through the development process can result in sloppy code, unfinished features, and a subpar user experience. Take the time to plan, design, and develop your app thoughtfully, ensuring quality and reliability throughout the development lifecycle. If required, create a lightweight web app as well.
In 2024, Android application development is characterized by the integration of 5G technology for faster connectivity and enhanced user experiences. Developers are using artificial intelligence and machine learning to create smarter and personalized apps, while augmented reality and virtual reality technologies continue to offer immersive experiences.
Additionally, there is a focus on IoT integration, progressive web apps, enhanced privacy and security measures, create app for free, and the adoption of cross-platform development solutions for more efficient and versatile app creation.
How to make an Android app in 2024? Well, it is an exciting journey that requires dedication, creativity, and continuous learning. By following the steps outlined in this guide and staying abreast of industry trends, you can bring your app idea to life and make a mark in the competitive app market.
If you need an experienced Android app development company, consider Artoon Solutions. Our team of skilled Android developers creates high-ranking mobile apps with a great user experience. Check out our Android App Development Services and hire Android app developers from Artoon Now!
It takes time to develop an app for Android. Depending on the complexity of the app. Simple apps may take a few weeks, while more intricate apps with advanced features can take several months to develop.
While having coding experience can be beneficial, there are user-friendly app development platforms and tools available that allow beginners to create apps without extensive coding knowledge. Learning the basics of programming languages like Java or Kotlin can also help in app creation.
To publish an app on the Google Play Store, you need to pay a one-time registration fee of $25. Additionally, there may be costs involved in app development, testing, marketing, and ongoing maintenance of the app.
There are various monetization strategies for Android apps, such as in-app purchases, ads, subscriptions, and paid downloads. Analyze your target audience and app niche to choose the most suitable monetization method that aligns with your app’s goals.
Emerging technologies like Artificial Intelligence (AI), Augmented Reality (AR), Internet of Things (IoT), and Machine Learning are shaping the future of Android app development. Integrating these technologies into your app can enhance user experience and offer innovative features.
Copyright 2009-2024