The Unity Line Renderer is a powerful tool that allows you to create and render lines in Unity. You can use it to create a wide range of visual effects, from simple lines to complex shapes and patterns. The Line Renderer component takes in an array of points for customizing the shape of the lines. You can also set the color, width, and number of vertices of the Line Renderer depending on the required look and behavior.
Additionally, you can use Line Renderer in conjunction with other Unity features such as colliders, physics, and scripting to create interactive and dynamic line-based effects.
Basics of Unity Line Renderer
Line Renderer is very easy to use if you know the basics of how it works. Unity draws a line from point 1 to point 2 and the width of the line is based on the start width and end width specified by the user.

Adding a Line Renderer Component
Line Renderer component can be added to any game object. To add line Renderer, select the game object in the Hierarchy window and go to the Inspector window, click on Add Component and select Line Renderer.
Adding Material to Line Renderer
Mostly the line that Unity draws will be pink in color as there is no default material for line Renderer. You need to apply a custom material to fix this. Create a new Material and then drag and drop it to the material property of Unity Line Renderer.

Let’s go through some examples on how to use Unity line Renderer.
Draw a line using Line Renderer
- Create an empty game object called line.
- Add the Line Renderer Component to it.
- Set the Line size to 2.
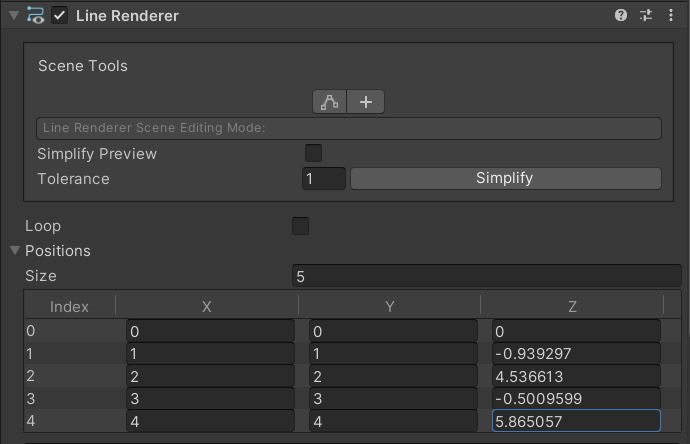
- Enter the start position at index 0 and the end position at index 1. For example, you can draw the line from 0,0,0 to 10,10,10.
- Create a new Material and set it to the Line Renderer.
- That’s it you are done.
Draw a line using code and Line Renderer
If you want to draw the line using code then here are the steps.
- Create an empty gameobject and name it as line.
- Add Line Renderer Component to it. (The script will automatically add the component if you forget)
- Create a new script called LineDraw and add it to the line game object.
- Assign the material to the mat property and hit play.
using UnityEngine;

[RequireComponent(typeof(LineRenderer))]
public class LineDraw : MonoBehaviour
{
    LineRenderer lr;
    [SerializeField]Material mat;
    void Start()
    {
        lr=GetComponent<LineRenderer>();
        lr.positionCount=2;
        Vector3[] positions=new Vector3[2]{new Vector3(0,0,0),new Vector3(10,10,10)};
        lr.SetPositions(positions);
        lr.material=mat;
    }

}
Unity Line Renderer 2D
Unity doesn’t have a separate 2D component for Line Renderer. You can use the Line Renderer component for 2D also. You can set z component to a fixed value in all the points in Line Renderer and have a line in 2D.
Now let’s try to draw some 2D shapes using Line Renderer in 2D.
Draw a Triangle using Line Renderer
- Create a new game object and name it as Triangle
- Add the line Renderer Component to it
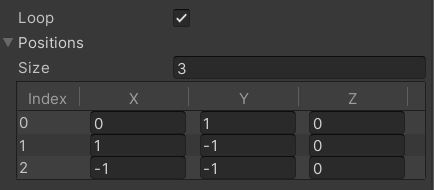
- Check the Loop check box
- Set the size of positions array as 3
- Set the position value to vertices of the triangle. If you don’t know then set some random values.
- Make sure the z value is set to 0 in all positions for a 2D project.
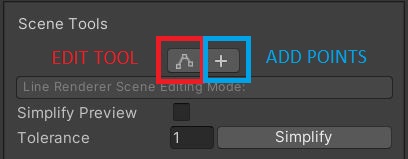
Using scene tool for creating a Triangle
Scene Tools allows you to add the points inside the Unity Editor.
- Click on the + Sign inside the Scene Tool property of Line Renderer.
- Click inside the scene view to add a point. Click to add two more points for the triangle.
- Click on the + sign again to stop adding more points.
- Click on the Edit sign near the + sign to edit the added points.
- Move the points to the desired location.
Using Script to draw a triangle
Let’s try to draw a triangle with vertices (0,1,0), (1,-1,0) and (-1,-1,0).
Create a new Game object of name Triangle and add a new script called DrawTriangle to it. Copy and paste the code below to draw the triangle
using UnityEngine;

[RequireComponent(typeof(LineRenderer))]
public class DrawTriangle : MonoBehaviour
{
    LineRenderer lr;
    [SerializeField]Material mat;
    void Start()
    {
        lr=GetComponent<LineRenderer>();
        lr.positionCount=3;
        Vector3[] positions=new Vector3[3]{new Vector3(0,1,0),new Vector3(1,-1,0),new Vector3(-1,-1,0)};
        lr.SetPositions(positions);
        lr.material=mat;
        lr.loop=true;
    }

}
Complex Polygon shapes using Unity Line Renderer
As we did with the triangle, to create complex polygon shapes you just need more positions. You can either add these vertices manually by entering it in the positions array or you can draw on screen using the scene tool. The other option is to generate them using code.
Using Scene tool and Manual Positions
- Create an empty game object and name it as Polygon.
- Add a line Renderer Component to it.
- Check loop option.
- Set the size of the array based on the polygon you are going to draw. For this tutorial, let’s try to make a Hexagon, so set it as 6.
- Enter 6 vector3 values inside the position array. If you don’t know the values then enter some random values. If you are making a 2D shape then set the z value to 0 in all positions.
- Click on the edit icon in the scene tool and move the position in the Scene view to the desired location.

Using code to generate Dynamic Polygon shapes
We are going to take in the following inputs from user
- Number of vertices
- Initial starting point.
We are going to rotate the initial vector by the angle based on the number of vertices. For example, if there are 4 vertices then the angle of rotation will be 90 degrees.
Add a new script called DrawPolygon. Copy and paste the code below.
using UnityEngine;
[RequireComponent(typeof(LineRenderer))]
public class DrawPolygon : MonoBehaviour
{
[SerializeField]int Vertices;
[SerializeField]Vector3 initialPos;
LineRenderer lr;
void Start()
{
lr=GetComponent<LineRenderer>();
lr.positionCount=Vertices;
lr.startWidth=0.25f;
lr.endWidth=0.25f;
//Quaternion rotate=Quaternion.Euler(0,0,360/Vertices);
Vector3[] positions=new Vector3[Vertices];
positions[0]=initialPos;
for(int i=1;i<Vertices;i++)
{
positions[i]=Quaternion.Euler(0,0,360*i/Vertices)*initialPos;
}
lr.SetPositions(positions);
lr.loop=true;
}
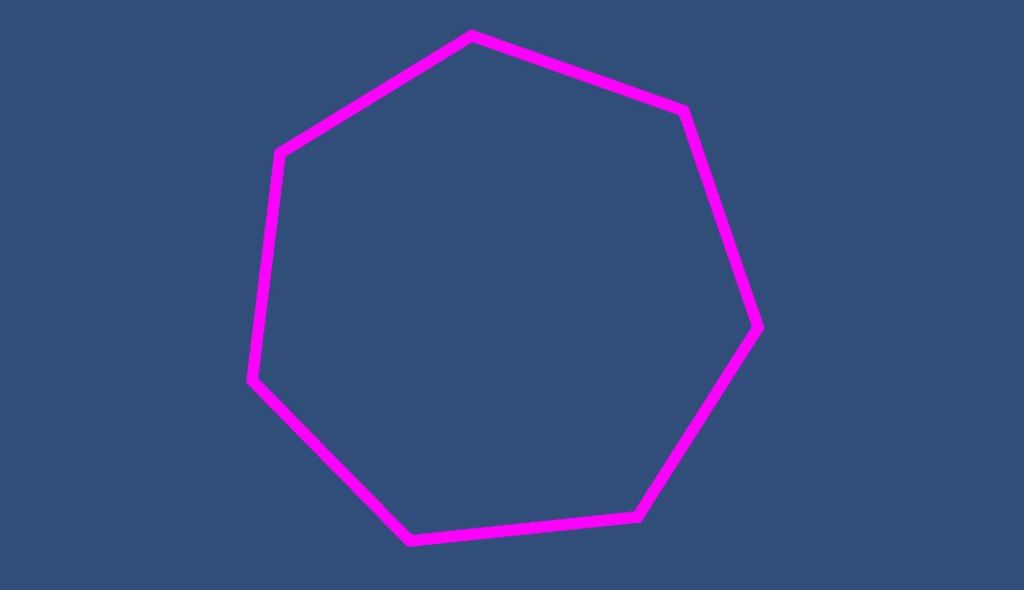
}The code below rotates the Initial position along the z axis. So, make sure you set the initial vector’s Z axis to 0. For the purpose of this tutorial, let’s set the vertices to 7 and initial vector to (4,4,0).
Now let’s try some complex effects using Unity Line Renderer.
Creating a Blast Wave using Unity Line Renderer
Blast wave is a really cool effect that you can use in your game. Using a Unity Line Renderer gives a cool horizontal blast effect
Here is how the output will look like
Video Tutorial of blast effect
Creating the Line Renderer Effect
The first step is to create the Line Renderer Effect. For this We will be using some mathematics to find out the points on the circle. Then we will increase the radius of the circle and update the Line Renderer’s position.
To find the positions, we need the angle between each point. You can divide 360 by the number of points to get this.
anglebetweenPoints=360/pointCount;Next, we need to get the position in the X and Z as our game is in the XZ plane. We can use SIn and Cos of the angles to get the direction and multiply them with the radius to get the position. As the last position should be equal to the first position, we can set it separately.
for(int i=0;i<pointCount-1;i++)
        {
            float angle=anglebetweenPoints*i*Mathf.Deg2Rad;
            positions[i]=new Vector3(Mathf.Sin(angle),0,Mathf.Cos(angle));
        }
 positions[pointCount-1]=positions[0];
We will increment the radius in our update function and set the positions of the Line Renderer.
if(radius<=maxRadius)
        {
            SetPositions();
            radius+=Time.deltaTime*speed;
            lr.widthMultiplier=(maxRadius-radius)/maxRadius;
        }
Adding Physics Force to move objects
Now that we have the Line Renderer for the visual effect, we need to add forces to objects within the radius to move them.
We will use the Physics overlap sphere function to find the colliders in the specified radius and add force to them. You need to have Rigidbody attached to the colliders to apply the force.
Here is how the code looks like
col=Physics.OverlapSphere(transform.position,radius);
        foreach(var i in col)
        {
            i.gameObject.GetComponent<Rigidbody>().AddForce((i.transform.position-transform.position)*forceval,ForceMode.Impulse);
        }
Combining all these codes together and adding the Line renderer to an Empty game object we have our final effect.
Go to the Hierarchy window and create a new empty game object. Attach the script below to this gameobject and add a Line Renderer component. Change the material of Unity Line Renderer to the material of your choice and make sure to uncheck “Use World Space”.
Here is the final script
using UnityEngine;

public class BlastScript : MonoBehaviour
{
    LineRenderer lr;
    float radius=0;
    int pointCount=30;
    float anglebetweenPoints=0;
    public float speed=10;
    float maxRadius=30;
    Vector3[] positions=new Vector3[30];
    Collider[] col;
    Rigidbody rb;
    float forceval=1;
    // Start is called before the first frame update
    void Start()
    {
        lr=GetComponent<LineRenderer>();
        lr.enabled=true;
        lr.positionCount=pointCount;
        FindPoints();

    }
    void FindPoints()
    {
        anglebetweenPoints=360/pointCount;
        for(int i=0;i<pointCount-1;i++)
        {
            float angle=anglebetweenPoints*i*Mathf.Deg2Rad;
            positions[i]=new Vector3(Mathf.Sin(angle),0,Mathf.Cos(angle));
        }
        positions[pointCount-1]=positions[0];

    }

    // Update is called once per frame
    void FixedUpdate()
    {
        if(radius<=maxRadius)
        {
            SetPositions();
            ApplyForce();
            radius+=Time.deltaTime*speed;
            lr.widthMultiplier=(maxRadius-radius)/maxRadius;
        }
        else{
            radius=0;
        }

    }
    void ApplyForce()
    {
        col=Physics.OverlapSphere(transform.position,radius);
        foreach(var i in col)
        {
            i.gameObject.GetComponent<Rigidbody>().AddForce((i.transform.position-transform.position)*forceval,ForceMode.Impulse);
        }
    }
    void SetPositions()
    {
        for(int i=0;i<pointCount;i++)
        {
            lr.SetPosition(i,positions[i]*radius);
        }
    }
}