
Creating immersive and lifelike character animations is essential for captivating players and enhancing the overall gameplay experience. One powerful tool that enables developers to achieve realistic movements and interactions is Unity Ragdoll Physics.
Ragdoll physics refers to a technique that simulates the dynamic behavior of a character’s body parts, allowing them to react to external forces and collisions. Ragdoll physics is generally used to create realistic collision movement of a character. But in recent times, active ragdoll physics is used for player movement also.
In this tutorial, we will understand how ragdoll physics work and how we can create a ragdoll in Unity.

Video Tutorial
How Ragdoll works in Unity?
Unity Ragdoll works with the help of three major components:
Every limb of the body that is a part of the ragdoll, needs all these three components. Unity uses the rigid body component to know the mass and friction of the limb. Character joints are used to calculate the direction of motion of the limb and the colliders are used to detect collision for the limbs.
Using these three components, Unity calculates how each limb should move on collision.
Creating a Ragdoll
Unity has an inbuilt ragdoll creator but it only works on humanoids. The Unity’s ragdoll creator is not perfect, but it is a good starting point. To create a ragdoll for a model that is not a humanoid, you will have to select each limb and add a rigid body, a collider and a character joint manually.
To use the Unity’s inbuilt ragdoll creator, add your rigged 3D model into the scene in T pose. You cannot create a ragdoll if your model is not rigged.
Go to GameObject>3D>Ragdoll. This will open the “Create Ragdoll” window as shown below.
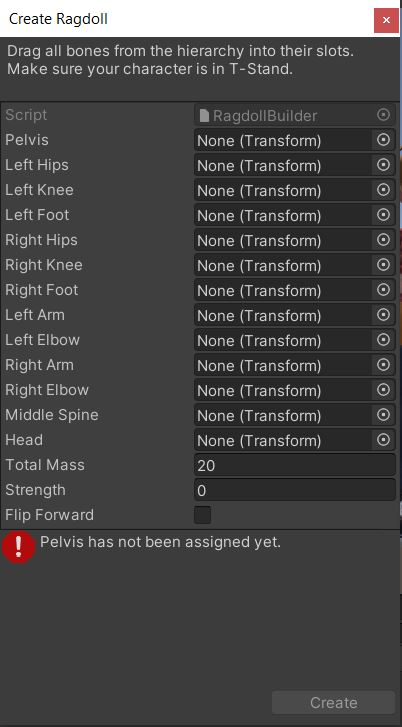
Assing each bone to position mentioned in the Ragdoll creator and click on create. This will add the colliders, character joints and rigid body to the limbs of your 3D model. If you select the 3D model now, you should see the colliders as shown below.

If your 3D model is not in the T pose, then the colliders will not align with the arm or legs. Here is an example of a wrong T pose and how the colliders are misaligned. If the 3D model axes are not proper, you have to use a 3D modelling software like Blender to fix it and reimport into Unity.

As you can see, some colliders are bigger in size, some are smaller, and some are pointing in the wrong direction. This was not the case, when the T pose was accurate.
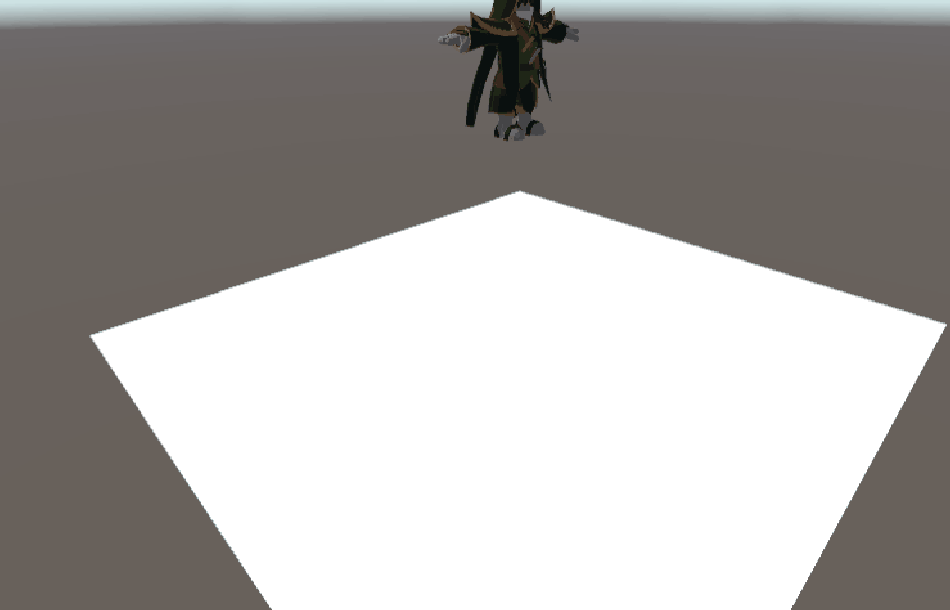
You can just hit play and see the 3D model fall to the ground and act like a ragdoll but there is scope for improvement.
Fine tuning the Colliders and Character joints
Select the Limbs that you assigned for creating the ragdoll one by one and adjust the colliders radius and center. Also, make sure, that no two colliders are overlapping. This can lead to weird movement while falling.
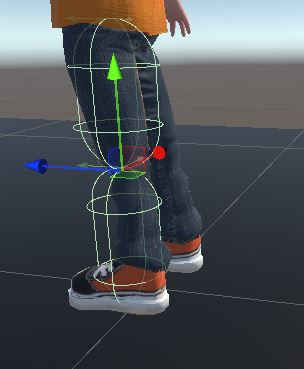
We can edit the character joint to control the turning direction of the limb. For example, the calf or knee portion should not bend in front while falling. To adjust this, select the knee bone and click on edit angular limits option on the character joint component.

Adjust the angular limits based on the limb you have selected. This is a manual task and there is no alternative to it.
Once you are done just hit the play mode and the character should drop down like a ragdoll. If any of the limbs are going through the plane, then set the collision detection to continuous for that limb.
Further you can play around with the rigid body mass for each limb until the fall feels realistic to you. You can also add a physics material to all the limbs for added functionalities like friction and bounciness.
Ragdoll for Non-humanoid characters
The concept of Ragdoll is same for both humanoids and non-humanoids, but the skeleton structure of a non-humanoid model will vary. So, we cannot use the built-in ragdoll creator for it.
For non-humanoid objects, you’ll need to manually create a ragdoll by setting up colliders, rigid bodies, and joints that match your object’s structure.
Before assigning the rigid body and character joints here are some things you should know.
- The main body part of the character (pelvis in case of humanoid) should have only the rigid body and the collider. It should also be the parent of all game objects in the hierarchy. You should assign more than 30% of the mass to this rigid body.
- All the other body parts should have rigid body, colliders and character joints components.
- The connected joint and the angular limits have to be carefully set for all the limbs.
- Make sure none of the colliders are overlapping with each other.
Here are the general steps to create a ragdoll for non-humanoid objects:
- Break your object into separate parts (e.g., limbs, torso, head) if it’s not already separated.
- Add appropriate colliders (e.g., BoxCollider, SphereCollider, CapsuleCollider) to each part of the object.
- Add a RigidBody component to each part, adjusting mass and other properties as needed.
- Connect the parts using character joints depending on the desired behavior.
- Configure joint properties, such as limits and connected bodies, to achieve the desired motion and constraints.
That’s it for the ragdoll tutorial. Now it’s your turn to have fun with ragdolls. Try it out and if you have any other questions, leave them in the comment box below.