Welcome to our detailed guide on building a Nodejs WebSocket server! In this blog post, we’ll dive into WebSocket technology and see how Node.js helps developers build strong real-time communication tools. Throughout this guide, You can also checkout our detailed comparison guide on Node js vs Python, highlighting their respective strengths and use cases in real-time applications. So, Let’s start with the basics of WebSocket and move on to adding advanced features and testing methods. Let’s build a scalable, safe and fast WebSocket. Let’s get started!
What is WebSocket and why is it significant?
WebSocket is a protocol for full-duplex communication between a client and a server using one continuous connection. Unlike traditional HTTP, which follows a request-response model, WebSocket allows for real-time, bidirectional communication, making it ideal for applications requiring instant updates or constant data exchange. This protocol has gained significant popularity due to its efficiency in enabling interactive web applications, such as chat applications, online gaming, and real-time data streaming.
How does Node.js empower server-side JavaScript runtime?
Node.js is an open-source, cross-platform JavaScript runtime environment that executes JavaScript code on server-side. It utilizes the V8 JavaScript engine, developed by Google, to compile and execute JavaScript code outside of a web browser. Node.js is known for its non-blocking, event-driven architecture, which allows for asynchronous I/O operations, making it highly efficient for handling concurrent connections and real-time applications. With its vast ecosystem of libraries and frameworks, Node.js has become a popular choice for building scalable, high-performance web applications, including WebSocket servers for real-time communication.
Read More: node js modules exports
Let’s Understand WebSocket in Node.js
What is the WebSocket protocol and how does it work?
WebSocket allows both clients and servers to communicate bidirectionally. It allows real-time data exchange, unlike traditional HTTP which is more like sending letters back and forth. With WebSocket, once the connection is made, it stays open for instant communication.
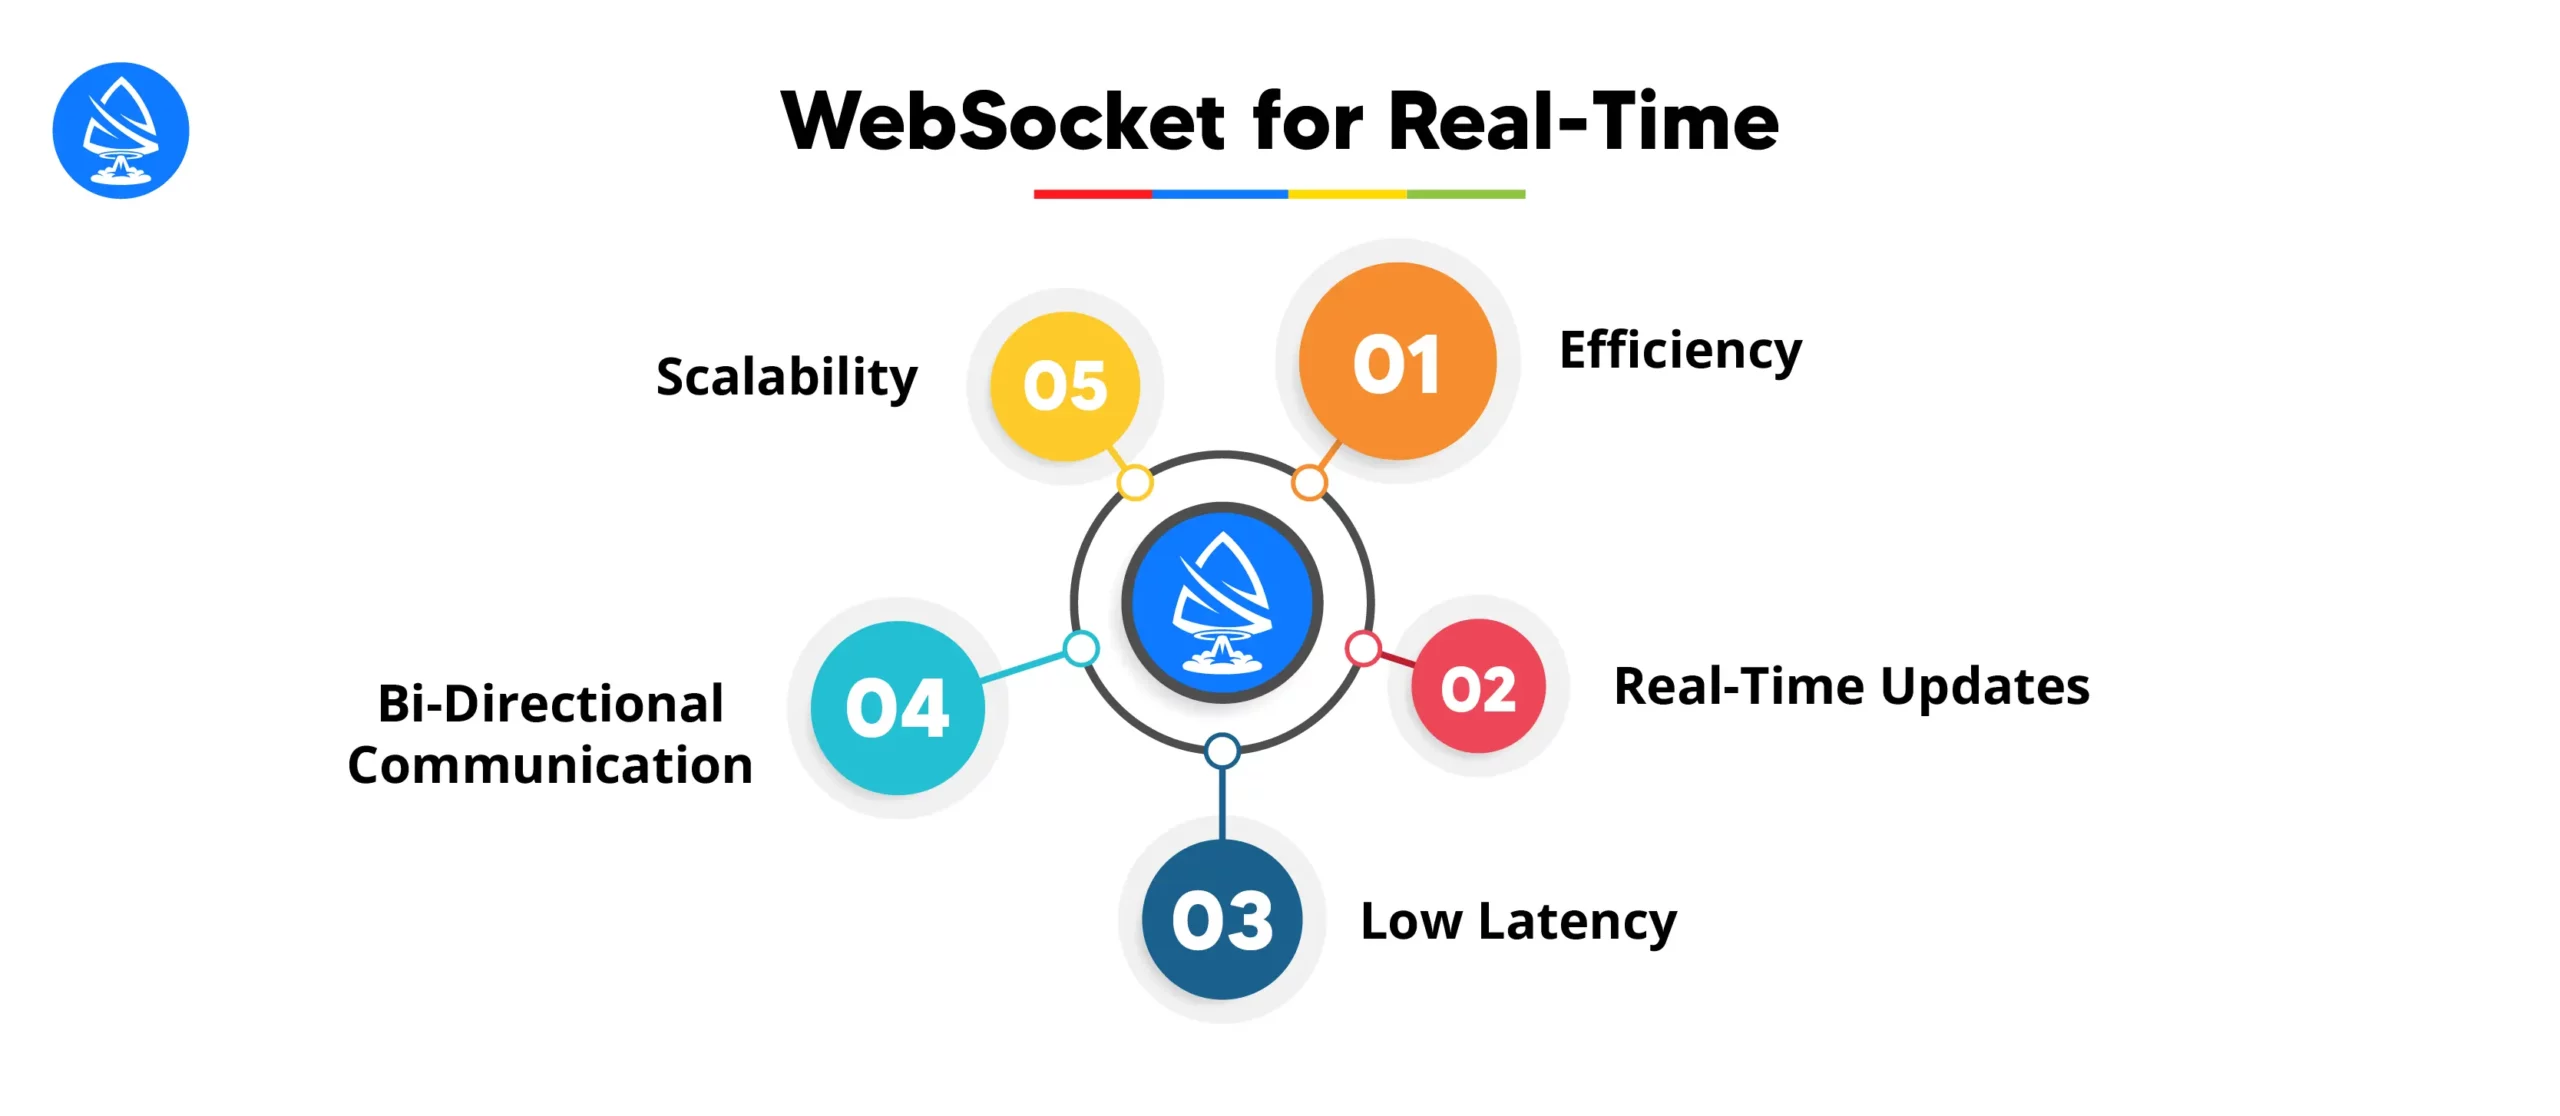
Why should one use WebSocket for real-time communication?
Efficiency: WebSocket reduces overhead by eliminating the need for repeated HTTP requests and responses.
Real-time Updates: It facilitates instant data transfer, ideal for live updates in chat apps, online gaming, and financial tickers.
Low Latency: WebSocket’s persistent connection minimizes latency, providing a smoother user experience.
Bi-directional Communication: Both the client and server can start conversations, enabling smooth interaction in both directions.
Scalability: WebSocket is scalable and can handle a large number of concurrent connections efficiently.
Who benefits from Node.js for WebSocket server development?
Node.js’s event-driven, non-blocking architecture makes it an excellent choice for WebSocket server development. Its asynchronous I/O model enables it to handle thousands of concurrent connections with minimal resource consumption. Node.js also offers a rich ecosystem of libraries and frameworks, such as ws and Socket.IO, simplifying WebSocket server node implementation and enhancing development productivity. This makes it ideal for WebSocket server Nodejs development.
Setting Up the Development Environment
How to Install Node.js and npm
Download Node.js: Visit the official Node.js website and download the appropriate installer for your operating system.
Install Node.js: Run the downloaded installer and follow the installation prompts to install Node.js on your system.
Verify Installation: Open a command prompt or terminal and type node -v and npm -v to verify that Node.js and npm (Node Package Manager) are installed correctly.
What to Do to Initialize a New Node.js Project
Create Project Directory: Create a new directory for your Node.js project using the command line or your operating system’s file explorer.
Navigate to Project Directory: Open a command prompt or terminal, navigate to the newly created project directory using the cd command.
Initialize Project: Run the command npm init and follow the prompts to initialize a new Node.js project. This will create a package.json file with project configuration details.
Where to Find and How to Install Necessary Dependencies
Identify Dependencies: Determine which dependencies your project requires, such as libraries or frameworks.
Install Dependencies: Use npm to install dependencies by running commands like npm install <package-name>. Ensure to save dependencies to your package.json file using the -save or -save-dev flag as needed.
Verify Installation: After installation, verify that dependencies are added to your package.json file and check for any installation errors in the command prompt or terminal.
Implementing a Basic WebSocket Server in Node.js
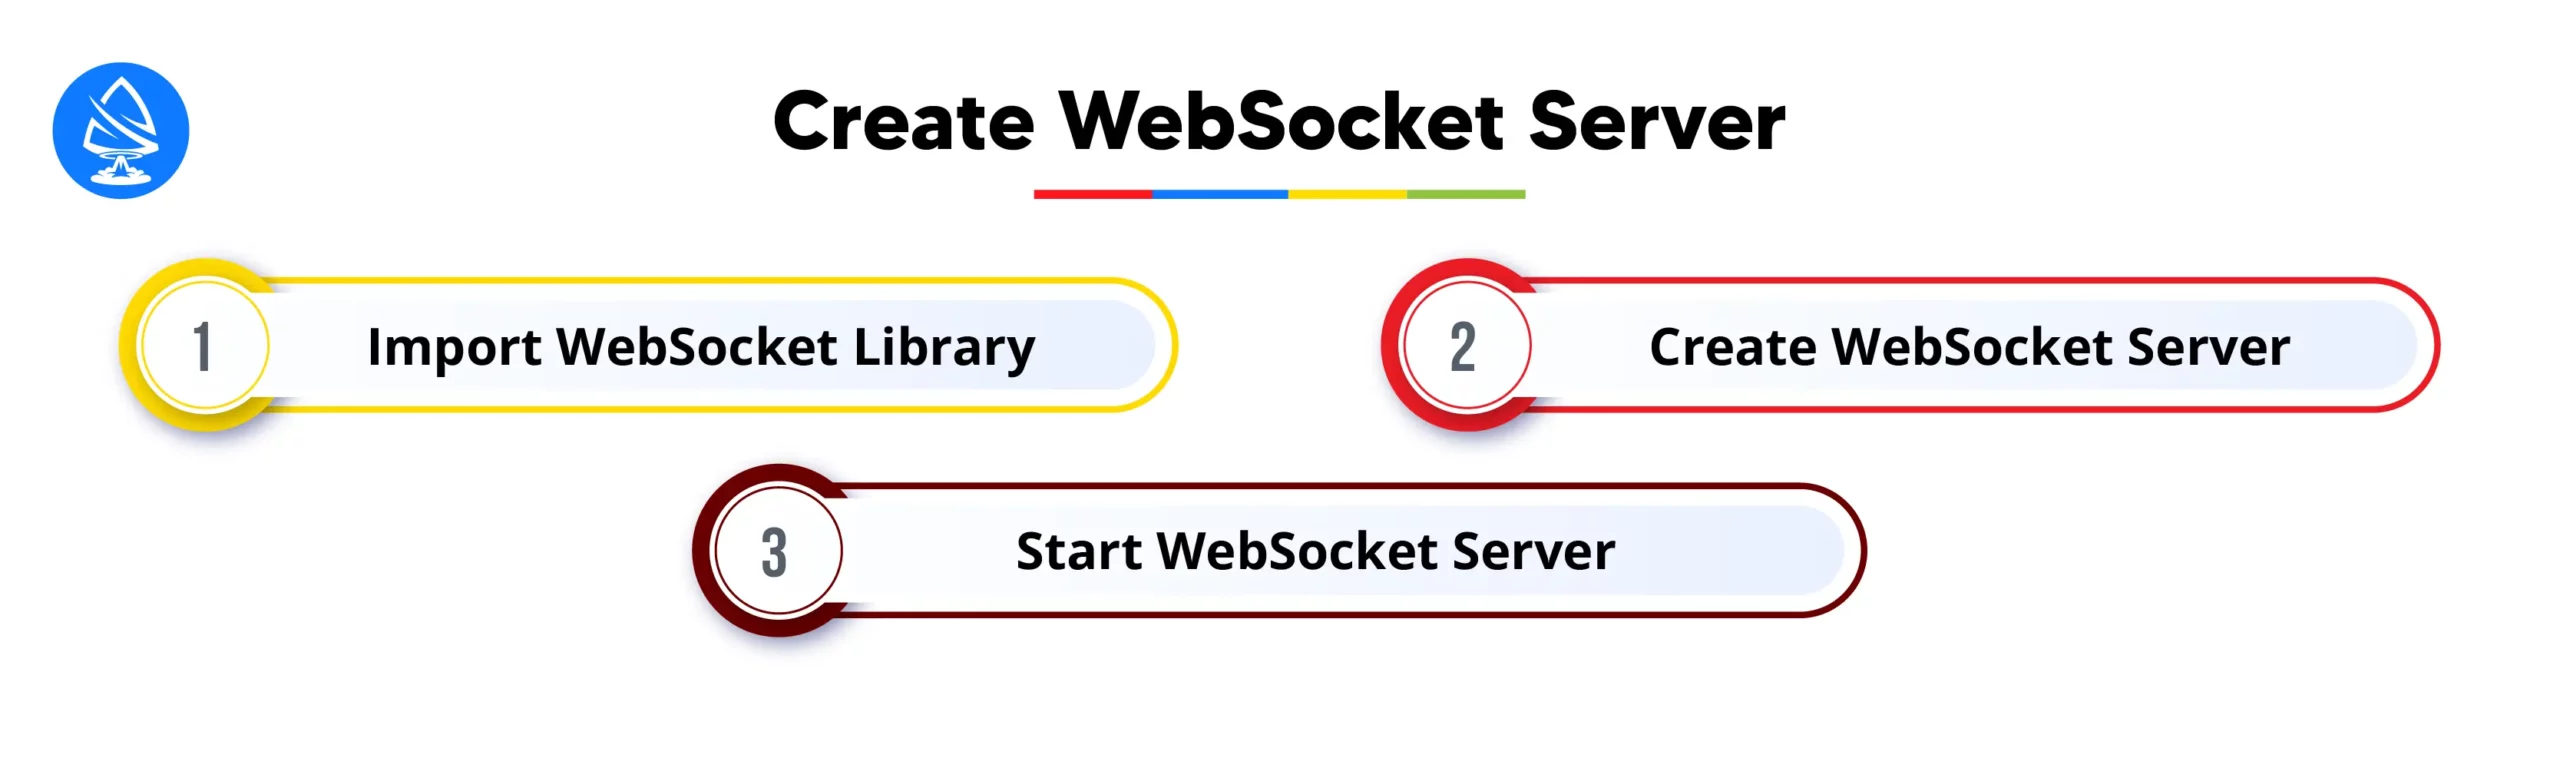
How to Create a WebSocket Server Instance in Node.js
Import WebSocket Library: Begin by installing the WebSocket library using npm (npm install ws) and then importing it into your Node.js application.
Create WebSocket Server: Instantiate a WebSocket server by creating a new instance of the WebSocket.Server class, passing the server configuration, such as port number and options, if needed.
Start WebSocket Server: Listen for incoming WebSocket connections by binding the server to a specific port using the server.listen() method.
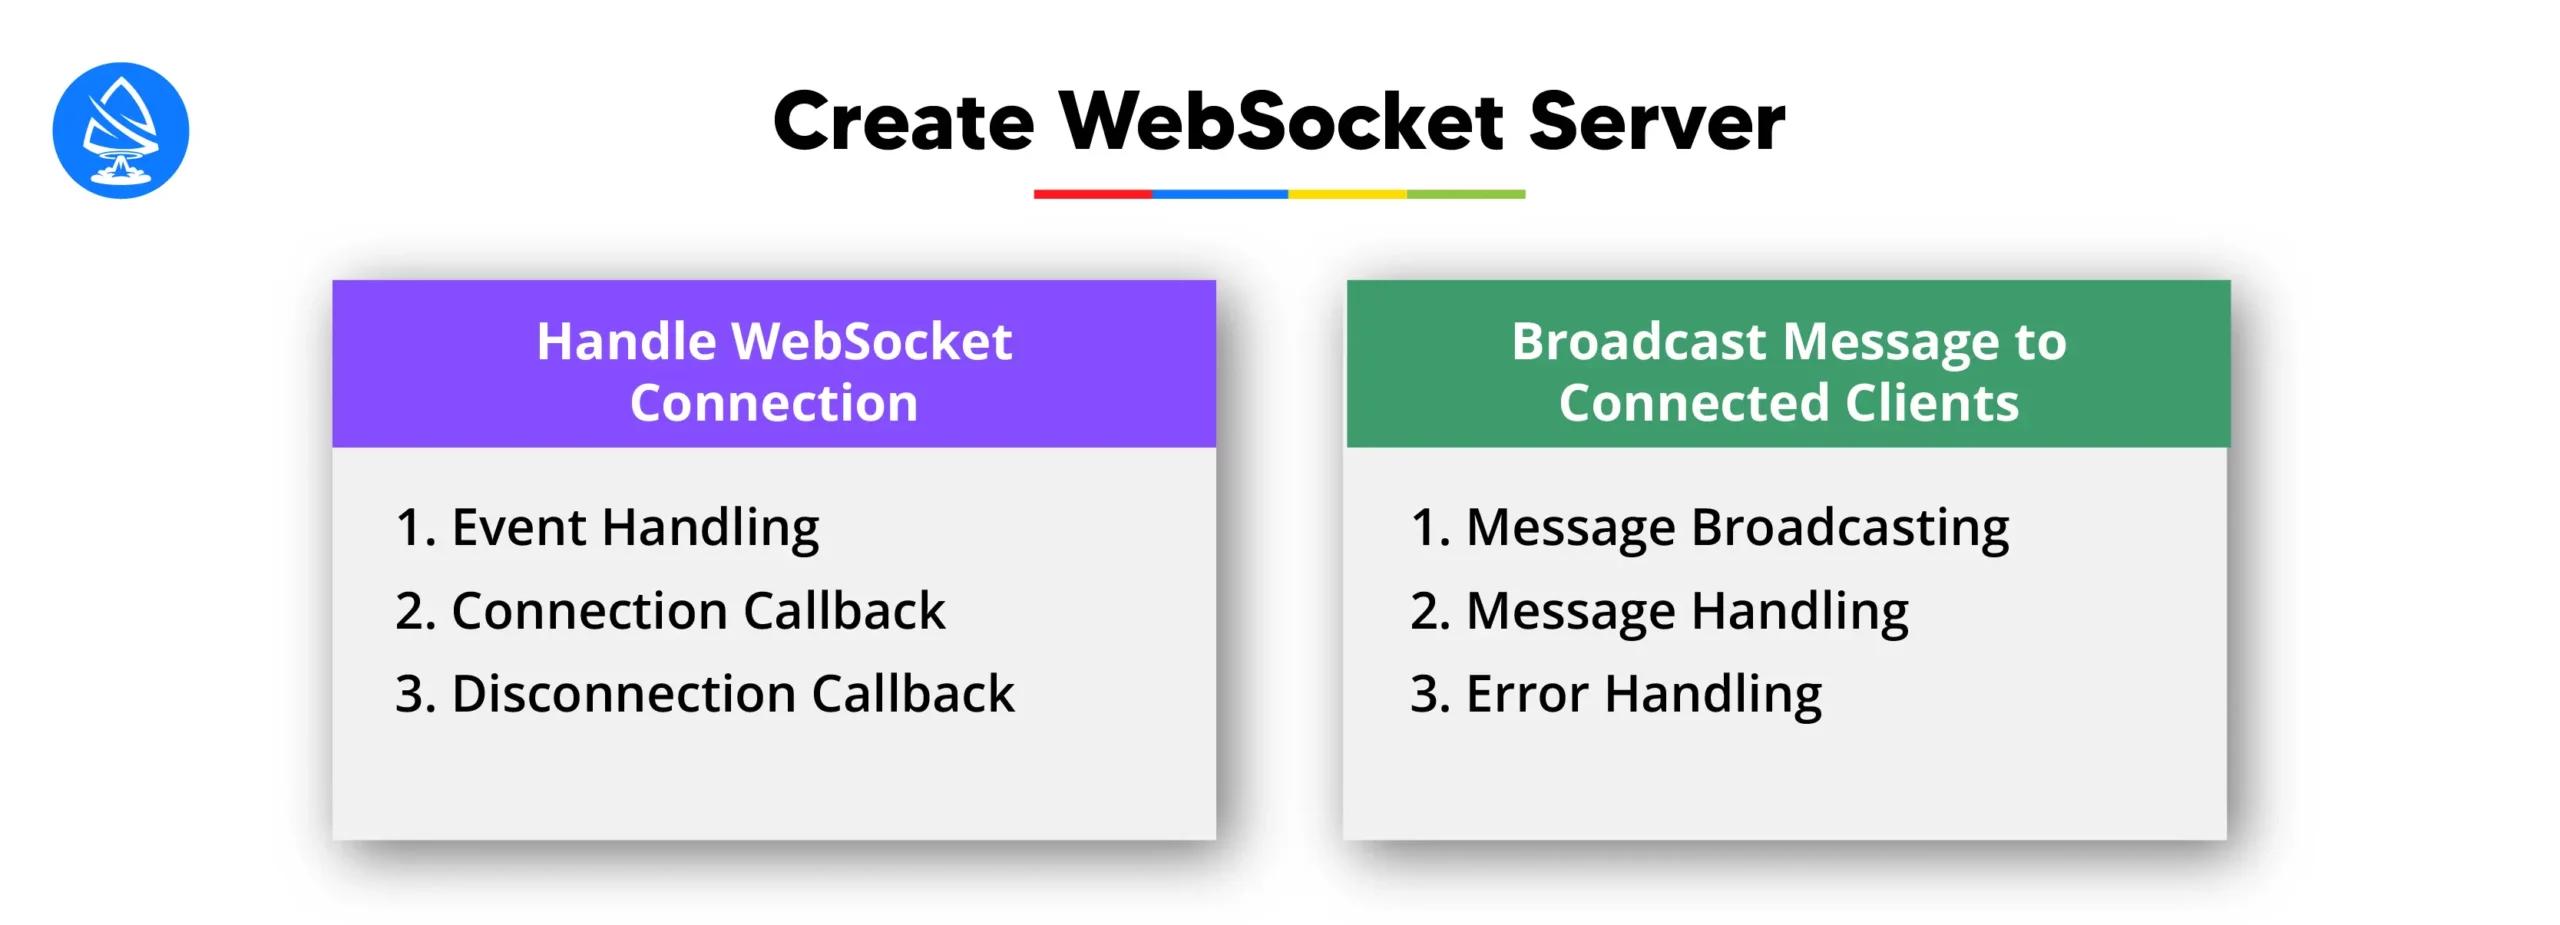
How to Handle WebSocket Connections and Disconnections in Node.js
Event Handling: Define event listeners for the WebSocket server to handle various events, such as connection (‘connection’) and disconnection (‘close’) events.
Connection Callback: Implement a callback function to handle new WebSocket connections. This function typically receives a WebSocket object representing the client connection.
Disconnection Callback: Define a callback function to handle WebSocket disconnections. This function may perform cleanup tasks or log disconnection events.
Broadcast Messages to Connected Clients in Node.js
Message Broadcasting: Utilize the WebSocket server instance to broadcast messages to all connected clients. This is typically achieved by iterating over the list of connected WebSocket clients and sending messages using the client.send() method.
Message Handling: Implement logic to handle incoming messages from clients if bidirectional communication is required.
Error Handling: Implement error handling mechanisms to deal with issues such as failed message transmissions or unexpected client behavior.
These steps outline the fundamental process of creating a basic Nodejs WebSocket server which enables real-time communication between clients and the server.
How to Implement WebSocket Events and Error Handling in Node.js
Event Handling: Utilize node js WebSocket events such as ‘connection’, ‘message’, and ‘close’ to handle various stages of WebSocket communication.
Custom Event Handling: Implement custom events for specific logic, like broadcasting to clients or acting on received messages.
Error Handling: Set up error handling for WebSocket to ensure robustness and reliability during communication.
Why Secure WebSocket Connections with Authentication and Encryption in Node.js
Authentication: Implement authentication mechanisms to verify the identity of clients connecting to the WebSocket server which prevent unauthorized access.
Encryption: Use secure WebSocket protocols such as WSS (WebSocket Secure) to encrypt data transmitted between clients and the server which make sure confidentiality and integrity.
TLS/SSL: Configure Transport Layer Security (TLS) or Secure Sockets Layer (SSL) certificates to establish encrypted connections, safeguarding sensitive information from eavesdropping and tampering.
How to Scale Node js WebSocket Server for High Traffic Scenarios
Load Balancing: Employ load balancing techniques to distribute WebSocket traffic across multiple server instances which prevent overload and ensure optimal performance.
Horizontal Scaling: Scale WebSocket servers horizontally by adding more server instances or nodes to accommodate increasing traffic demands.
Caching: Implement caching mechanisms to store frequently accessed data in memory, reducing the load on the WebSocket server and improving response times during peak traffic periods.
These advanced features enhance the functionality, security, and scalability of Nodejs WebSocket server, making them suitable for a wide range of real-time communication applications.
Testing and Debugging in WebSocket Server
How to Implement Strategies for Testing WebSocket Server Functionality
Unit Testing: Develop unit tests to verify individual components of the WebSocket server which make sure that each part functions correctly in isolation.
Integration Testing: Conduct integration tests to validate the interaction between different modules of the WebSocket server, simulating real-world scenarios.
Load Testing: Perform load tests to assess the WebSocket server’s performance under heavy traffic conditions, identifying potential bottlenecks and optimizing scalability.
Security Testing: Conduct security tests to assess the WebSocket server’s resilience against common vulnerabilities such as injection attacks, XSS, and CSRF.
Compatibility Testing: Ensure compatibility across various platforms, browsers, and devices by testing WebSocket functionality in different environments.
End-to-End Testing: Implement end-to-end tests to validate the entire WebSocket communication flow, including client-server interactions and message handling.
Why Debugging Common Issues and Errors is Important in WebSocket Server Development
1. Logging:
Utilize logging frameworks to record server-side activities and error messages, facilitating the identification and troubleshooting of issues.
2. Error Handling:
Implement robust error handling mechanisms to gracefully handle exceptions and errors, preventing server crashes and ensuring uninterrupted service.
3. Debugging Tools:
Utilize debugging tools and libraries such as Chrome DevTools, Node.js Inspector, and WebSocket client libraries to inspect WebSocket traffic, diagnose issues, and trace execution flow.
4. Network Monitoring:
Employ network monitoring tools to analyze WebSocket traffic, detect latency issues, and diagnose connectivity problems between clients and the server.
5. Code Reviews:
Conduct regular code reviews to identify potential bugs, performance optimizations, and security vulnerabilities in the WebSocket server codebase.
6. Community Support:
Seek assistance from online communities, forums, and documentation resources to troubleshoot complex issues and leverage collective expertise.
You can implement these testing strategies and debugging practices, Nodejs WebSocket server developers can ensure the reliability, performance, and security of their applications, minimizing downtime and enhancing user experience.
Traditional Hosting Providers: Utilize traditional hosting providers like AWS EC2, Google Cloud Compute Engine, or DigitalOcean Droplets to deploy Node.js WebSocket servers.
Platform as a Service (PaaS): Leverage PaaS providers such as Heroku, Google App Engine, or Microsoft Azure App Service, offering simplified deployment and management of Node.js applications.
Serverless Architectures: Explore serverless options like AWS Lambda, Google Cloud Functions, or Azure Functions for event-driven WebSocket server deployments, scaling automatically based on demand.
Containerization: Use containerization technologies like Docker to package WebSocket server applications and deploy them across various environments using container orchestration platforms such as Kubernetes or Docker Swarm.
Edge Computing: Consider edge computing platforms like AWS IoT Greengrass or Azure IoT Edge for deploying WebSocket servers closer to end-users, reducing latency and improving real-time communication performance.
Best Practices for Deploying WebSocket Servers
Environment Configuration: Ensure consistent environment configuration across development, staging, and production environments to minimize deployment-related issues.
Continuous Integration/Continuous Deployment (CI/CD): Implement CI/CD pipelines to automate the build, test, and deployment processes, ensuring rapid and reliable WebSocket server deployments.
Security Measures: Implement security best practices such as HTTPS/TLS encryption, authentication mechanisms, input validation, and rate limiting to protect WebSocket server deployments from security threats.
Monitoring and Logging: Set up comprehensive monitoring and logging solutions to track WebSocket server performance metrics, detect anomalies, and troubleshoot issues promptly.
Auto-Scaling: Configure auto-scaling for WebSocket to adjust server capacity based on workload, ensuring optimal performance and resource use.
Backup and Disaster Recovery: Implement WebSocket server backup and recovery for business continuity during outages or data loss.
Considerations for Scaling and Monitoring
Horizontal Scaling: Plan horizontal scaling by distributing WebSocket instances across nodes or containers to handle increasing user loads.
Load Balancing: Implement load balancers to evenly distribute WebSocket traffic, preventing server overload and enhancing scalability across instances.
Health Checks: Configure health checks to monitor WebSocket server instances and automatically remove unhealthy instances from the load balancer rotation.
Performance Monitoring: Use performance monitoring tools to track WebSocket server metrics such as response times, throughput, and error rates, identifying performance bottlenecks and optimizing server performance.
Alerting: Set up alerts for WebSocket server issues or performance drops to enable proactive admin intervention and troubleshooting.
You can follow these deployment options, best practices, and considerations. Organizations can effectively deploy, manage, and scale Nodejs WebSocket server to meet the demands of real-time communication applications.
Connect with Artoon Solutions Pvt Ltd
Artoon Solutions Pvt Ltd is renowned globally as a top-tier Nodejs development company in USA, specializing in crafting cutting-edge solutions powered by Node.js technology. With a wealth of experience and expertise, Artoon Solutions excels in delivering scalable, real-time Node.js solutions tailored to meet diverse business needs and requirements. We provide best Nodejs development services to our clients with our top notch support. Let’s build your nodejs WebSocket Server with ease.
Wrapping Up!
Finally, building Nodejs WebSocket Server opens up a world of possibilities for creating dynamic and interactive web applications. By following key steps such as initialization, server creation, event handling, client interaction, and deployment, developers can harness the power of WebSocket technology to deliver real-time communication solutions. WebSocket technology plays a crucial role in modern web development by facilitating low-latency, bidirectional communication, improving user experience, efficiency, and scalability.
Moving forward, continued exploration, experimentation, and engagement with the developer community will further enhance skills and drive innovation in WebSocket server development. With a commitment to learning, exploring advanced features, and contributing to the ecosystem, developers can unlock the full potential of WebSocket technology and build transformative web applications that redefine real-time communication on the internet. Looking to hire Nodejs developers for your backend project? Book a free call with Artoon Solutions now and let us know your requirements.
FAQs
1. What are the main advantages of using WebSocket technology in Node.js?
Node.js WebSocket offers real-time bidirectional communication, low-latency data exchange, enhanced user experience, reduced network overhead, and scalability.
2. How can I deploy a Node.js WebSocket server for production use?
Deploy a Node.js WebSocket server with traditional hosting, PaaS like Heroku/AWS, serverless, or containerization using Docker and Kubernetes.
3. What are some best practices for securing WebSocket connections in Node.js?
4. How to monitor and scale a WebSocket server in Node.js to handle increasing traffic?
Implement logging and monitoring, use load balancers, auto-scaling groups, optimize server-side code, and leverage caching mechanisms in Node WebSocket Server.
5. Are there any common pitfalls or challenges when building WebSocket servers in Node.js?
Managing stateful connections, efficient request handling, error handling, memory optimization, and thorough testing are common challenges.
")