
Error Code Diver in CoD MW2: Explained and Fixed
We will show you how to fix the DIVER error in Call of Duty: MW2 😎
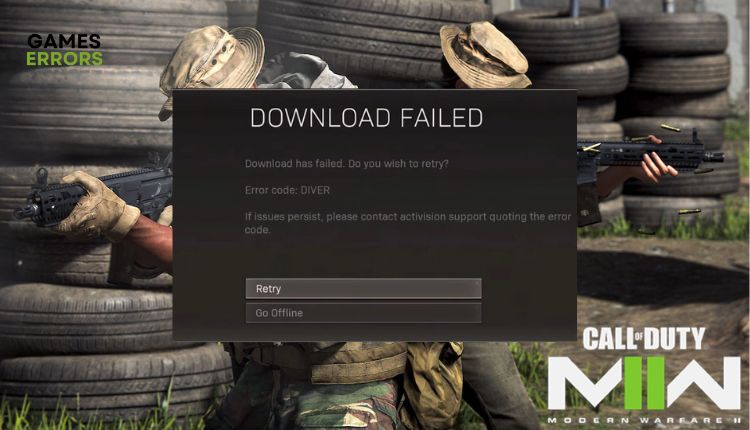
Call Of Duty Modern Warfare 2 (MW2) is quite a quality, content, and popular game. Unfortunately, it also knows how to throw various startup or in-game errors and thus reduce your gaming experience. One such error is the “Error code DIVER,” which does not provide a sufficient explanation of what the problem is. However, from our experience, we know it’s a problem when a game can’t download all files to run successfully. In this article, we decided to help you quickly solve the Diver error code in MW2.
Why do I get the error code DIVER in MW2?
DIVER error codes refer to a problem where MW2 cannot download all the files needed to play the game. This usually happens due to game server problems, slow and unstable internet connection, corrupted game files, poorly configured windows firewall, antivirus, etc.
How do I fix the DIVER error in MW2?
Before getting into the more complicated steps, do these simple things first:
- Check the game server status.
- Restart the game or your PC.
- Close all background apps, like antivirus, P2P, VPN, etc.
- Power cycle your modem or router (unplug power cables for one minute and back in).
If you still have the problem, do the following:
- Check your internet connection
- Temporarily disable the Windows firewall
- Update network driver
- Verify game files
- Change your DNS server
- Disable VPN
1. Check your internet connection
Apart from game server issues, your slow and unstable internet connection is one of the main reasons you might get a DIVER error in MW2. We recommend that you do the following:
- Check online with one of the popular internet speed testers if you’re having problems with downloads or uploads.
- Disconnect all unnecessary WiFi devices that can eat up your bandwidth.
- If the signal is weak where you keep your PC or console, get a wireless network extender.
- Always use ethernet for a faster and more stable connection than wireless for gaming.
- Check with your ISP that it hasn’t throttled your bandwidth or resources for some reason.
2. Temporarily disable the Windows firewall
The Windows firewall often blocks outgoing and incoming connections, causing the DIVER error. We suggest temporarily disabling your firewall to ensure the problem is with it. Do the following:
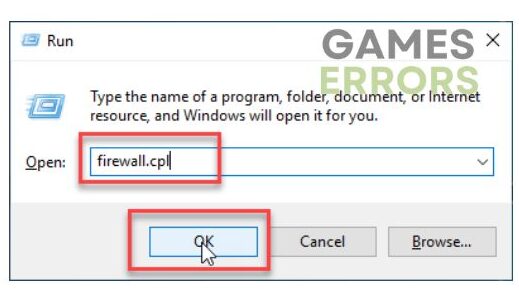
1. Press the Windows + R keys on your keyboard to launch the Run dialog.
2. Type the firewall.cpl and press Enter.
3. Click on Turn Windows Defender Firewall on or off.
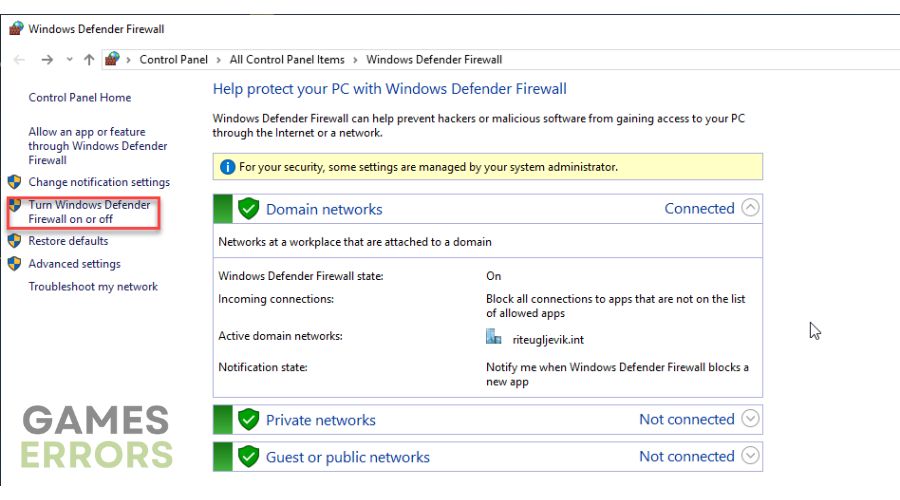
4. Tick all radio buttons – Turn Off Windows Defender Firewall.

5. Launch the game to see if the DIVER error is gone.
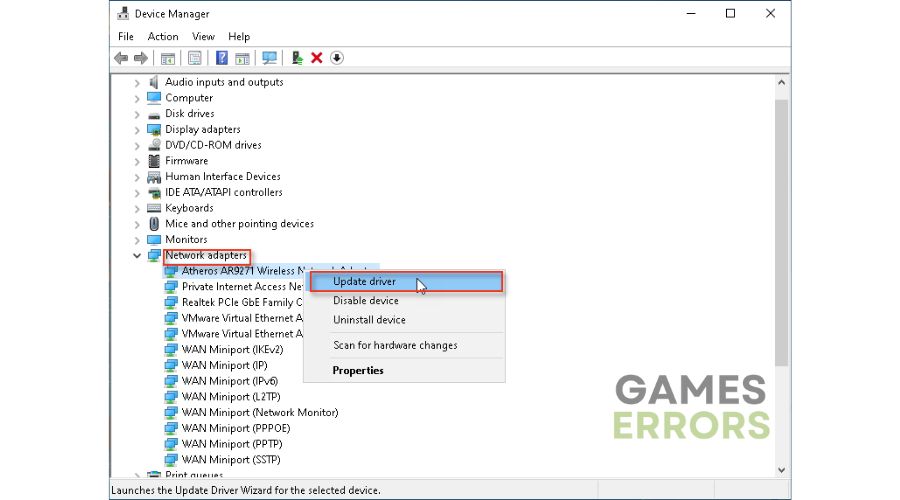
3. Update network driver
The Diver error code results from a bad network connection but can also be from outdated network drivers. We recommend that you first update your network driver from Device Manager.
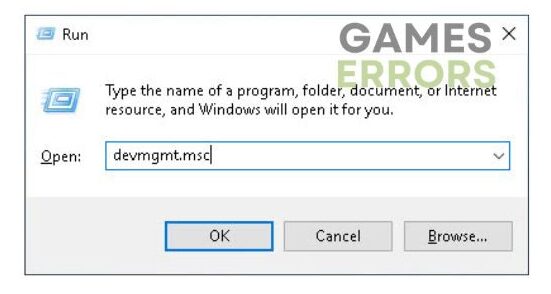
1. Press the Windows + R keys on your keyboard to launch the Run dialog.
2. Type; devmgmt.msc and press Enter.
3. Double-click the Network adapters and right-click on your network card to select Update driver.
4. Click on the Search automatically for drivers and wait to finish the update process.
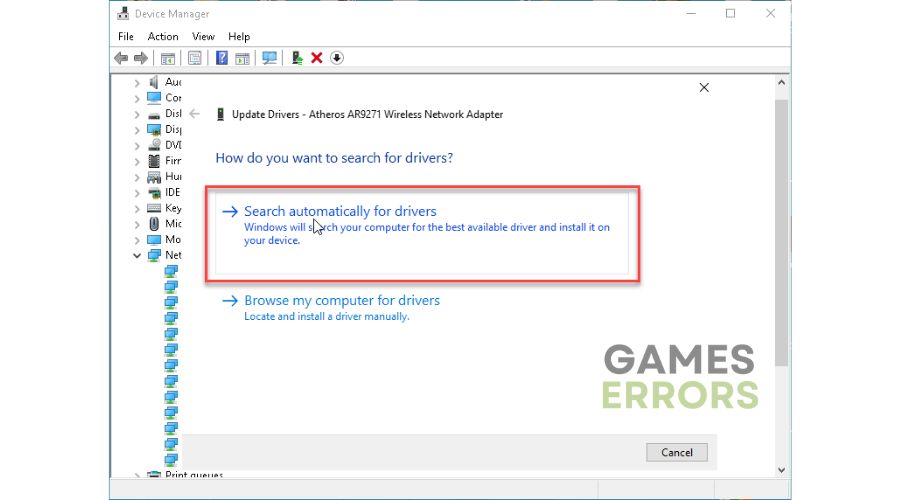
5. Restart your PC, launch MW2, and see if the DIVER error is gone.
A much simpler way to always have all system drivers up to date is to use Outbyte Driver Updater. This helpful tool will scan all your drivers and ensure you have the latest ones.
⇒ Get Outbyte Driver Updater
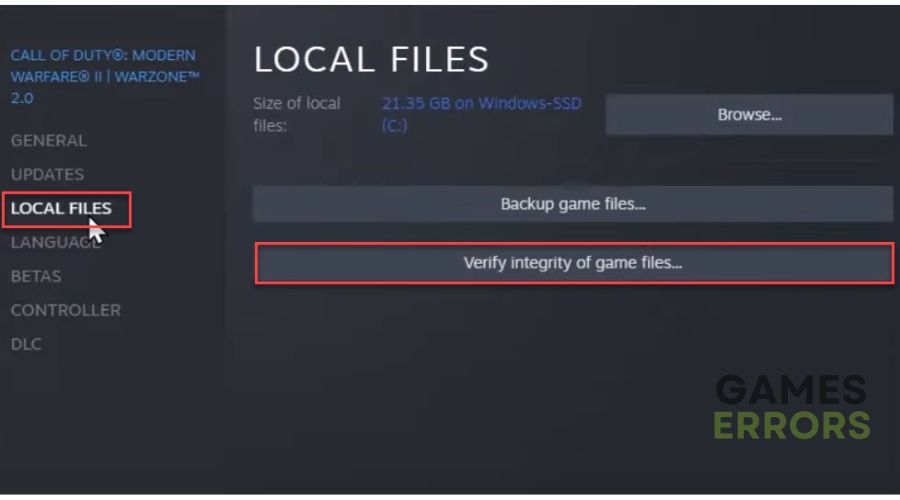
4. Verify game files
Time needed: 3 minutes
The error code DIVER in MW2 can also appear if one or more game files have been corrupted or missing. For this reason, we recommend that you check the integrity of the game files on the Steam client.
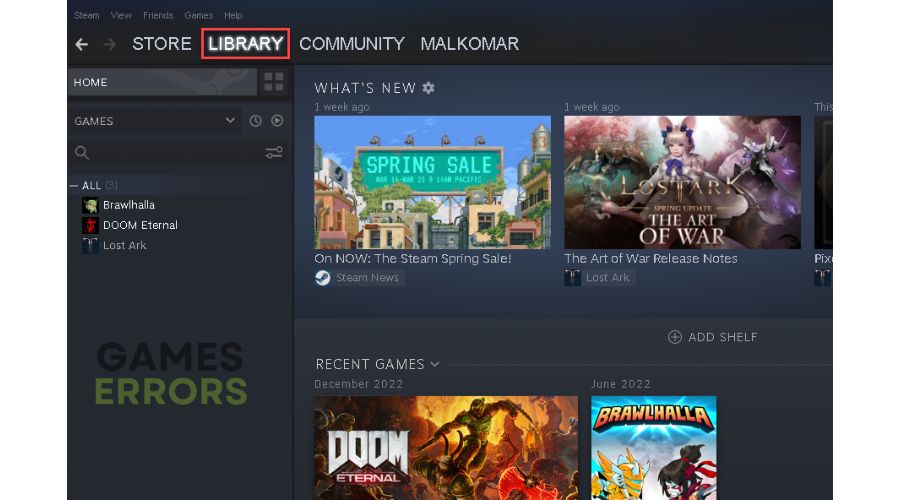
- Launch the Steam
Launch the Steam client and go to your games library.

- Locate Call Of Duty: Modern Warfare 2 in Library
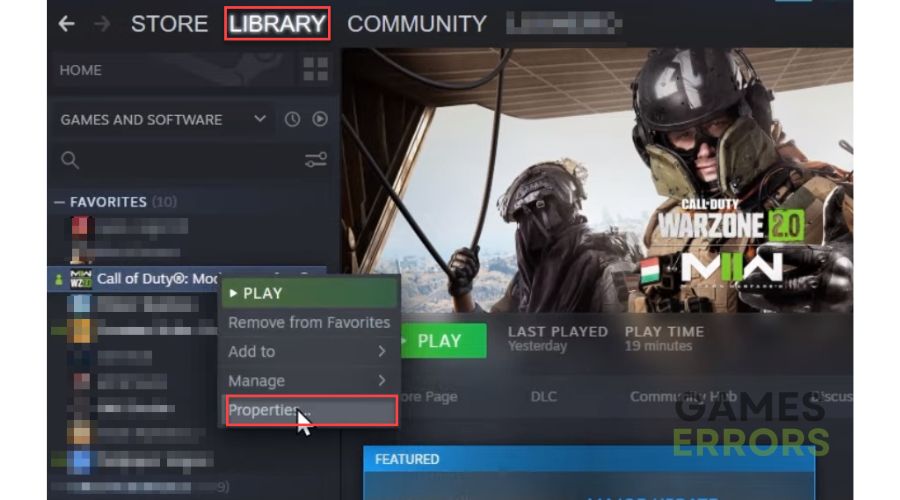
Right-click on the Call Of Duty: Modern Warfare 2 and select Properties.
- Select the LOCAL FILES menu option
Click on Verify the Integrity of Game Files. Wait a couple of minutes to Steam finishing verification.
- Restart your PC
After restarting, run MW2 to check if the DIVER error is gone.
5. Change your DNS server
Error code DIVER in MW2 can also happen if there is any interruption between the game server and your DNS (Domain Name Server). Your default DNS was automatically assigned to you by your ISP (Internet Service Provider). We recommend changing your DNS to a public and reliable one like Google’s. Do this as follows:
1. Press Windows+R on the keyboard to open the Run dialog.
2. Type: ncpa.cpl and press Enter (or click OK.)
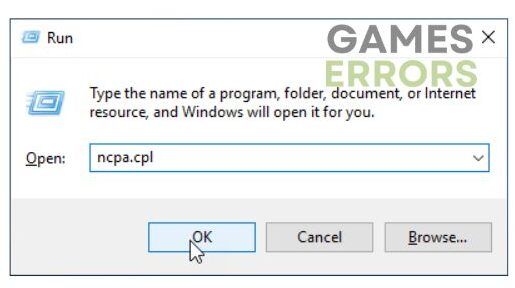
3. Right-click on your network adapter, and select Properties.
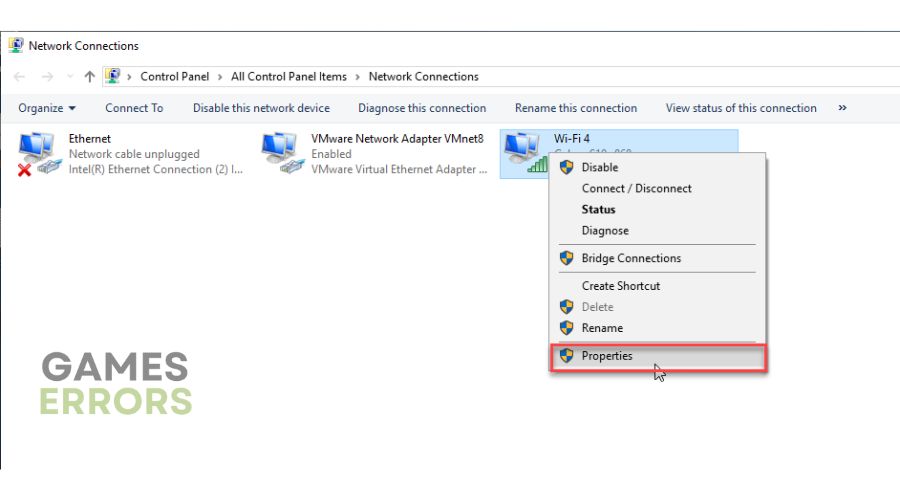
4. Choose Internet Protocol Version 4 (TCP/IPv4) and click the Properties button.
5. Tick the radio button – Use the following DNS server addresses. For the Preferred DNS server, type: 8.8.8.8, and for the Alternate DNS server, type: 8.8.4.4.

6. Confirm changes on the OK and restart the PC
7. Try running MW2 to see if the DIVER error code recurs.
6. Disable VPN
We have verified that having a VPN on can also affect the DIVER error code in MW2. Sometimes your VPN can limit bandwidth or behave unstably, so we advise you to turn it off temporarily.
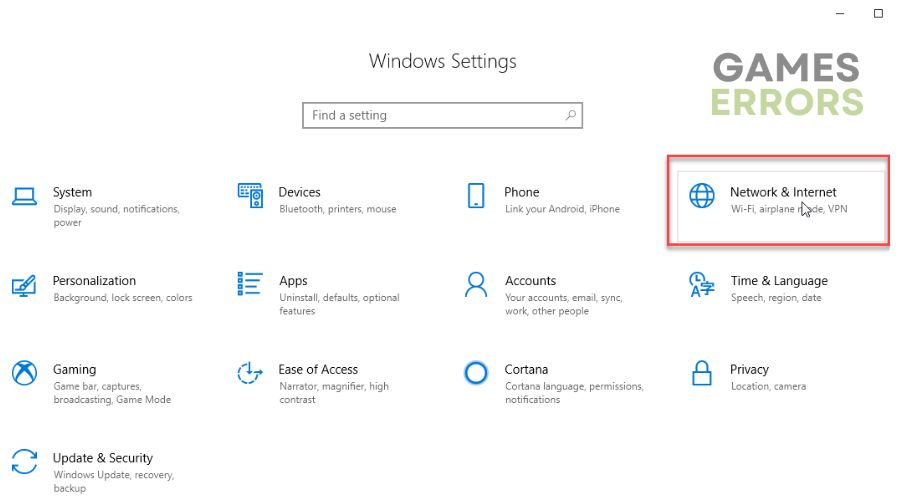
1. Right-click on the Windows Start and select Settings.
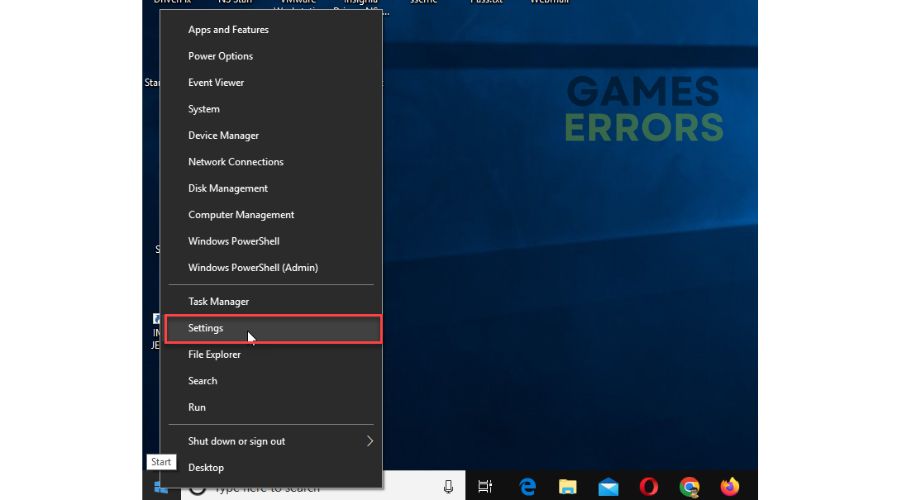
2. Click on Network and Internet.
3. Select the VPN option, and click the Remove button to disable the VPN.
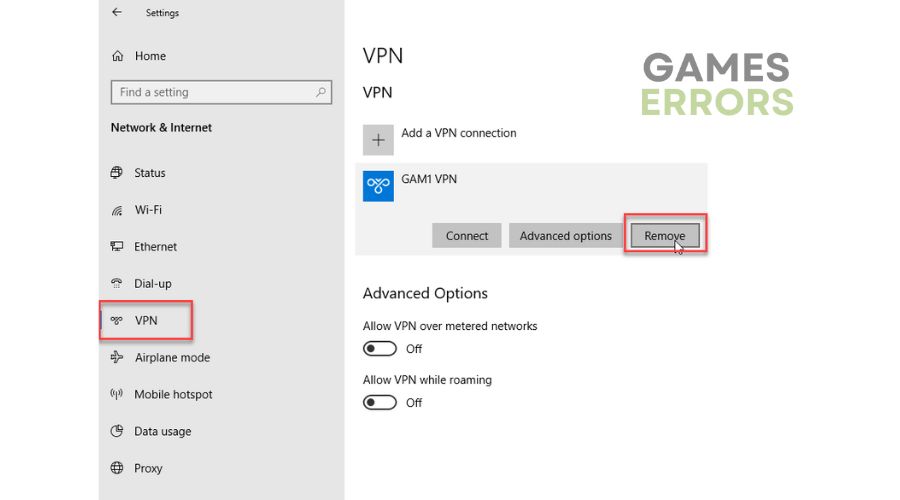
4. Close Settings, launch the game, and see if the error is gone.
If you have a third-party VPN turned on, disable it.
Related articles:
- Dev Error 11642 In MW2: How To Rapidly Fix It
- MW2 Keeps Crashing On PC: How To Fix It Really Quick
- [SOLVED] Game_ship.Exe Crash Error In Modern Warfare 2
Conclusion
We have tried to give you specific tips on how to get rid of the error code DIVER in Call of Duty: MW2. However, don’t hesitate to comment below if you still have the problem or have found another way to fix it.