Creating a virtual controller is very simple using the new input system if you already have an action map setup. If you have not already setup the new Input system then check out our tutorial on Getting started with Unity’s new Input system.
Adding UI, accessing UI from script will be same as in the old input system. You will need to change things only if you had a virtual controller on screen. Because the way the old input system maps the controller to UI is completely different to how the new Input system does it.
To just enable an UI element on Button press, you can use the same action map from our getting started tutorial and enable the gameobject on button press. Here is the sample code

using UnityEngine;
using UnityEngine.InputSystem;

public class PlayerController : MonoBehaviour
{
    [SerializeField]GameObject image;

    // Start is called before the first frame update
    void Start()
    {
        TestControl newInput=new TestControl();
        newInput.Testactionmap.Enable();
        newInput.Testactionmap.Jump.performed+=PlayerJump;
    }

    private void PlayerJump(InputAction.CallbackContext obj)
    {
        image.SetActive(true);
    }
}
The Event System for New Input
The Event System added with the UI will not work with the new Input system. If you select the Event system in the Hierarchy and check the components in the inspector window. You should see an error on the stand alone input system component as shown in the image below.

Unity provides a button to replace the component with the new input system on the error message. You can just press the button and Unity will replace the component. But you need to do this every time you add an event system to the Unity scene.
Configuring a Virtual Controller
In our getting started tutorial, we created an action map for player jump. The player would jump when the space bar was pressed. Now, if you want to create virtual button on the screen for player jump, you don’t need to create a new action map. You can link the Keyboard space bar button to an UI button.
To do this, you need to use the new On-screen Button component.
First, let’s add an UI image to the scene by going to UI>Image. Select the image and click on Add Component to add the On-screen Button.

Click on the Control Path drop down and select click on the listen button. Press the space bar key on the keyboard and select it.
Now you have mapped the space bar to the UI button.
Let’s test our old action map to see if it works with the new UI button. The Player controller script in our getting started tutorial is connected to the directional light and will log a message when space bar is pressed. Now it should log a message when the UI button is pressed.

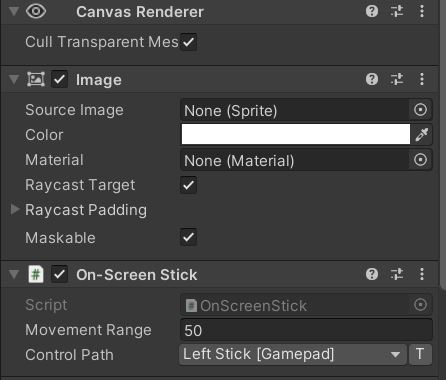
Similarly, if you have an action map with your controller stick setup then you can easily convert it into UI stick using the On-screen Stick component.
You just have to add an image of a controller stick and add the component. You can control the distance travelled by the on-screen stick using the movement range parameter. You can assign it to the gamepad’s left or right stick using the Control path.