
CG Spectrum's Dept. Head of VFX Daniel Hourigan (Aquaman, The Hunger Games: Mockingjay, Terminator: Dark Fate) takes us through how he built his KitBash3D Mission to Minerva settlement in Houdini, detailing key steps from his recent informative livestreams, including a great workaround for creating a fast rendering volumetric glow. Plus, we reveal the final shot!
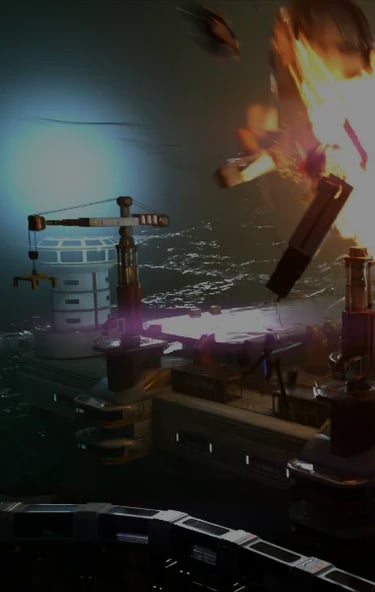
Still from Daniel's final shot using KitBash3D's Mission to Minerva Kit.
Daniel has worked in the visual effects industry as an FX Artist, including in lead and senior roles, for over 15 years. An expert in Houdini and Nuke, Daniel is also a passionate mentor of CG Spectrum's Houdini FX courses, dedicated to passing on his knowledge to the next wave of prospective VFX artists.
The final shot built by Daniel in Houdini using the free KitBash3D Mission to Minerva Kit. All elements were rendered together, and editing and color grading was applied in Nuke.
Read Daniel's process and tips below.
NB: KitBash3D's Mission to Minerva challenge closed on December 2nd. Good luck to all who entered!
Setting up your Kit
Four steps to take before you start building to ensure you're set up for success.
- Work within the supplied KitBash3D Mission to Minerva Houdini file — all assets and associated materials are already loaded and ready to use. You can download everything you need via the Mission to Minerva Kit page on the KitBash3D website.
- Organize assets into groups (e.g., big, small, vehicles, props, etc.). This helps when creating a scene by being able to easily pick from groups of assets instead of one long list, and it provides a good overview of what you have to work with. From here you can make some selections of the buildings and props you would like to use.
- Create new groups to separate geometry or use the groups provided by KitBash3D, which are especially handy for splitting up assets for destruction or animation.
- Do test renders of your assets because assets may appear different once rendered (considering things like transparency, glass, etc.). A test render will help you determine the final look, which may then influence which assets you choose to use and where.
Selecting a base terrain
In the Mission to Minerva Kit, there are three different terrain materials supplied. I decided on Terrain C because it had flat mountain details that I thought would work well with building placement. (I initially wanted to use the Houdini Terrain tools to build the terrain but, due to time restraints, I went with the base terrain instead.)
After first displacing a high-resolution plane using the height map supplied, I thought there must be a way to get an image onto a height field. If there is a will, there's a way with Houdini — you just need to search for the right node or make your own!
Luckily, there is already a node called Height Field File which allows you to load in a 2D image or displacement map to create the base height field. From there you can use all of the terrain tools as normal.
Layout
Now that I had my base terrain, I started laying out buildings, all the while thinking about a narrative for my shot and asking questions. What could be happening in this scene? If I place this building here and this one there, how does that affect the scene? And does it give me any ideas for FX that I can add?
You can watch me explain the layout process here:
Daniel's layout process as part of the Mission to Minerva Livestream Part 1.
Animation
Once some buildings were laid out, I then turned my attention to the vehicles. As far as narrative goes, vehicles and animation are a great way of bringing a scene to life and helping to tell a story.
I chose the Cargo Ship asset, which I think is the only vehicle that looks like it can fly. I brought it into a new geometry container and started to separate it into animatable sections. Thankfully, KitBash3D assets provide lots of groups that are clearly named, so it makes separating things like doors and thrusters a breeze!
After splitting off the various components, I made a very simple rig consisting of a bunch of transforms with different pivots for the different components. I set all of this up on the static vehicle, still at origin.
It's much easier to set a rig or even an effect up at origin and then apply animation and world space transformations to it afterward. If you try to set animation or FX up on something that might have already been rotated, it makes things much harder.
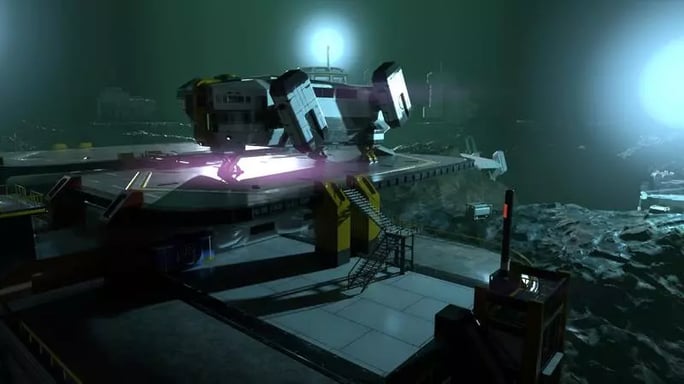
Rig demonstration with the Cargo Ship asset from KitBash3D's Mission to Minerva Kit. Check out the rigging section in the livestream replay for more information.
After I animated the door closing and the thrusters turning, I did a very rough flying animation pass. At this point, I still wasn't really sure what my shot was exactly going to entail, so I was just trying to get some animation done to help set the scene and give me ideas.
[featured]
Reasonably happy with the animation*, I proceeded to place the ship and animation into the building layout. I used a building that looked like a landing pad, so it made sense for me to put it there. Immediately when I did that, I noticed the ship was flying straight through one of the cranes on the landing pad. Now ideas were flowing! Sometimes I would move the ship or adjust the animation so it wouldn't go through something, but I'm an FX artist, so I'm also definitely going to blow stuff up!
You can watch the process of how I set everything up in part 2 of the livestream:
How Daniel set up the animation in the Mission to Minerva Livestream Part 2.
(*I'm not an animator, so rather than labor over something that I know I'll probably never get perfect, I prefer to just get something passable and then move on to something I know more about. As you'll see, a lot of the animation doesn't get used in the end.)
Unique fracturing technique
You will notice that even though part two of the livestream is a rigid body simulation, I didn't use common fracturing techniques. A little while ago I came up with a cool little technique that I think works well for these kinds of assets.
Industrial sci-fi-looking machines made up of metal plates that appear to be riveted together probably wouldn't tear apart like concrete or cloth. However, they are often modeled in such a way that they have few subdivisions, so a panel on the ship might just be one or two polygons.
My technique is as follows:
- Take an asset and put a facet node on it. Select unique points. Now all the polygons on the ship are no longer connected to each other. This is your fractured geometry.
- You then need to hold the asset together using constraints so that it doesn't fall apart too early. For this, I use Soft Constraints. They are flexible and can bend and stretch but you actually want them to be quite stiff, otherwise, they look too floppy and the asset will collapse in an unrealistic way. You want it to feel like there is resistance to breaking.
That is basically it! It's very simple but very effective for this type of asset.
In the stream, I didn't quite get the result I was after, but I did some tweaking afterward, setting the stiffness a lot higher, and got a nice result. See below how the ship bends and flexes as it breaks apart.
After the RBD (Rigid body Dynamics) component was completed.
FX (blowing stuff up!)
Next, I started work on the explosion. Because I was doing it live, I used a quick method for getting a base explosion: I used a preset! GASP!
I don't often use presets in practice, but sometimes they can be great for temping something in or even just getting a quick jumping-off point. To be honest, there is no right or wrong way of doing things — whatever gets the job done!
You can watch me build the explosion in this part of the livestream, and below is the final explosion I came up with after some tweaking, which took approximately 12 hours to sim.
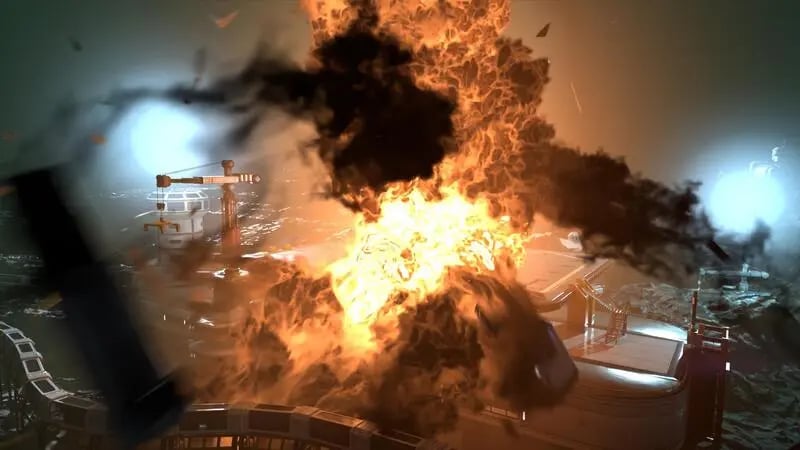
Another still from the finished shot including Daniel's final explosion!
Creating the volumetric glow
Detailed below is an interesting technique I came up with while building my Mission to Minerva Kit. I haven't seen anyone do this in Houdini before, but I think it's likely to be how some real-time engines might approach volume lighting.
Volume lighting renders are notoriously slow. I was thinking about how fire without smoke renders very quickly because it is pure emission and does not require the renderer to calculate light rays passing through a volume (that's the slow part). So I approached the effect the same way.
I created a density volume from a sphere. Then I wanted to blur it to create the effect of light falloff. At first, I tried to be super accurate about it and apply the inverse square law to the density field. But I found that it was a little hard to dial-in a good look. So I ended up just applying a blur to the field.
There are some other steps (shown in the image below) to get the final blurred look I wanted.
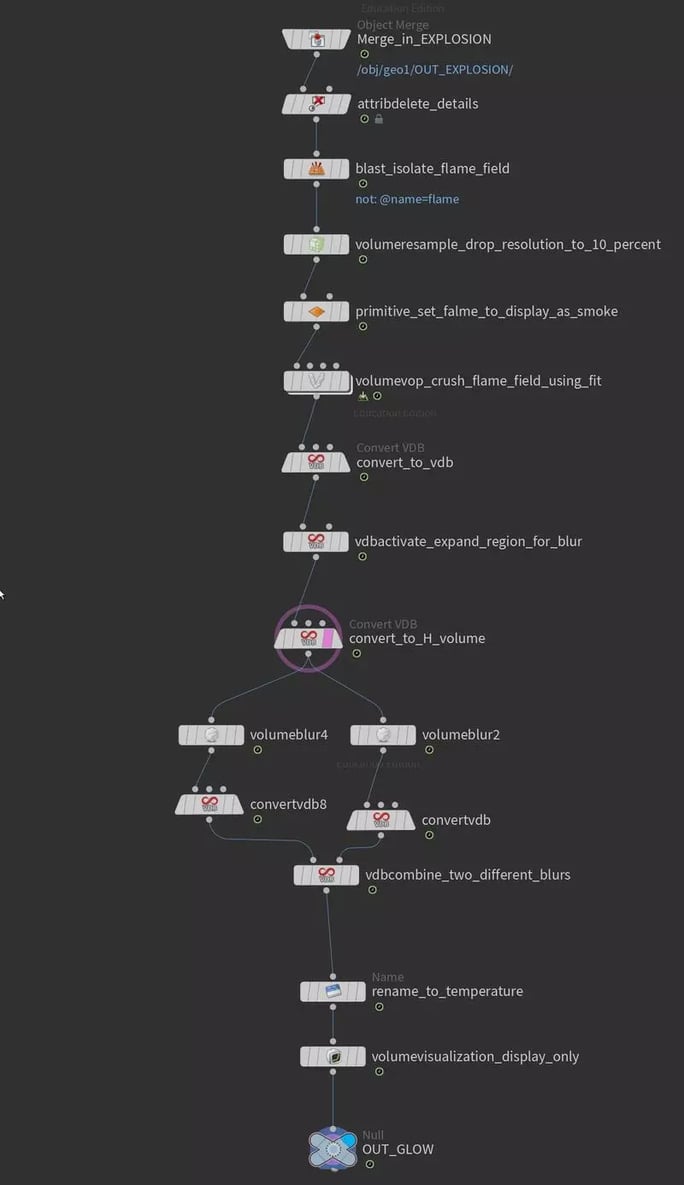
Node graph for volume creation.
After the volume was created, I needed to generate the material. I always visualize the values in the viewport first to give me a range to input into a material. Also, it's much better to be able to see what it looks like before rendering. So I input my density field into the emission tab of a volume visualization node and played with the input ranges until I got a look that worked.
I then created an emissive volume material using Material X in the stage context. This is something I had not done before, but it is much the same as creating materials in the matte context with VOPs (Node-Based Programming) — you just need to figure out the names of the corresponding Material X nodes. See the node graph below for the material.
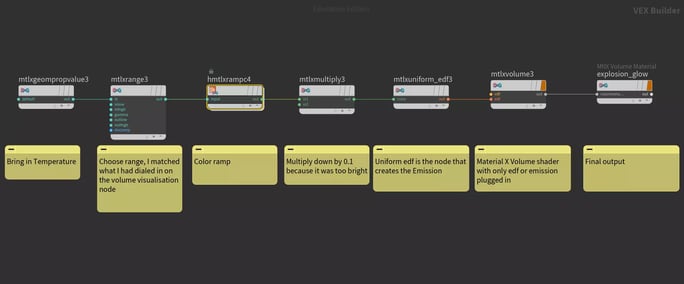
Material X node graph (with notes).
I played with the values a little while render testing, but eventually had a nice quick render of volumetric lights that, in the past, have taken so long to render.
I've had a lot of ideas since coming up with this technique. I have applied it again as a volumetric glow for the explosion, which gives a really nice atmospheric feeling to it. It also means I don't have to apply one in the composite!
It's important to note that putting every element in a single render is risky because it limits your ability to change things later on. If I was rendering this for production, I would render the glow as a separate pass so that it could be dialed up or down by a compositor.
Daniel's explosion with added volumetric glow.
To see some other great entries check out our half-way point blog post. (Please note, the KitBash3D Mission to Minerva Challenge is now closed.)
Study at CG Spectrum and learn how to create out-of-this-world shots like Daniel's!
Whether you want to focus on building 3D models, animating them, integrating them into shots, or blowing them up (Daniel's favorite!), CG Spectrum has courses to suit your area of interest and skill level.
Check out our 3D modeling, visual effects, virtual production, and animation courses, and take the next step towards your career in film and games!
[more]Read Daniel Hourigan's bio[/more]

Recommended for you!
Free Visual Effects resources and articles to inspire you on your journey into the film and games industry.