

Destiny 2 Error Code Coconut: How to Fix It in 5 Minutes
Are you getting disconnected while playing Destiny 2? This is a connectivity issue that has to do with your system configurations. Fix it here
Destiny 2 Error Code Coconut keeps you from continuing the game and leaves you in a lurch, wondering what went wrong with the game. It is not as friendly as its name suggests, and it can be quite bothersome and annoying to encounter it. The fun fact is that the logic behind the code name Coconut is as mysterious as the code itself.
Many games have error codes identified in numbers. But Destiny 2 chose marketable names for its error codes.
What is Destiny 2 Error Code Coconut?
Error code Coconut is a connectivity issue which means that something went wrong with your network or that there is a problem with your configurations, the intrusion prevention system (IPS). Also, it might be the result of a DDoS attack, which unfortunately means that someone got upset because you were too good and decided to cut you off.
Overall, there are too many things that could go wrong with your internet connection. Here are some of the causes of this error code that you can easily fix:
- Your firewall is blocking Destiny 2 from accessing the internet.
- Your network drivers are out of date.
- You need to reset your router.
- Your internet connection is slow or unreliable
- You need to update Destiny 2 to the latest version.
How to Fix Destiny 2 Error Code Coconut?
1. Update Network Drivers
Much like any other driver on your system, network drivers go through new updates every now and then. The new updates address issues of connectivity and make sure that your connection’s performance stays at optimal speed. If you get Destiny 2 error code Coconut, then chances are that your network driver is out of date. Here’s how to update it.
- Close any apps that are using the internet.
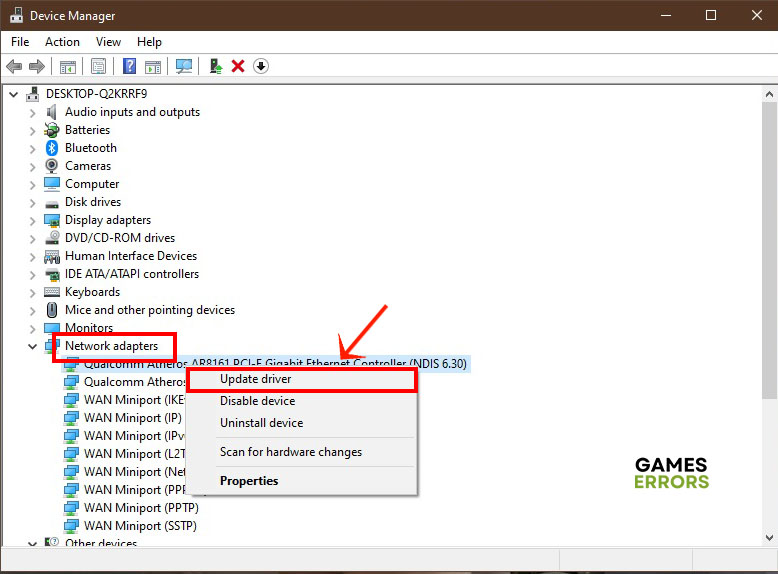
- Right-click the Start menu and select Device Manager
- Scroll down to Network Adapters and click to expand it.
- Right-click your network driver and select Update Driver

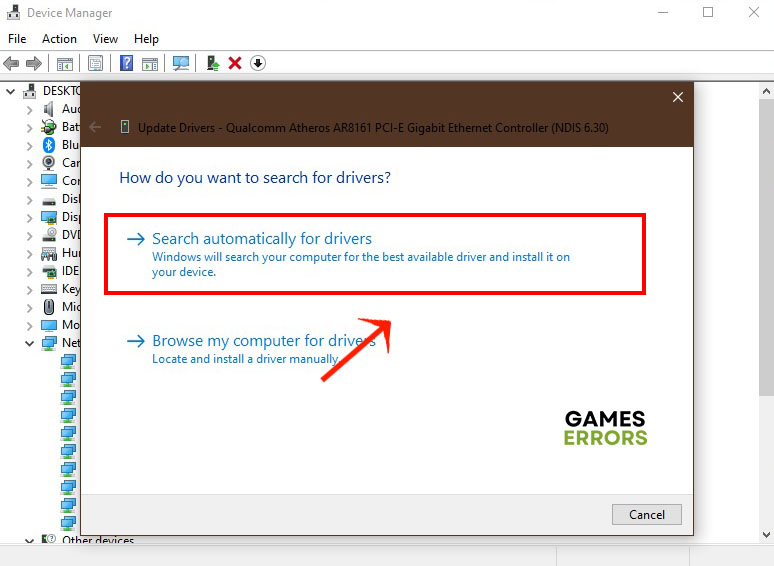
- Click Search automatically for drivers and follow the instructions on the screen.

- Restart your PC and launch Destiny 2 and check that the error is fixed.
You can save yourself a lot of hassle and keep your network drivers up to date at all times with Outbyte Driver Updater. This valuable app runs in the background and downloads the latest drivers and installs them on your system without much input on your side.
⇒ Get Outbyte Driver Updater
2. Check your Internet Speed
Time needed: 2 minutes
Most of the time, connectivity issues can be explained by a slow internet connection. If your connection is spotty, unreliable, or doesn’t meet the minimum requirements of Destiny 2, then you’ll lose your connection to the server more frequently than you’d like. Here’s an easy way to check your internet speed online.
- Close any background apps such as Spotify, Youtube, or online music.
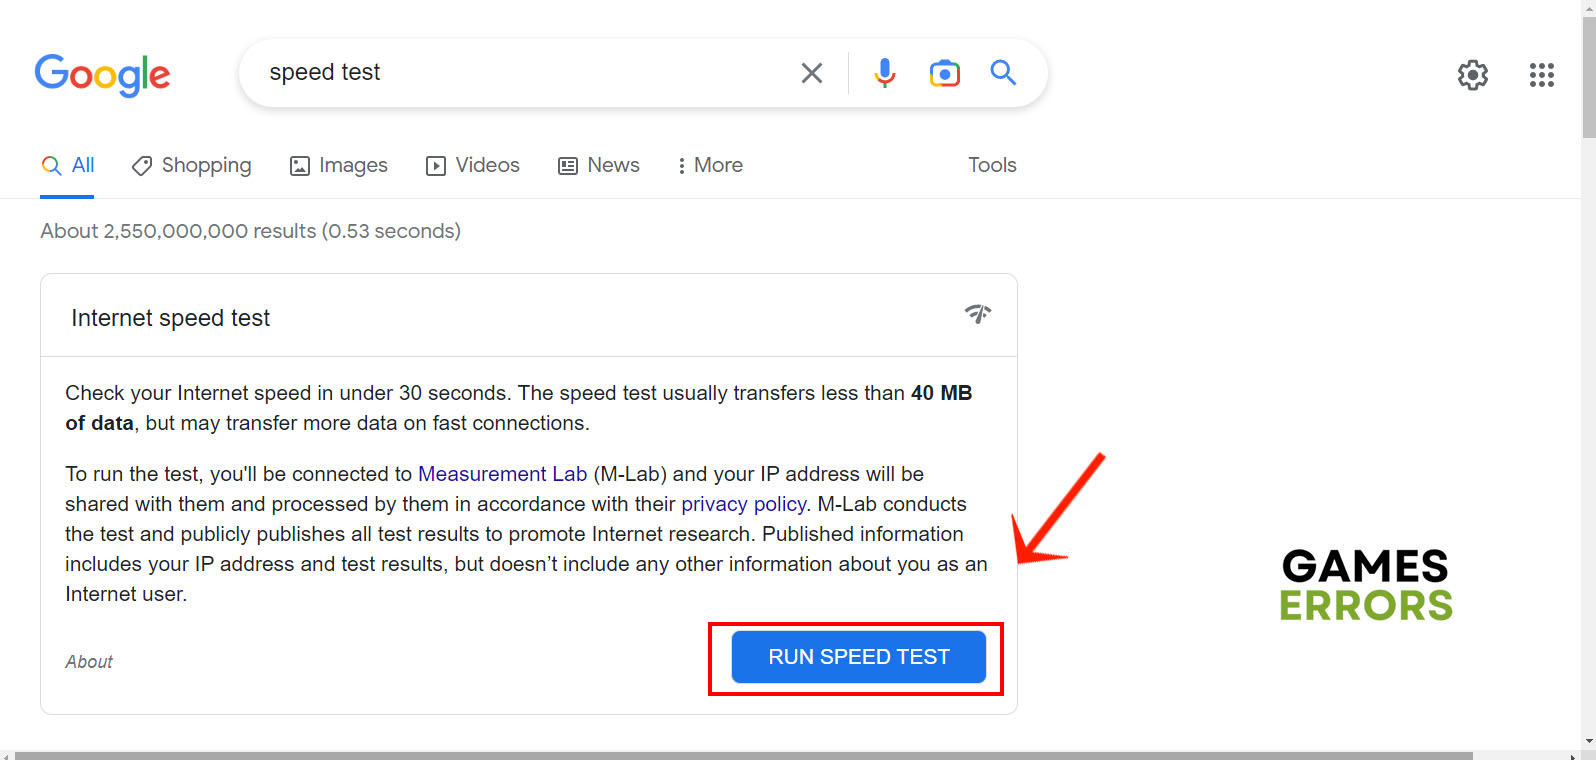
- Open the browser and go to Google.com.
- In the search bar, type “internet speed test” and hit Enter
- Google offers a free speed test tool. Just click the Run Speed Test button and wait for it to finish.

- Check that your download speed is above 3 Mbps and your upload speed is above Mbps. Ping latency should be under 50ms.
- Launch Destiny 2 and make sure not other apps are running in the background.
3. Reset the Router
Your router runs somewhere in a secluded corner all the time. While you switch off your PC and phone once in a while, the router stays on. This can lead to corrupt configurations especially when your IP address gets changed without you even noticing. The result is a poor internet connection and bad connectivity. The solution is simple. Just reset the router.
- Unplug your modem and router from the power source.
- Wait for a full minute, then replug the modem and wait for the lights to turn green.
- Plug the router and wait for the internet icon to turn green.
- Start Destiny 2 and see if the error code Coconut has been solved.
4. Switch to Another DNS
The default DNS your PC is using is the one assigned to it by your internet service provider. That means you have no control over which websites to view and your provider can block the Destiny 2 servers and prevent you from playing the game. To get around this, you’ll need to switch to another DNS. Here’s how to do it.
- Open Settings > Network & Internet
- Under Wi-Fi, scroll down to Change Adapter Options and click.
- Right-click your active internet connection and select Properties.
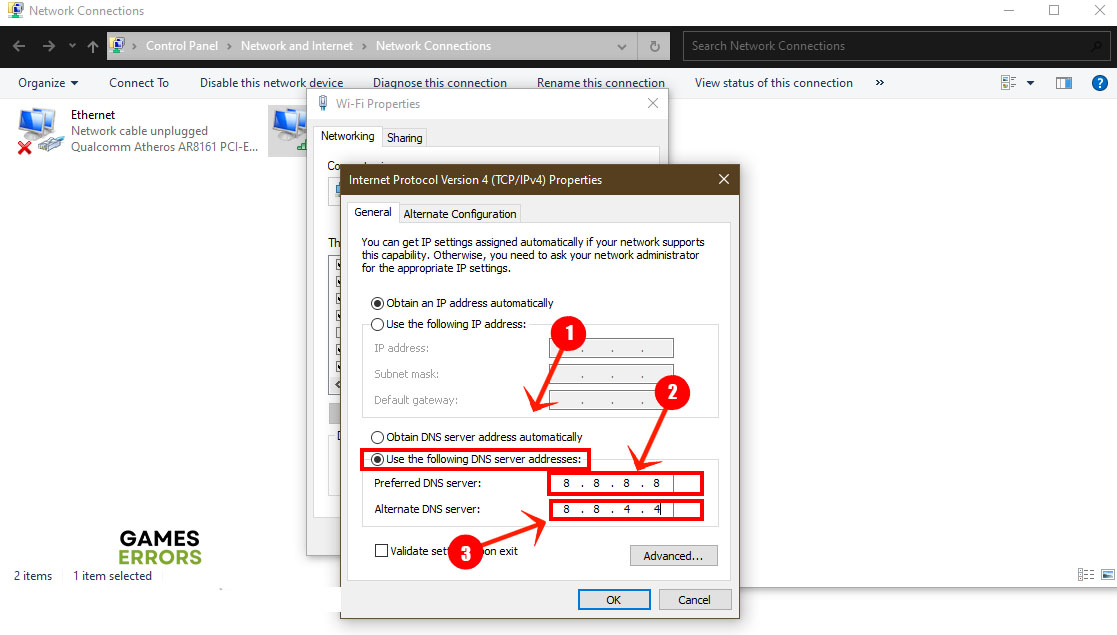
- Select Internet Protocol Version 4 and click Properties.
- Check the Use the following DNS server addresses option and enter these values:
- Preferred DNS Server: 8.8.8.8
- Alternate DNS Server: 8.8.4.4

- Click OK and launch Destiny 2.
Related Articles:
- Destiny 2 Preservation Mission Not Showing Up: How To Fix
- Destiny 2 Error Code Baboon: Tips And Tricks To Fix It Fast
- Destiny 2 Error Code Buffalo: Most Successful Methods To Fix It
Any one of these solutions will fix Destiny 2 error code Coconut for you. Let us know in the comments section about other solutions you might have.