
XDefiant FOXTROT-01 Error: What It Is And Fixes
Server-related issues can interfere with game play and trigger errors. Luckily, we can help you fix this in XDefiant 😉.
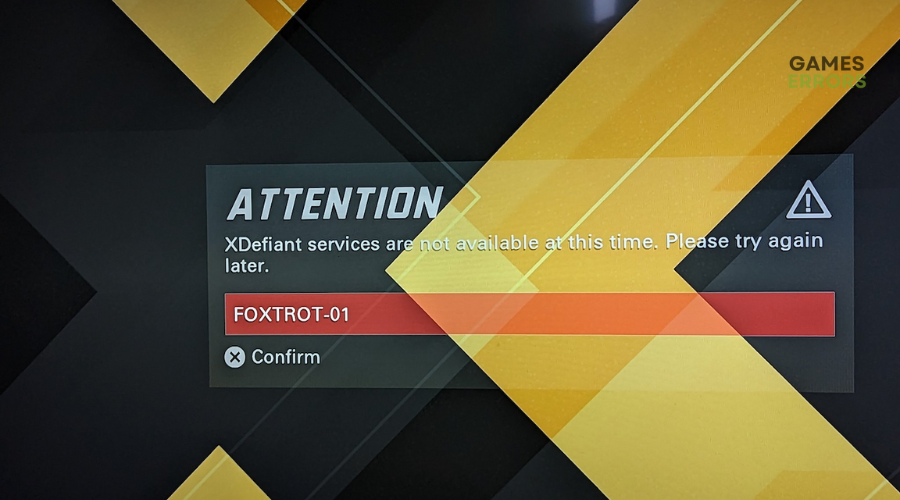
XDefiant‘s highly anticipated release has disappointed fans after realizing the game experiences several errors. While errors are expected with any new game launch, the ones in XDefiant can be annoying. Many players report encountering the error FOXTROT-01, which causes the game to crash, freeze, or lag and prevents you from logging in. The error displays the following message:
ATTENTION
XDefiant services are not available at this time. Please try again later.
Fortunately, we have identified a few proven solutions players use to fix FOXTROT-01 errors in XDefiant. Keep reading to find these fixes.
What causes the FOXTROT-01 error in XDefiant?
Internet accessibility issues and server-related problems mainly cause the FOXTROT-01 error. XDefiant servers are often reported to experience downtimes and outages that make connecting to gaming devices impossible. Similarly, the game’s developers may schedule server maintenance, which also causes connectivity issues. Unfortunately, you have no option but to wait when it comes to connectivity and server-related matters issues. However, if waiting isn’t an option, try some of our solutions below to help fix the error.
How to fix the XDefiant FOXTROT-01 error?
Before diving into this troubleshooting guide, we recommend doing the following prechecks:
- Check XDefiant server status downtime, congestion, overload, outages, or scheduled maintenance. Servers can be down sometimes, preventing you from accessing XDefiant.
- If no server issues are reported, try restarting the game and device to eliminate temporary bugs and glitches.
- Check your internet connection status to ensure it’s fast and reliable.
If you still run into the XDefiant FOXTROT-01 error, here are some fixes worth trying:
1. Run a speed test
Running a speed test measures different aspects of your internet connection, such as download speed, upload speed, latency, and ping. It can also identify any issues with your connection. To run a speed test on your internet connection, you can follow these steps:
- Open your browser and choose an online speed test service. We recommend this.
- You’ll see a Go or Start button on the speed test website to initiate the test. Click on that button to begin the speed test.
- Wait for the test to complete.
- Analyze the results and use them to assess the performance of your internet connection.
It’s essential to note that speed test results can vary depending on various factors, including your internet service provider (ISP), network congestion, and the server location you are testing against. So, you may want to run the test at different times to get an accurate reading of the problem.
2. Update your network drivers
Time needed: 4 minutes
Update your network drivers to eliminate faulty, damaged, or corrupted drivers that trigger errors. Here’s how to do this:
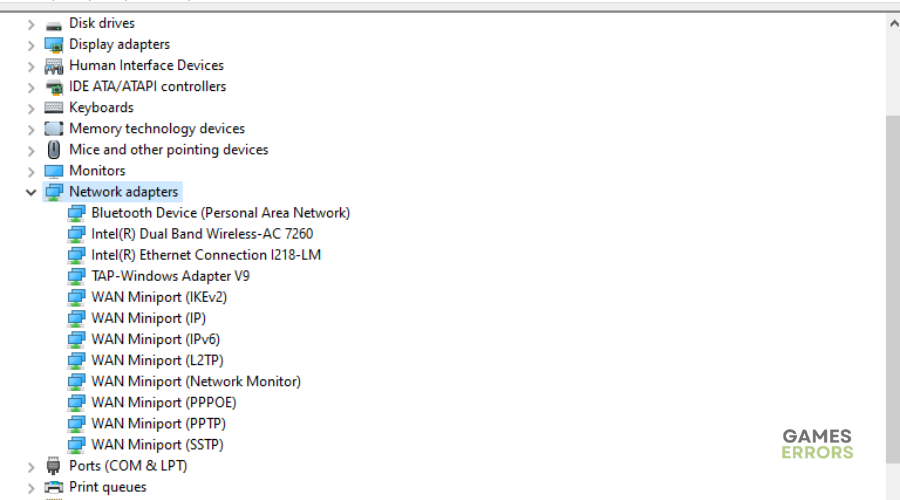
- Device manager
Press the Windows key + X on your keyboard and select Device Manager from the menu that appears.
- Network adapters
In Device Manager, locate the Network Adapters category and click on the arrow next to it to expand the list.

- Update driver
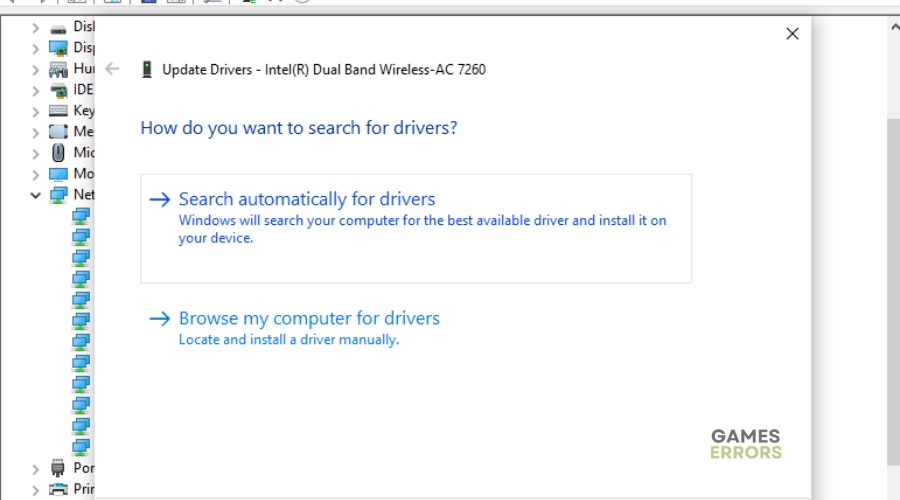
Find the network adapter you want to update, right-click, and select Update driver from the context menu.
- Choose the update method.
Choose the Search automatically for updated driver software option to allow Windows to search online for the latest driver software. If Windows finds an updated driver, it will install it.
- Restart
After the driver update, restart your PC to ensure the changes take effect, then launch XDefiant to see if the issue is solved.
Download and install Outbyte Driver Updater to automatically update your faulty and outdated network drivers, saving you time.
⇒ Get Outbyte Driver Updater
3. Disable VPN
While a VPN helps create a secure connection between your PC and the Internet, sometimes it can mess up the servers and make the connection unstable. Disable any VPN you use to establish a secure connection with XDefiant servers. Here’s how to do this:
- Look for the VPN client software running on your PC. You can find it in the system tray (bottom right corner of the screen) or in the taskbar.
- Right-click on the VPN client icon to open the context menu.
- In the context menu, look for an option to disconnect, disable, or turn off the VPN connection.
- Click on the appropriate option to disconnect or disable the VPN connection. This will terminate the VPN connection and revert your internet connection to your default settings.
Related articles:
- XDefiant Error Code 17004: Why & How To Fix Quickly
- XDefiant Slow Download Speed: How to Speed Up [Tested]
- XDefiant Low FPS: Simple Methods to Boost Performance
Conclusion
XDefiant’s FOXTROT-01 error can make playing this exciting game a nuisance. We hope some of our troubleshooting steps, like running a speed test, updating your network drivers, and disabling VPN, help fix the problem.