
Kickstarter campaigns are rapidly becoming the primary means of sales for many board game creators. Even alone, Kickstarter campaigns can be very lucrative, but there is potential to do more afterward. Even if you can’t get your game into physical stores, you can always set up shop online, whether through Amazon or through your own site.
Need help on your board game?
Looking for more resources to help you on your board game design journey?
Today’s focus will be on creating a shopping site that will collect money for pre-orders after your Kickstarter campaign ends. I am specifically referring to taking orders and payment early in exchange for games that you will send shortly after your Kickstarter games are fulfilled. There are five parts to this process:
- Setting up an online shop with your products.
- Testing the shop.
- Integrating the shop with your website.
- Directing people from your Kickstarter to your shop.
- Adding clear calls to action to push people to your shop.
Setup
For simplicity sake, I’ll teach you how to set up an online shop with the software I use for War Co.: Celery. I use it because the fees are low, the back-end is easy to use, and the interface is pretty slick. That checks all the boxes for me, but I encourage you to do your own research on other e-commerce solutions.
The first thing you will need to do is sign up for an account. Shortly after that, it will ask for your Stripe information so you can accept payments. If you’ve raised funds through Kickstarter, you already have a Stripe account so you will need to retrieve that information to set up Celery.

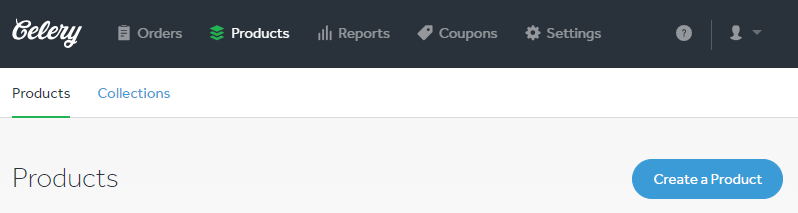
Shortly after logging in and entering your information, you will get to the main part of Celery. This is where you will set up everything else. The first part of your set up: adding products. Click Products. For each product, you want to add, click Create Product.
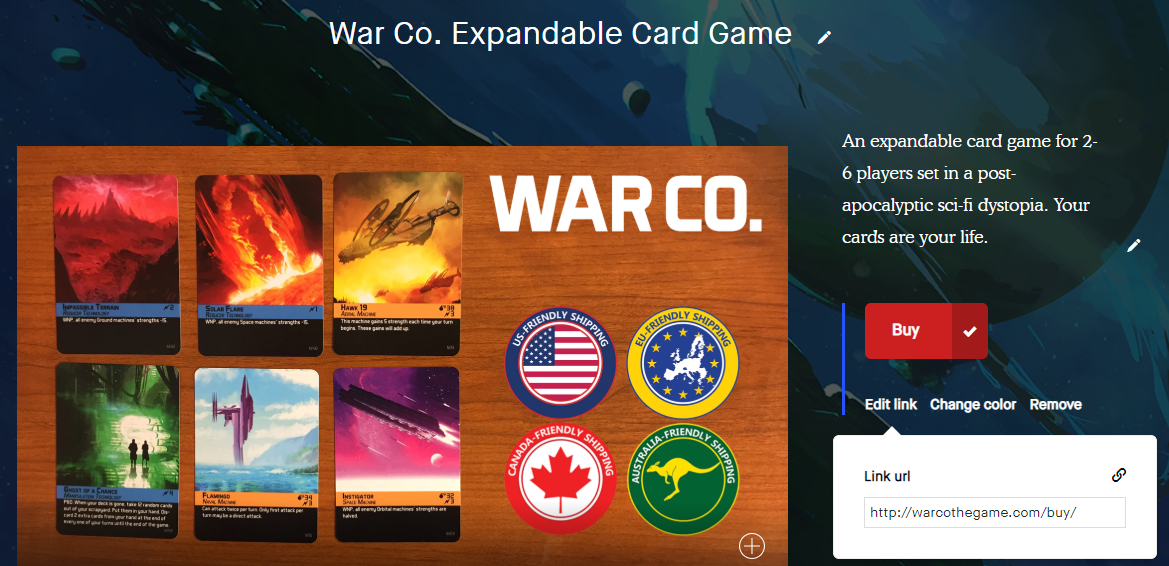
On the Products page, you will enter in all of the following information.
- Basic Info
- Name
- Description
- Image
- Pricing & Options
- Limit units total sold (good for inventory)
- My product has “Only one size, color or material” or “Multiple sizes, colors or materials”
- Price
- SKU
- Charge Taxes – leave this checked!
- Install on Your Website
- Publish – check this when you’re ready
Once you’re done, Save & Preview your item. When you’re happy with it, click Save.

After you’ve set up your products, click on Settings. Then click on Checkout.

Fill out the following information.
- Visual & Appearance
- Background Color
- Text Color
- Button Text
- Click Save when done
- Required Fields
- Shipping address
- Phone number
- Optional Fields
- Allow message from buyer (optional)
- Message to your buyers
- Click Save when done
- Order Processing
- Lock orders when paid / when fulfilled
- Confirmation Page
- Custom Scripts
- Custom URL
- Sharing
- Save each section when done

Click on Payments. Double check everything here. Is your Stripe account set up? Are you collecting the right currency and are you auto-charging orders or manually charging them?

Click on Shipping. Click Create Shipping Rule. For each product, set up Country, Shipping Method, First Item, and Each Additional Item as appropriate. For each Country that does not have an explicit shipping rule, it will be charged the “Rest of the World” rate (which you will also need to set).

Click on Taxes. At this point, you’ll need to refer to your local tax code to do the shipping right. However, the easiest way to get started is to make sure – if you are based in the USA – that you enter the ZIP code where you have a physical presence. That will allow Celery to automatically account for certain taxes.

Click on Notifications. Enter the following:
- Seller Information
- Business Name
- Business Email
- Click Save
- Buyer Email Notifications – when buyers will receive emails
- Order Placed
- Order Cancelled
- Order Updated
- Payment Charge Succeded
- Payment Charged Failed
- Payment Refund Succeeded
- Fulfillment Order Fulfilled
- Seller Email Notifications – when you will receive emails
- Order Created
- Order Cancelled
- Order Updated
Integrating
Integration can get complicated, but I’ll share the simplest version here. Go to each individual product and scroll down to the Install On Your Website section. For the I want to install as… dropdown box, click “a link I can share.” Then copy and paste the link onto your site. Make sure your product is published first!
Now a word of caution: it’s best to do this on a test version of your website before going live.
Testing
Speaking of testing, you need to act as your own customer. Make sure items show up correctly – they should have the right prices and the right tax rates. Have a friend or a fan make an actual purchase on your system and make sure both they and you get the notifications you should when you should.
Don’t shortcut this!
Redirecting from Kickstarter
Once you’ve set up your shop and tested it, make sure to set up a call to action on your Kickstarter page. This is easy to do – just go to your campaign page and edit the button on the right side of your campaign picture, as I’ve shown below.
Calls to Action
Don’t forget to set up calls to action on your own website and social media, too. Clearly labeled buttons and well-made product photos go a long way!
Setting up a shop where you can take pre-orders is a straightforward task. Once you do it, you can very smoothly transition from Kickstarter campaign to taking pre-orders, which will allow you to take advantage of the continued spotlight and make a little more money.
Do you have any questions about setting up shop? Ask away in the comments 🙂


2 thoughts on “How to Take Pre-Orders when Your Board Game Kickstarter Ends”