Preview Here: Preview Link
Introduction to UVs
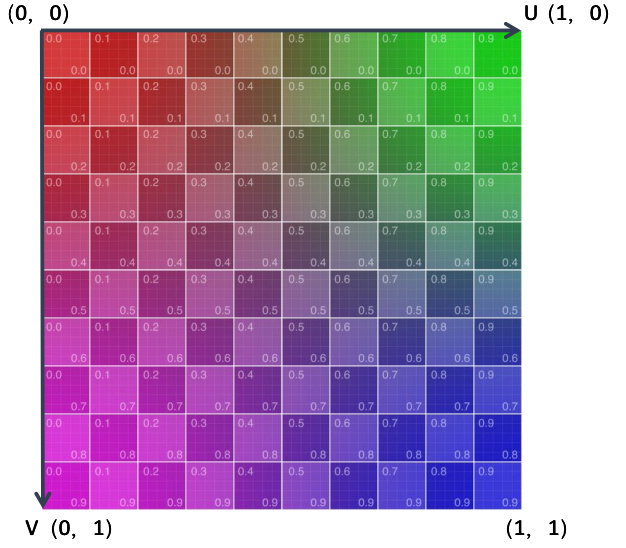
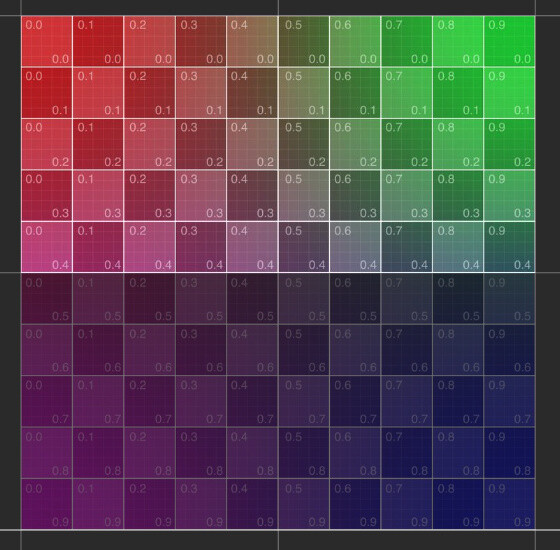
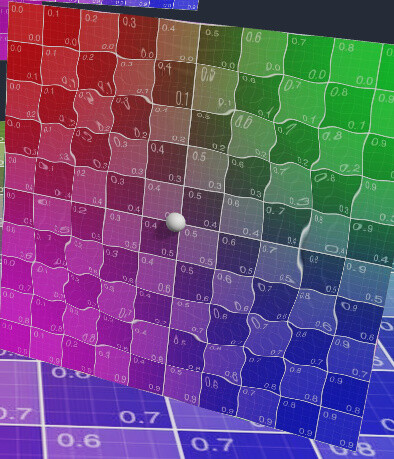
The reason for naming it as UV is that X, Y, and Z have already be used by 3D coordinates. In order to distinguish it from 3D, so it is named as UV. Among them, U refers to the horizontal axis, V refers to the vertical axis, and the range of UV is 0 to 1.
 )
)
The vertical axes of textures and picture pixels is shown above, when sampling textures in shaders, that is from top to bottom, which is top-right corner.
This is consistent with how most image file formats store pixel data, and with how most graphics APIs work (including DirectX, Vulkan, Metal, WebGPU, but not OpenGL).
Due to the difference from OpenGL (and frameworks based on it). If your previous development experience is based on OpenGL, you may find that the texture on your grid is vertically flipped. You have to use the upper left corner as the origin of the UV, which need to make some adjustments.
UV is also inconsistent with the world coordinate system used elsewhere in Cocos (the Y axis points upward, as shown in the figure below), and this issue should also be paid attention to when calculating the UV position through world coordinates.

Use UV in Shader
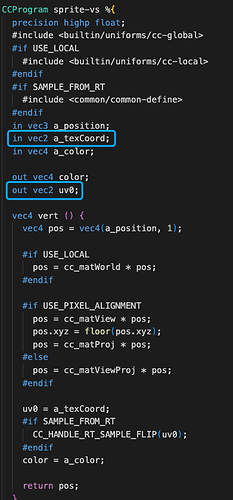
Both 2D and 3D shaders in Cocos are obtained in the vertex shader (VS) and passed to the pixel shader (FS).
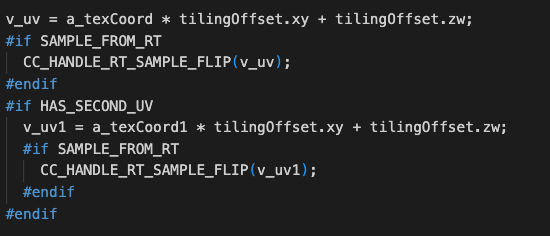
By default, the 3D Shader of Cocos will multiply the tile Tilling and add the Offset, and it also supports the flip repair for RenderTexture.
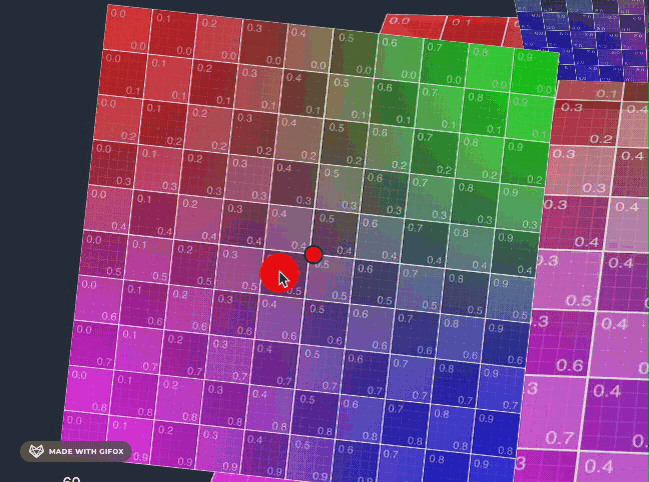
The following shows a small application of UV effect
  vec4 frag() {
     vec4 col = mainColor * texture(mainTexture, v_uv);

     vec2 uv = v_uv;

     if(uv.y>0.5){
       col.rgb *= 0.5;
     }

     CC_APPLY_FOG(col, v_position);
     return CCFragOutput(col);
   }
When the V of UV is greater than 0.5, the RGB of the color will be multiplied by 0.5 to make the color in bottom darker.
By dynamically changing this value, a simple animation effect can be achieved.
More applications of UV in Shader
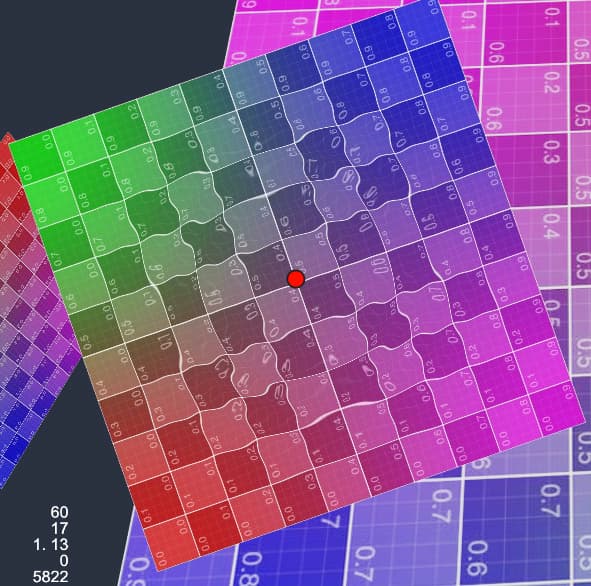
UV can be widely used in effects such as frame animation and water ripples.
Here are the implementation of water wave effects on 2D sprites and 3D meshes: Preview Link
The math behind it is simple, the water wave is simulated by the Sin function, and then the fluctuation range is increased in the Update function.
vec2 waveOffset (in vec2 uv0) {
       float waveWidth = 0.25;
       vec2 uv = uv0;
       #if USE_WAVE
       vec2 clickPos = vec2(waveFactor.x-uv0.x,waveFactor.y-uv0.y);
       float dis = sqrt(clickPos.x * clickPos.x + clickPos.y * clickPos.y);
       float discardFactor = clamp(waveWidth - abs(waveFactor.w - dis), 0.0, 1.0)/waveWidth;
       float sinFactor = sin(dis * 100.0 + waveFactor.z * 10.0) * 0.01;
       vec2 offset = normalize(clickPos) * sinFactor * discardFactor;
       uv += offset;
       #endif
       return uv;
   }
Some optimizations are applied here, where the UV will be calculated in advance in update function (to save GPU), and a Vec4 is used to set the Shader parameters.
Use water effect on 2D sprite
@ccclass('spTouchExample')
export class spTouchExample extends Component {

     @property
     waveDis = 0.4;
     @property
     waveSpeed = 1;
     @property
     waveStr = 0.5;
     @property(Node)
     debug: Node = null;

     @property(Label)
     debugText: Label = null;

     public waveProp: Vec4 = new Vec4();

     private _trans: UITransform;
     private _pass: renderer. Pass;
     private_handle: number;

     start() {
         this._trans = this.node.getComponent(UITransform);

         this._pass = this.node.getComponent(Sprite).material.passes[0];

         this.waveProp.w = 100;

         this.waveProp.z = this.waveStr;

         this._handle = this._pass.getHandle("waveFactor");

     }

     onEnable() {

         this.node.on(Node.EventType.TOUCH_START, this.onTouchStart, this);
     }

     onDisable() {

         this.node.off(Node.EventType.TOUCH_START, this.onTouchStart, this);

     }

     onTouchStart(event: EventTouch) {

         const touch = event. touch;

         touch.getUILocation(v2_0);

         v3_0.set(v2_0.x, v2_0.y);

         this._trans.convertToNodeSpaceAR(v3_0, v3_0);

         this.debug.setPosition(v3_0);

         const size = this._trans. contentSize;

         const x = size.x;

         const y = size.y;

         v4_0.x = (x * 0.5 + v3_0.x) / x;

         v4_0.y = 1 - (y * 0.5 + v3_0.y) / y;

         v4_0.w = 0;

         this.waveProp.set(v4_0);

         this.debugText.string = "Clicked: " + this.node.name + " UV: " + v4_0.x.toFixed(2) + ", " + v4_0.y.toFixed(2);

     }


     update(dt) {

         if (this. waveProp. w < 100) {

             this.waveProp.w += dt * this.waveSpeed;
             if (this.waveProp.w > this.waveDis) {
                 this.waveProp.w = 100;
             }
             this._pass.setUniform(this._handle, this.waveProp);

         }

     }


}
Here, touch listeners are added to the sprite node, and the clicked UI world coordinates are converted into the local coordinates of the picture, and then the position of the UV is calculated by using the local coordinates and the length and width of the picture, and at last the uniform parameter of the material is set in the update.
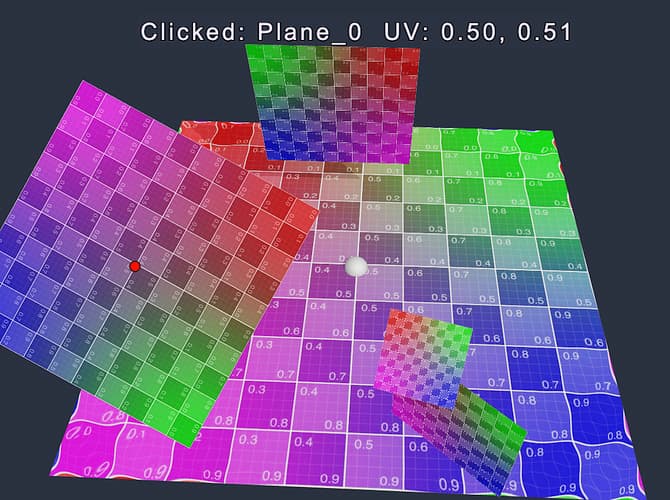
Use the water wave effect on the 3D meshes
This is only for 3D planes with tiled UV Mapping.
onTouchStart(event: EventTouch) {
         const touch = event. touch!;
         this.cameraCom.screenPointToRay(touch.getLocationX(), touch.getLocationY(), this._ray);
         this.rayHit();

     }

     /* check model hit */
     rayHit() {
         let distance = 300;
         let mesh: MeshRenderer
         for (let v of this. meshes) {
             let dis = geometry.intersect.rayModel(this._ray, v.model);
             if (dis && dis < distance) {
                 distance = dis;
                 mesh = v;
             }
         }

         if (mesh) {
             this._ray.computeHit(v3_0, distance);
             const node = mesh. node;
             m4_0.set(node.worldMatrix);
             const halfSize = mesh.model.modelBounds.halfExtents;

             const scale = halfSize.x * 0.1 * node.scale.x;

             this.debug.setWorldPosition(v3_0);

             this.debug.setScale(scale, scale, scale);

             m4_0.invert();
             Vec3. transformMat4(v3_0, v3_0, m4_0)


             if (halfSize.y == 0) {

                 const x = halfSize.x;
                 const z = halfSize.z;

                 v4_0.x = (x + v3_0.x) / (x * 2);
                 v4_0.y = (z + v3_0.z) / (z * 2);
             } else {
                 const x = halfSize.x;
                 const y = halfSize.y;
                 v4_0.x = (x + v3_0.x) / (x * 2);
                 v4_0.y = (y - v3_0.y) / (y * 2);
             }

             v4_0.w = 0.1;

             const meshCtrl = node. getComponent(meshTouchCtrl);

             meshCtrl.waveProp.set(v4_0);

             this.debugText.string = "Clicked: " + node.name + " UV: " + v4_0.x.toFixed(2) + ", " + v4_0.y.toFixed(2);

         }
     }
The location of the touch will be detected by the screen ray.
It will be different from calculating UV in sprite, first by multiplying the world coordinates of the clicked position with the inverse world matrix of the plane node, so the world position of the clicked position will be converted into the local position under the plane node. When clicked, it judges the object by its bounding box to determine whether it is a Quad or a Plane (Cocos built-in basic geometry, confirmed by semi-surrounding), and calculates the UV coordinates from the clicked position.