Welcome to the complete tutorial on making an Endless runner game using Unity’s Visual Scripting. We will start off with the basic introduction of what is visual scripting and then get into making our endless Runner. You can download the whole Unity package from the end of this tutorial. Let’s get started.
Getting Started with Unity Visual scripting
Bolt was a visual scripting asset in Unity asset store and Unity acquired. From Unity 2021, bolt is repackaged as visual scripting inside the Unity editor. So, if you’re using a Unity editor that is after 2021 then you don’t need to import any type of packages because visual scripting is imported by default and if you are using a Unity editor which is older than 2021 that is 2020 or 2019 then you have to download a package called Bolt.
Initially bolt was not free but after Unity acquired it, bolt is made completely free so if you are using an older version just go to the Asset Store, download Bolt and import it. Now there is one more visual scripting tool called Playmaker.

You can read more about it in our post on Bolt vs Playmaker. By default, the visual scripting package is imported into all projects. If for some reason it’s not imported then you can go to package manager, make sure Unity registry is selected and search for visual scripting and then you can install it.
Now to add the visual scripting graph to your game object, just select the game object and click on add component and search for script machine. Once you add script machine component, you’ll also see a component called variables added to your game object.
You can see that there is a drop down here near the source and if you select embed then this visual script can only be used with this game object. It’s better to go with the graph, so that you can use the same script on different game objects. To create a new graph, click on new and let’s just give it a name, we’ll say test and then press enter.
To edit the graph, you can just click on edit graph. When you create a new graph, Unity adds the start and the update nodes to the graph. When you open the graph for the first time Unity takes some time and loads all the node options and once all the nodes are loaded the graph editor will be displayed.
Using Visual Graph
- To add a node, just right click on the workspace and search for the node that you want to add.
- To delete a node, Select the node and press delete on your Keyboard.
- Drag your mouse from one connection point to another to connect two nodes.
- Select a connection and press delete to remove it.
- Press escape to remove the connection line if you decide not to connect in between.
Small Exercise
- Create a new Test Graph
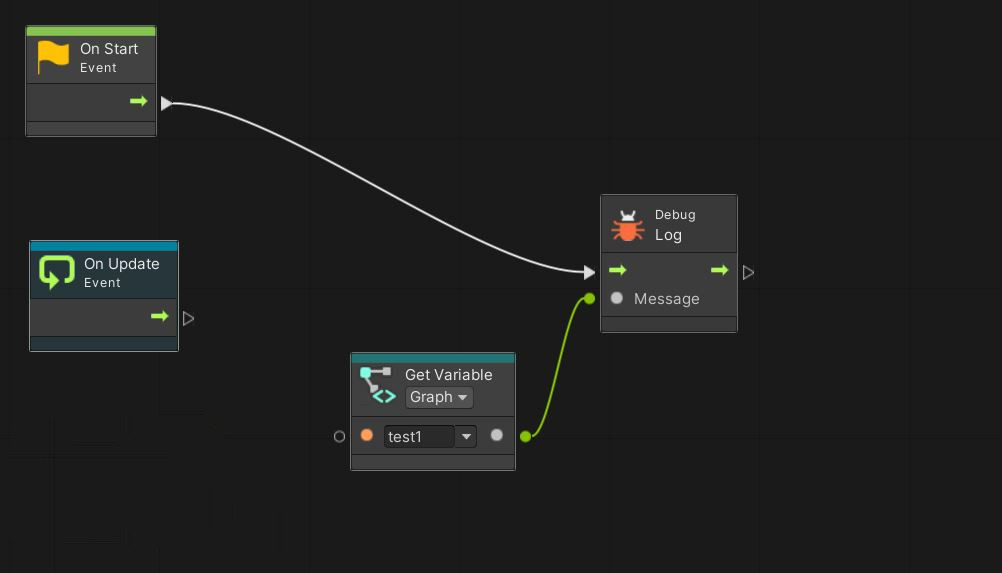
- Add a new variable called test1.
- Click on Edit Graph to open the graph editor.
- Select the object variable tab on the left and drag the test1 variable on to your workspace.
- In the Start event connect a debug log node.
- Pass the value of test1 as message to debug log.
Testing out the basic Nodes in Unity Visual scripting
Transform Position
You can use get transform position and set transform position nodes to get and set the position of a gameobject in runtime. These nodes get and set the values on the transform component attached with the game object.
Transform Rotation
You can get and set the rotation of a gameobject using the rotation nodes. By default, the rotation has a Quaternion output. If you need to get the values or set the values in Euler angles then you can use the Get or Set Euler angles node.
Wait for seconds
Wait for seconds node delays the process after the node by the time specified by the user. But this node can only be used inside a Coroutine. If you want to delay a process inside the normal function then you can use the timer node.
Destroy
This node can be used to destroy a game object or a component attached to the game object. There are multiple variants of this node that you can select depending on what you want to destroy. You can also pass in different game object if you want to destroy that.
Instantiate
Instantiate is the node that you will use when you want to spawn game object. Depending on the level of control that you need while spawning a game object you can select the variant of the instantiate node. For example, if you want to just spawn the game object without specifying the position or rotation then you can just select Instantiate (Original).
Setting up the Scene and Player Movement
Scene Setup
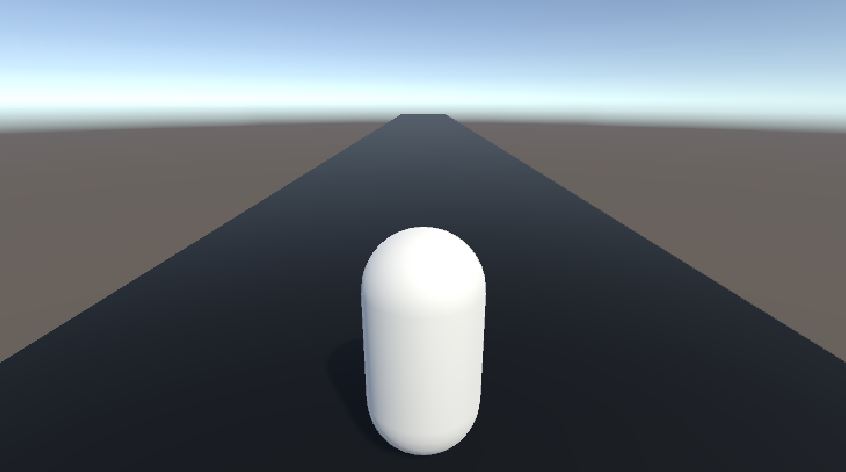
We are going to create a very basic endless runner. Let’s add a Plane which will be our ground. Set the scale of the ground to 10 in the z-axis. Now add a Capsule to the scene and move it to the end of the plane. Make sure, when we increase the z position of the capsule it moves in the forward direction. Adjust the camera to look in the forward direction. The game window should look like this.
Select the Capsule and add a Rigidbody component by going to the inspector window. Rigidbody component is required to add physics forces to your game object and to detect collision.
Player Movement Visual Script
Select the capsule and click on Add Component in the inspector window. Search for script machine and add it. In the variables component add a variable speed of type float.
Click on new graph and save the graph as PlayerMovement. Click on Edit graph to open it. Delete the Update node and add a Fixed Update node.
Drag and drop the speed variable on to the workspace. Then add an Input axis node, multiply node, create vector3 node and a Set velocity node.
Connect them as shown in the image below.

Close the graph and set the value for speed in the inspector window.
Play the game and test if the visual script is working.
Making the Camera follow the player using Visual script
There are multiple ways to make the Camera follow the player in Unity. You can read more on our detailed post on camera follow player in Unity. For this tutorial, we will create a visual script to do the same.
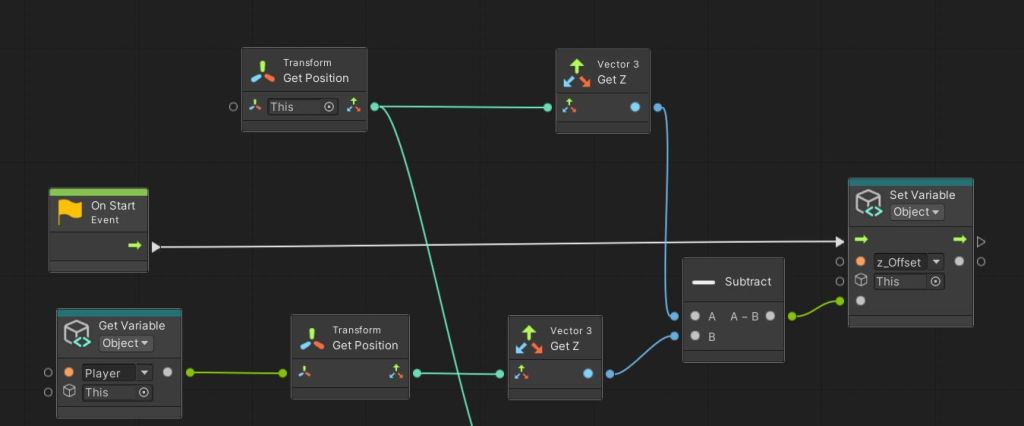
We will initially set the camera’s view and then get the camera position in our start event. Then we will set the difference between the camera’s z position and player’s z position as the offset. Then we will update the Camera position based on player movement.
Add a script machine and create a new graph camera_follow.
Creating variables
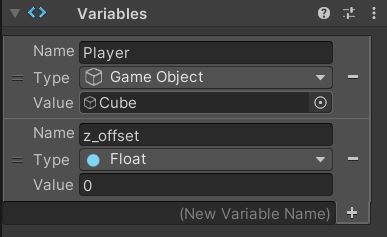
- We need two variables for this process.
- First one is a gameobject which will be our player.
- The second one is a float that will have the offset value of the camera’s z-axis.
- Drag and drop the player gameobject as the value for the Player variable.
- Leave the offset value as 0. We will set it in the Start function.
Editing the flow graph
- Click on edit graph in the inspector window.
- Add set variable block near the start event.
- Add a get position block and a get z block for the Camera and one for the Player.
- Take the z value from the transform and subtract the Camera z position with the Player z position.
- Select the difference to z offset and connect the start event to the set variable block.
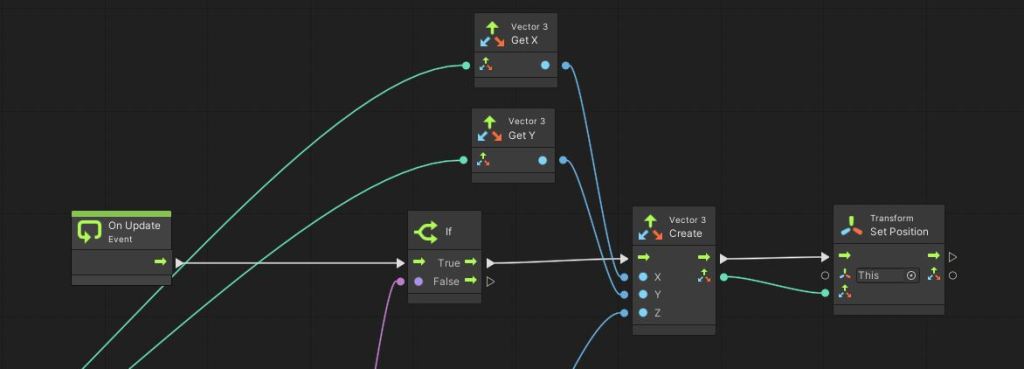
- In the Lateupdate event add get variable, get position, get z, get x, add and set position block.
- Set the get variable block to type object and select player as the variable.
- Connect output of get variable to the get transform block. This way we can get the position of the player.
- Get the x and z position from the get position block of the Player transform. Add the z value with the float variable from start event.
- Get y from the get position of camera in the start event.
- Create a new vector 3 and assign x, y and z from the Get X, Get Y and Get Z blocks.
- Connect the vector3 to set position of the camera

Making the Plane spawn Endlessly as the Player Moves
We can either spawn multiple grounds or we can move the ground in front of the player as he/she moves forward. If we spawn multiple grounds then we also need to destroy them. So, the best way will be to have two instance of the ground and move one instance to the front as the player moves.
Let’s Duplicate the Plane in scene by selecting the plane and pressing Ctrl (Cmd)+D. Move the duplicated plane behind the original plane. Since my original plane is at 0, 0, 0 and the plane size is 100 in z. I will move the new plane to 0, 0, -100. Now select the original plane and add a script machine to it.
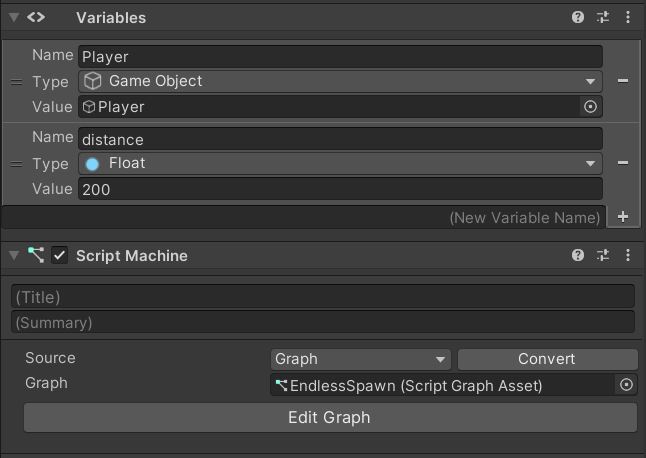
Create two variables Player and Distance. The distance is basically twice the size of your plane. The plane in our scene is 100 Units in length so let’s set the distance at 200.
Create a new Graph and name it EndlessSpawn. Click on Edit Graph.
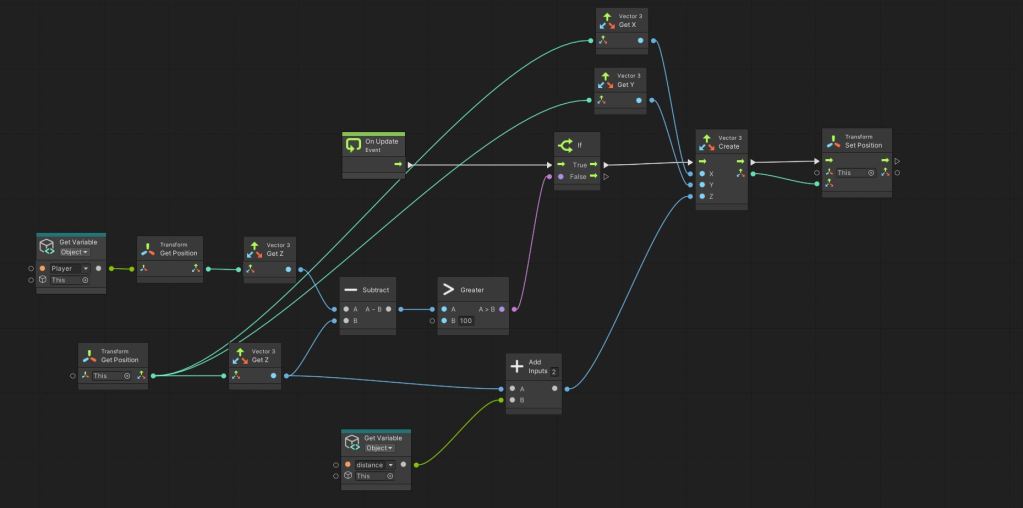
The logic we are going to build is, when the player is more than 100 units away from the ground then we will move the ground by 200 units which will put the ground in front of the player. If your ground is 300 Units in length then check if the player is 300 Units away from the ground and move the ground by 600 Units.
Create a visual graph as shown in the image below.
The Condition for moving the plane

the Update function
Complete Logic
Before we move forward, we need to attach the same graph and variable component to the duplicated ground. You can click on the three dots on the script machine component to copy the component and paste it on the other ground.
Spawning Obstacles & Progressive Difficulty
We are going to spawn the obstacle at a particular distance from the player. So, let’s create an empty game object and call it Obstacle Spawner. Let’s set the z as -40. Just make sure that the obstacle spawner is not outside the ground. Set the Y so that the spawned object is not buried inside the ground. In our case, let’s use the standard Unity cube as Obstacle so let’s set the Y at 0.5. We will set the x position randomly using script.
Add a 3D cube to the scene by clicking on the + sign in the hierarchy window>3D Object> Cube. Reset the transform. Name it as obstacle. Drag and drop the cube to the project window. This will convert it into a prefab. Now you can delete it from the Hierarchy. Set the tag of the prefab as Obstacle.
Make the Obstacle spawner a child of the Player game object. Now add a script machine component to it.
Add two variables to it. One is the prefab that needs to be spawned and the next one is the time interval in which we will spawn the obstacle. Drag and drop your cube prefab from project window on to the prefab folder.
Create a new Graph called ObstacleSpawn and click on Edit graph.
We will generate a random x value and spawn obstacles in the time interval. Then we will reduce the time interval to spawn the obstacle faster.
Since we are doing it in the start function, we will have to connect the last node back to timer start so that the obstacles keep on spawning.

Increasing player speed and destroying player on Collision
To increase the player speed, just add the fixeddeltatime node with the speed and set the new value to the speed variable in the player movement graph.

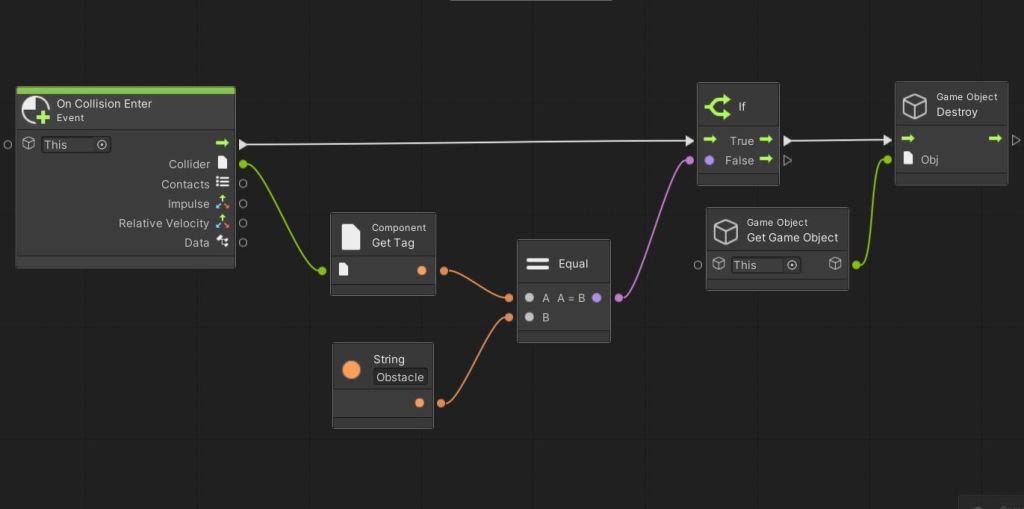
To detect collision, let’s use the OnCollisionEnter node and check if the collided object has an Obstacle tag. If yes then destroy the player.
Destroy the obstacles once the player has crossed them
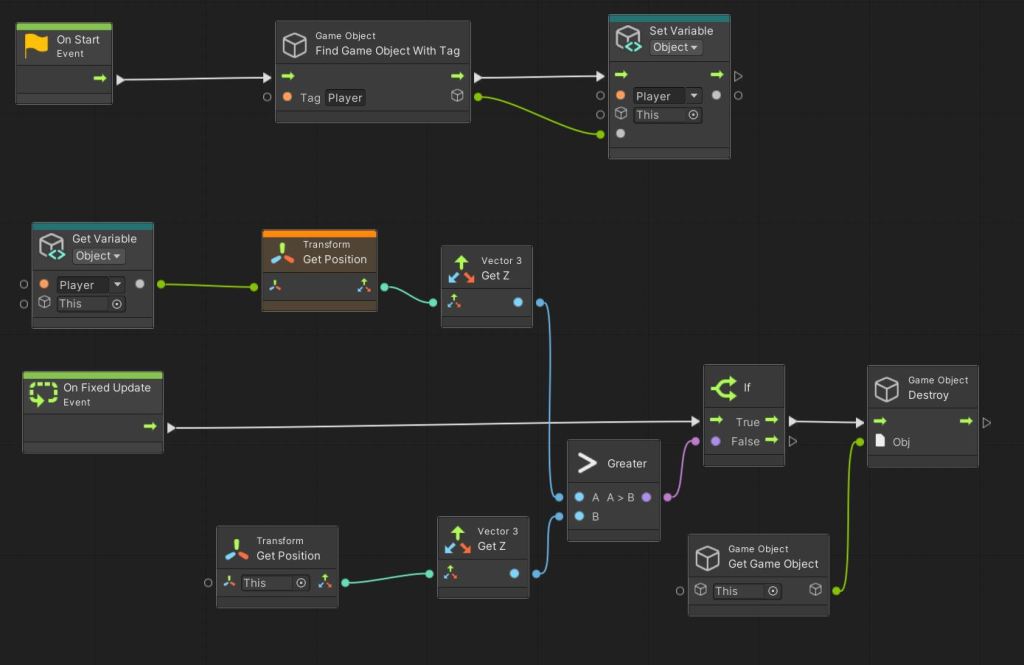
First, let’s set the tag of the player as Player. This is required to get the player gameobject from the obstacle. We cannot assign the player as we did in other graphs as the obstacle is spawned in Runtime.
Let’s add a selfdestroy graph to obstacle and a Player variable.
In the start, we will get the player and in the Fixed Update we will check if the player has crossed the obstacle. If so, we will destroy the obstacle. You can also use object pooling to move the obstacle in front of the player to improve performance.
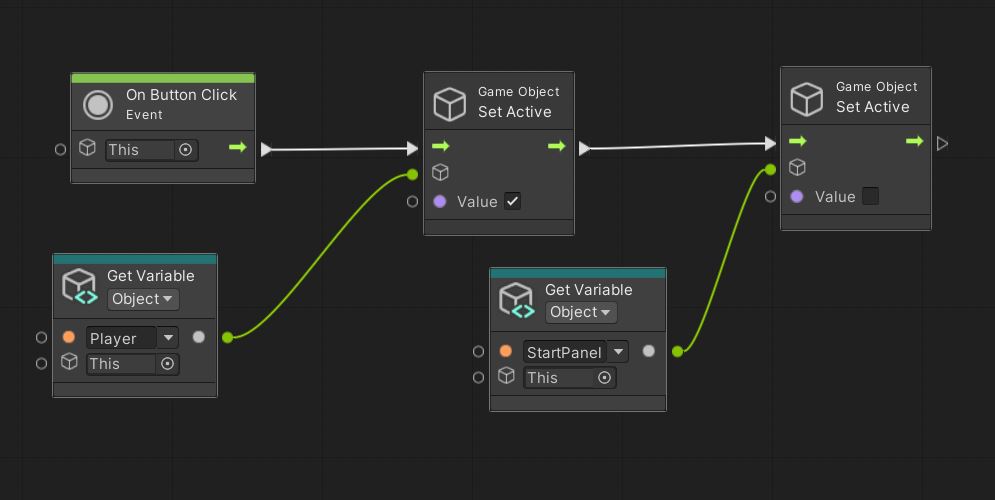
First, we need a start menu. So go the Hierarchy window, click on the + sign>UI>Panel. Name it as starts panel. Right Click on the start panel and add a button to it. Rename it as Start. We need a logic to start the game when the player presses the start button.
Add a script machine to the start button. Also add a player variable and drag and drop the player to the variable. Add another variable called StartPanel and assign the start panel to it. Before you build the logic disable the player in the Hierarchy window. We will enable the player when the game starts and disable the start panel.
Here is the graph for the start button
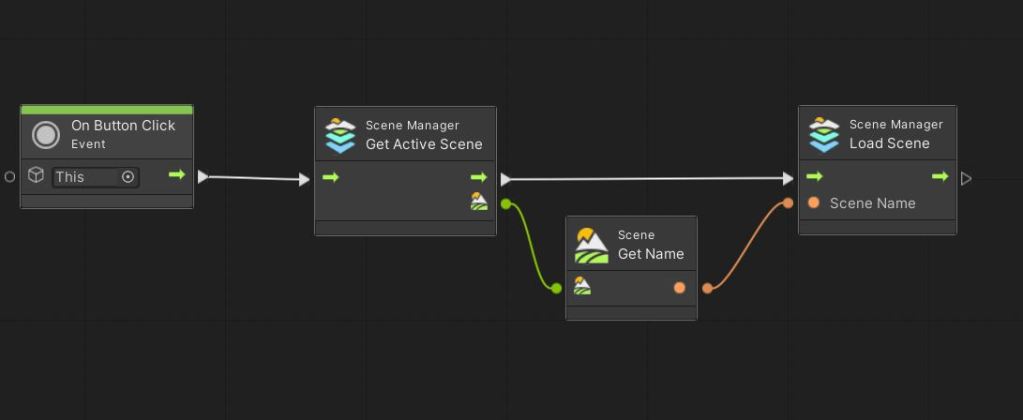
Duplicate the start panel to create a restart panel. Rename the panel as restart. Make sure you update the button text. Add a new graph to the restart button. We don’t need any variables for restart.
Here is the logic for restart
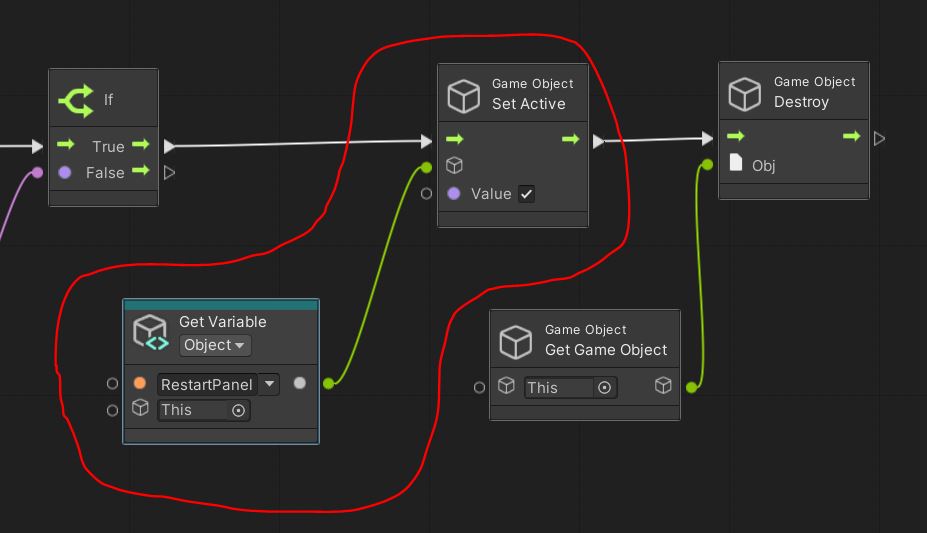
We need to enable the restart panel before the player is destroyed. Open Player Movement graph and edit it as shown below
Thats it. You have created a complete endless runner game in Unity. You can replace the Ground, Obstacle, Player with animated assets of your own and have a great looking game in no time.
Download the Template
The whole Unity package is available to download on Itch.io. You can get it for free. Consider donating to help us create more templates like this.