
Cocos Shader Series - Use a Noise Map to Make a Dissolve Texture
Series Chapters
- Basic Introduction
- Build A Triangle
- Draw More Things
- Add Some Texture
- Draw Shaders With Cocos Creator
- Change a shader with a texture map
- Use a Noise Map to Make a Dissolve Texture
- Building With WebGL
- Alpha Testing and Blending
- Blend Testing
In the previous chapter, we successfully used custom effects and materials to replace the built-in materials of the Sprite component. In this chapter, we try to modify the custom Effect to achieve the texture dissolving effect.
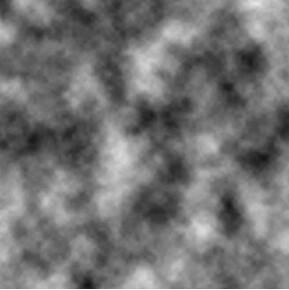
To achieve this effect, you need to mark which pixels are displayed and which pixels disappear. A better way is to use a noise map to mark each pixel. A noise map is similar to the figure below. A noise map has only three colors of black, white, and gray. The black, white, and gray are not uniformly distributed, leading to an irregular dissolution effect.
The most straightforward production of the dissolving effect usually requires two parameters: the noise map and the threshold for controlling the filtering of black/white pixels. Let’s try to define these two parameters.
Cocos Effect
CCEffect
In the previous article, we know that the CCEffect package is a rendering process description list edited in YAML format. The main content involves interaction with the editor and data interaction with CCProgram. Recalling the structure of CCEffect, the content is roughly the following:
CCEffect %{
    techniques: # technique Rendering technology represents the completion of a final effect plan. A plan can be completed by the integration of one or more Passes.  - passes: # A pass is a GPU drawing, which generally includes a vertex shader and a fragment shader.
      - vert: vs:vert
      frag: fs:frag
}

CCProgram vs %{
    //...
}

CCProgram fs %{
    //...
}
This is the most basic shader declaration (for example, the shader of the graphics component Graphics). If you want to add a parameter or texture, it cannot be satisfied. So we need to understand more parameters of pass. The most commonly used parameters are as follows:
Parameters
| Property Name | Description | Notes |
|---|---|---|
| properties | It stores the customizable parameters in the pass that need to be displayed on the property inspector | Refer to the properties parameters table |
| blendState | Mixed state of the material | Please refer to the mixing section in the pass parameter list of the Cocos Creator manual |
| depthStencilState | Depth & template direction status | The corresponding depthStencilState section of the pass optional configuration parameter of Cocos Creator manual |
| rasterizerState | Rasterization status data processing. At present, only the face culling option can be configured | Please refer to the RasterizerState section in the pass parameter list of Cocos Creator manual |
| switch | Specifies a power switch for the current pass. It could be any valid macro name that’s not defined in the shader. The macro name shouldn’t collide with any existing macros inside the shader | This property doesn’t exist by default, which means the pass is executed unconditionally |
Among them, blendState, depthStencilState, and rasterizerState can be worked on.
Properties
| Property name | Default value | Transparent term | Notes |
|---|---|---|---|
| target | undefined | undefined | Any valid uniform components, no random swizzle |
| Value | Refer to default values | ||
| editor.displayName | “ | Refine parameter of any string | |
| editor.type | vector | vector, color | Parameter type |
| editor.visible | true | true, false | Whether the parameter is visible to the editor |
| editor.tooltip | “ | Parameter usage prompt, any string | |
| editor.range | [min,max,[step]] | Parameter value range | |
| editor.slide | falsetrue | Whether the parameter values should be changed, which can be used in combination with the range | |
| editor.parent | “ | Specifies that a macro can only be used when it is enabled | |
| sampler.minFilter/magFilter | Linear | None, point, linear, anisotropic | Picture wrapping |
| sampler.addressU/addressV/addressW | wrap | wrap,mirror, clamp, border | Picture wrapping |
Defalut values
| Type | Default value | Optional |
|---|---|---|
| int, ivec2/3/4 | ||
| float, vec2/3/4 | ||
| sampler2D | default | Black, grey, white, normal, default |
| samplerCube | default-cube | Black-cube, white-cube, default-cube |
For more pass and properties parameters, please refer to the pass parameters list in the reference below.
After understanding some crucial parameters, you can start to define parameters. Add some content to the final modified shader in the previous chapter:
CCEffect% {
Techniques:
- passes:
- Vert: VS: Vert
the frag: FS: the frag
blendState:
Targets:
- Blend: to true
BlendSrc: src_alpha
blendDst: one_minus_src_alpha
blendDstAlpha: one_minus_src_alpha
rasterizerState:
cullMode: none
Properties:
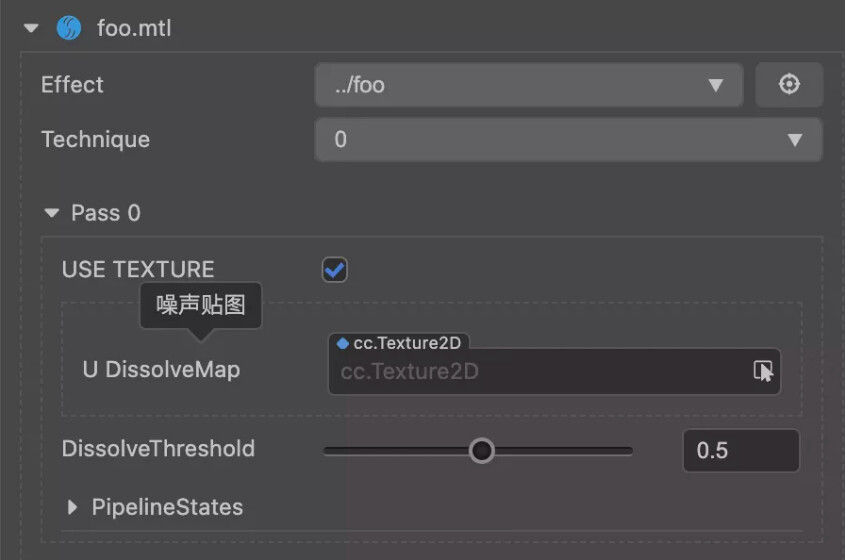
u_dissolveMap: {value: White, editor: {tooltip: 'Noise map' }}
dissolveThreshold: {value: 0.5, editor: {range:[0, 1, 0.01], slide: true , tooltip: 'dissolution threshold' }} # The parameters defined here are all Must point to the uniform declared at CCProgram
}%
CCProgram vs %{
precision highp float ; #inc lude <cc-global> in vec3 a_position; in vec2 a_texCoord; in vec4 a_color; out vec4 color; out vec2 uv0; vec4 vert () { vec4 pos = vec4 (a_position, 1) ; pos = cc_matViewProj * pos; uv0 = a_texCoord; color = a_color; return pos; } }% CCProgram fs %{ precision highp float; in vec4 color;
uniform Dissolve{
float dissolveThreshold;// Lava threshold [0, 1];
}; #if USE_TEXTURE in vec2 uv0; uniform sampler2D u_dissolveMap;// Lava shape texture; #pragma builtin(local) layout( set = 2, binding = 10) uniform sampler2D cc_spriteTexture; #endif vec4 frag () { vec4 o = vec4 (1, 1, 1, 1); #if USE_TEXTURE o *= texture(cc_spriteTexture, uv0); #endif o *= color; return o ; } }%
Then, go back to the editor, select the material, and you can see that two new adjustable parameters have been added:
After correlating the noise, process the solubility according to the dissolution threshold:
CCEffect% {
  Techniques:
  - passes:
    - Vert: VS: Vert
      the frag: FS: the frag
      blendState:
        Targets:
        - Blend:  to true
            BlendSrc: src_alpha
            blendDst: one_minus_src_alpha
            blendDstAlpha: one_minus_src_alpha
      rasterizerState:
            cullMode: none
      Properties:
            u_dissolveMap: {value: White, editor: {tooltip:  'Noise map'  }}
            dissolveThreshold: {value: 0.5, editor: {range:[0, 1, 0.01], slide:  true , tooltip:  'dissolution threshold'  }}  # The parameters defined here are all Must point to the uniform declared at CCProgram
 }%

CCProgram vs %{
  precision highp float;
  #include <cc-global> in vec3  a_position; in  vec2  a_texCoord; in vec4  a_color;   out vec4  color;  out vec2  uv0;   vec4  vert () {   vec4  pos =  vec4 (a_position, 1);     pos = cc_matViewProj * pos;     uv0 = a_texCoord;     color = a_color; return  pos;   } }% CCProgram fs %{

  precision highp float;

  in  vec4  color;

  uniform  Dissolve{
    float  dissolveThreshold;// Lava threshold [0, 1];
  };

  #if  USE_TEXTURE
    in  vec2 uv0;
    uniform sampler2D  u_dissolveMap; // The texture of the lava shape;
    #pragma builtin(local)     layout( set  = 2, binding = 10)  uniform sampler2D  cc_spriteTexture;   #endif    vec4  frag () {   vec4  o =  vec4 (1, 1, 1, 1); float  value = 1.0;     #if USE_TEXTURE    vec4  dissolveMap = texture(u_dissolveMap, uv0); // If the r component of the color Less than the threshold, discard this coloring operation;         value *= dissolveMap.r;     #endif if (value <dissolveThreshold) {
      discard; // Discard fragments smaller than the threshold to form a dissolution
    }

    #if USE_TEXTURE       o *= texture(cc_spriteTexture, uv0); // Blend with the original texture;     #endif     o *= color; if  (value <dissolveThreshold + 0.05) {       o = vec4(0.9, 0.6, 0.3, oa); // Set an edge over color on the edge of the dissolve     } return  o;   } }%
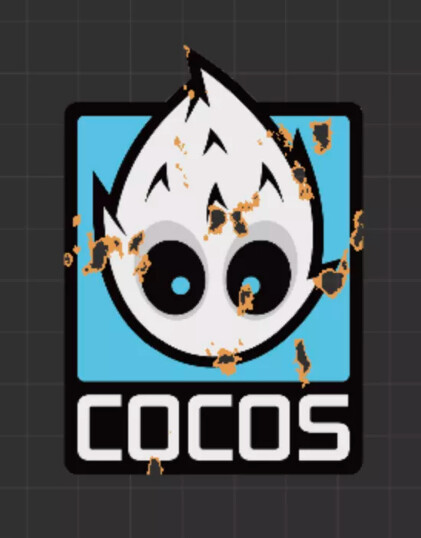
Finally, I replaced the original image with the Cocos logo and adjusted the threshold to 0.2. The effect of the screen presentation is as follows:
If you want to modify the threshold at runtime, you can use the following methods:
const sprite = this.getComponent(Sprite);
const mat = sprite.customMaterial;
mat.setProperty('dissolveThreshold', 0.5);
So far, we have completed the transformation of a shader, and it seems very simple? Getting started with the shader requires us to keep trying, so you must try more shader transformations when you are learning. There are also many examples on the Internet, and you can try them out.