
Preface
In the last article, Kylin shared how to add your own post-effect Shader in the custom render pipeline in Cocos Creator 3.8. However, based on the BlitScreen solution, we can only write the simplest post-effect Shader. If we want to support more complex Shaders, such as Blur, Depth of Field, and other effects, we need to work with the code to build it.
Today Kylin will use Gaussian blur to demonstrate how to write a multi-pass post-effect shader.
Prepare the Shader
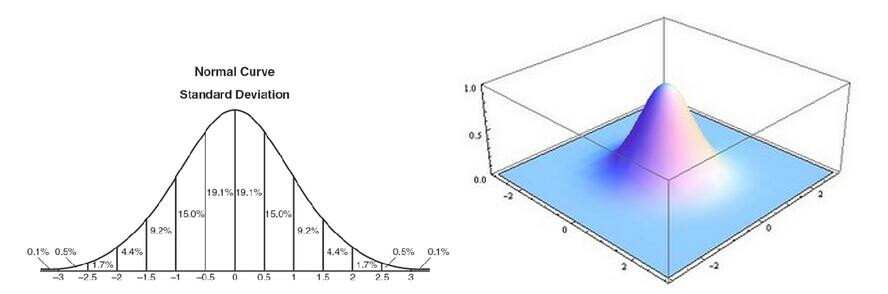
Gaussian blur is more involved with normal distributions, Gaussian functions, and Gaussian convolution kernels.
If you’re not interested in math, don’t worry about any of the above.
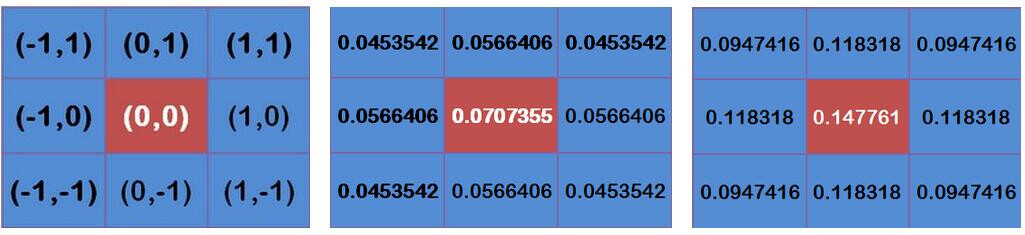
Simply put, Gaussian blur takes every pixel on an image and processes it with the following process.
To put it bluntly, it’s a simple weighted sum: while sampling the target pixel, sample some of the surrounding pixels and give each pixel a weight (the sum of the weights is 1.0). Final pixel value = sum of all (pixels * weights).
If you want good results, iterate a few more times; the more iterations, the better the picture, but the higher the performance overhead.
To create, we create a Cocos Shader file named “gaussian-blur.effect” and write the following.
CCEffect %{
  techniques:
  - passes:
    - vert: blur-hor-vs
      frag: blur-fs
      pass: blur-x
      depthStencilState:
        depthTest: false
        depthWrite: false
    - vert: blur-vert-vs
      frag: blur-fs
      pass: blur-y
      depthStencilState:
        depthTest: false
        depthWrite: false
}%

CCProgram blur-hor-vs %{
  //...
}%
CCProgram blur-hor-vs %{
  //...
}%

CCProgram blur-fs %{
  //...
}%

//...
As you can see, the entire Cocos Shader has only two Passes, one for horizontal blur and one for vertical blur.
The full Shader is placed at the end to avoid interfering with the article.
Note: In Cocos Creator 3.8.0, if there is a new post-effects shader, you need to restart the editor to recognize it. This process will be optimized in later versions.
Writing Component for Properties
In Cocos Creator 3.8, you only need to add the corresponding post-effect component to a node to start the corresponding post-effect.
We can inherit the postProcess.PostProcessingSetting component class to enable the visual interface configuration of post-effect parameters.
We can achieve the same experience as the built-in post-processing effects by customizing the post-processing effects on our own.
Create a new TS script file named “GaussianBlur.ts” and enter the following code.
Code Snippet 1:
import { _decorator, gfx, postProcess, Material, EffectAsset, renderer, rendering, Vec4 } from 'cc';
const { Format  } = gfx

const { ccclass, property, menu, executeInEditMode } = _decorator;

@ccclass('GaussianBlur')
@menu('PostProcess/GaussianBlur')
@executeInEditMode
export class GaussianBlur extends postProcess.PostProcessSetting{

    @property(EffectAsset)
    _effectAsset: EffectAsset | undefined

    @property(EffectAsset)
    get effect () {
        return this._effectAsset;
    }
    set effect (v) {
        this._effectAsset = v;
        if(this._effectAsset == null){
            this._material = null;
        }
        else{
            if(this._material == null){
                this._material = new Material();
            }
            this._material.reset({effectAsset:this._effectAsset});
        }
        this.updateMaterial();
    }

    @property
    iterations = 3;

    @property
    get blurRadius(){
        return this._blurParams.x;
    }
    set blurRadius(v){
        this._blurParams.x = v;
        this.updateMaterial();
    }


    private _material:Material;
    public get material():Material{
        return this._material;
    }

    @property
    private _blurParams:Vec4 = new Vec4(1.0,0.0,0.0,0.0);
    public get blurParams():Vec4{
        return this._blurParams;
    }

    updateMaterial(){
        if(!this._material){
            return;
        }
        this._material.setProperty('blurParams', this.blurParams);
    }

    protected start(): void {
        if(this._effectAsset){
            this._material = new Material();
            this._material.initialize({effectAsset:this._effectAsset});
            this._material.setProperty('blurParams', this.blurParams);
        }
    }
}
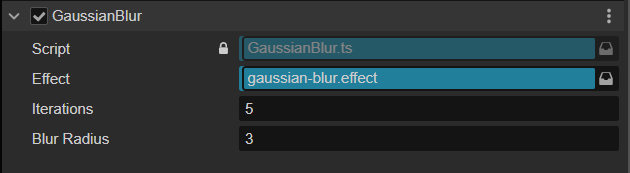
Next, we can add PostProcess/GansussianBlur to the post-processing node using the “Add Component” button.
As you can see, in the Inspector panel, it accepts three parameters.
-
effect: used to specify the Shader file to be used for this post-effect.
-
iterations: how many iterations are needed. The more iterations, the more blurring it is
-
blurRadius: the offset of the sampling near the pixels. The bigger the offset, the more blurring it is.
There is no effect because the corresponding rendering code has not yet been implemented.
Writing Render Code
The post-processing pipeline in Cocos Creator 3.8 is based on a new version of the custom pipeline based on the RenderGraph architecture.
You can simply think of a single post-processing effect that we want to implement corresponding to a node on the render flow graph.

The post-processing pipeline provides postProcess.SettingPass for us to write our own post-processing renderings. (It can also be called: custom the post-processing node’s resources and behaviors).
Next, let’s do the actual rendering implementation. We need to inherit the postProcess.SettingPass class from the custom pipeline and implementing the code we want.
-
get setting: get the setting information corresponding to the interface component implemented above.
-
checkEnable: use to judge whether this effect is enabled or not.
-
name: the effect’s name. Just keep it consistent with the class name.
-
outputNames: the final output RT array. (RTs for temporary use don’t need to be put here)
-
render: used to execute the rendering process
The complete code is as follows.
Code snippet 2:
export class GaussianBlurPass extends postProcess.SettingPass {
    get setting () { return this.getSetting(GaussianBlur); }

    checkEnable (camera: renderer.scene.Camera) {
        let enable = super.checkEnable(camera);
        if (postProcess.disablePostProcessForDebugView()) {
            enable = false;
        }
        return enable && this.setting.material != null;
    }

    name = 'GaussianBlurPass';
    outputNames = ['GaussianBlurMap'];

    public render (camera: renderer.scene.Camera, ppl: rendering.Pipeline): void {
        const setting = this.setting;
        if(!setting.material){
            return;
        }

        let passContext = this.context;
        passContext.material = setting.material;

        const cameraID = this.getCameraUniqueID(camera);
        const cameraName = `Camera${cameraID}`;
        const passViewport = passContext.passViewport;

        passContext.clearBlack();
        const format = Format.RGBA8;

        let input = this.lastPass!.slotName(camera, 0);
        for(let i = 0; i < setting.iterations; ++i){
            passContext
                .updatePassViewPort()
                .addRenderPass(`blur-x`, `blur-x${cameraID}`)
                .setPassInput(input, 'outputResultMap')
                .addRasterView('GaussianBlurMap_TMP', format)
                .blitScreen(0)
                .version();

            passContext
                .updatePassViewPort()
                .addRenderPass(`blur-y`, `blur-y${cameraID}`)
                .setPassInput('GaussianBlurMap_TMP', 'outputResultMap')
                .addRasterView(this.slotName(camera), format)
                .blitScreen(1)
                .version();
            input = this.slotName(camera);
        }
    }
}
Next, we’ll look mainly at what the render handles.
Preparation
Each SettingPass is a drawing node. The data for the node is stored in the context.
The render function will be executed every frame, so you need to call context.clearBack() to clean up the background.
Then, we have to set the material to context.
Blurring is handled by using the contents of the frame after the last process. So we use this.lastPass.slotName(camera,0); to get it.
Once everything is ready, it’s time to draw.
Drawing
Here, we use the iterations property to control the total number of iterations. For each iteration, the drawing process will go through.
Let’s look at what each step in the drawing process is used for.
-
updatePassViewPort: This function is used to specify the relative resolution size, which can be specified according to the algorithm requirements. If you want to keep it the same size as the background buffer, pass in 1.0.
-
addRenderPass: this function tells the pipeline that it needs to perform a rendering process.
-
layout: corresponds to the name of the pass in the Cocos Shader.
-
passName: the name of the pass, easy for debugging.
-
setPassInput: if you use RT resources in your custom pipeline (such as the result of the last execution), you need to specify them here so your custom pipeline can manage the resources.
-
inputName: the name of the resource assigned by the custom pipeline.
-
shaderName: the name of the uniform Sampler2D in Cocos Shader.
-
addRasterView: It can be understood as the output result
-
name: the name of the output RT, easy to reuse in subsequent processes.
-
format: the format of the output RT, e.g., RGBA8888, RGBA16F, etc.
-
blitScreen: execute drawing
-
passIdx: the pass index in Cocos Shader (this will be optimized in later versions, by then, the post-processing process can not pass this value).
-
version: meaningless, can be ignored.
Add to pipeline
After finishing the code, don’t forget to add the custom post-process shader to the pipeline, or nothing will happen.
Let’s add the following code at the end of the code file.
Code snippet 3:
let builder = rendering.getCustomPipeline('Custom') as postProcess.PostProcessBuilder;
if (builder) {
    builder.insertPass(new GaussianBlurPass(),postProcess.BlitScreenPass);
}
First, we get the Custom pipeline and add our newly written effect to it.
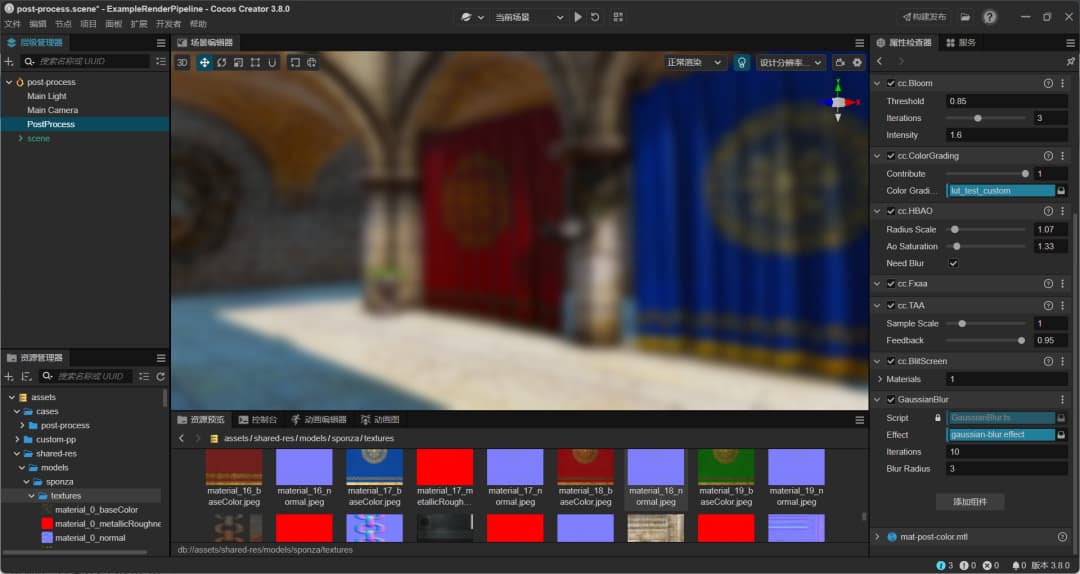
Return to the editor and adjust the parameters to see our new blur effect.
Post-Processing Pipeline Source Code Analysis
Here is some key source code to make it easier for you to understand the post-processing rendering flow.
Code Sets
Most of the post-processing-related classes are under postProcess. It is recommended to introduce postProcess from “cc” before using it.
RT Management
When the postProcess pipeline is turned on, the camera with the postProcess pipeline effect turned on will automatically generate RT and set its targetTexture.
The postprocessing pipeline is based on the RenderGraph pipeline architecture. The RenderGraph used in the Cocos engine is data-driven, collects the required RT resources per frame, and manages them in a unified way. So you don’t need to create new RTs manually.
Execution Order of Postprocessing Effects
Post-processing effects are not executed in the order they are added to the interface but in the order they are in the array. We can see its internal order through the source code as follows:
// pipeline related
  this.addPass(new HBAOPass());
  this.addPass(new ToneMappingPass());

  // user post-processing
  this.addPass(new TAAPass());
  this.addPass(new FxaaPass());
  this.addPass(new ColorGradingPass());
  this.addPass(new BlitScreenPass());
  this.addPass(new BloomPass());

  // final output
  this.addPass(new FSRPass()); // fsr should be final
  this.addPass(forwardFinal);
Post-processing effects are rendered, and the pipeline traverses this array, executing the available post-processing effects in turn.
for (let i = 0; i < passes.length; i++) {
    const pass = passes[i];
    if (!pass.checkEnable(camera)) {
        continue;
    }
    if (i === (passes.length - 1)) {
        passContext.isFinalPass = true;
    }
    pass.lastPass = lastPass;
    pass.render(camera, ppl);
    lastPass = pass;
}
Source location: engine/cocos/rendering/post-process/post-process-builder.ts
Notes on post-processing
Adding custom post-processes
There are a few things to keep in mind when adding your custom post-effects Shader to the pipeline:
-
They must be added before
ForwardFinal, or they have no effect. Therefore,builder.addPassis not recommended. -
When using
builder.insterPassto add a new effect, the old one will be removed first if the new effect is renamed to the old one. -
builder.insterPasswill insert the new effect after the one specified by the second parameter type. Usually, it is recommended to usepostProcess.BlitScreenPass.
Effects
-
TAA+FXAA+FSR should be turned on simultaneously to achieve a good anti-aliasing effect because TAA is mainly responsible for dynamic (inter-frame) anti-aliasing. Still, it will make the screen slightly blurry, FXAA is mainly responsible for edge anti-aliasing, and FSR can make the blurry screen clearer.
-
ColorGrading is the most cost-effective post-production effect, which can quickly improve the image value of your project.
-
Don’t rely on HBAO too much because it can’t run on low-end machines. Prioritize the scene to use lightmap to bake AO so that even if HBAO is turned off, the effect is still not bad.
-
Adjust the threshold of Bloom down and the intensity down to create a full-screen floodlight and soften the image, and adjust the threshold of Bloom up and the intensity up to create a bright pixel exposure effect.
Memory
-
Although RenderGraph automatically manages and reuses RT, after-effects still consume memory, so test how much memory is used when the desired after-effects are turned on.
-
Memory overhead is resolution dependent, so please refer to live tests.
-
The resolution can be lowered by shadingScale to reduce memory and rendering overhead to improve performance. The current actual resolution versus the set maximum after-effects resolution available for the model can determine this value.
Performance
-
Post-rendering reads and writes to the frame buffer multiple times, requiring high GPU bandwidth, pixel fill rate, and texture fill rate. It will likely cause a sharp drop in performance on low-end and mid-range models.
-
Do a good job of managing high, medium, and low-end models, and turn on corresponding combinations of after-effects on different grades of models to ensure a balance between performance and effect.
-
Many single Pass effects can be combined into one. For example, ColorGrading, FXAA, Vignette, and FinalPass can be combined into one. This can reduce the number of BlitScreen times and improve performance.
-
HBAO can significantly improve the spatial relationship but is also a considerable performance overhead. Use with caution.
Conclusion
The use of post-processing effects can significantly improve the image texture. Still, you must also pay attention to the extra memory overhead and fill rate overhead caused by post-processing effects.
Post-processing effects are very unfriendly to low-end models, so please be prepared to do an excellent job of staging on low-end machines based on performance test results.
In addition, there is a wide variety of post-processing effects, and they can be optimized for specific project requirements. Therefore, the engine can only provide commonly used post-processing effects for everyone to use. For more specialized post-processing effects, developers need to implement them themselves.
I hope that today’s sharing can help you. Thank you!
Complete Shader Code
Create a new Cocos Shader file, and copy the following shader code into the file.
CCEffect %{
  techniques:
  - passes:
    - vert: blur-hor-vs
      frag: blur-fs
      pass: blur-x
      depthStencilState:
        depthTest: false
        depthWrite: false
    - vert: blur-vert-vs
      frag: blur-fs
      pass: blur-y
      depthStencilState:
        depthTest: false
        depthWrite: false
}%

CCProgram blur-hor-vs %{
  precision highp float;
  #include <legacy/input-standard>
  #include <builtin/uniforms/cc-global>
  #include <common/common-define>

  uniform MyConstants {
    vec4 blurParams;
  };

  out vec2 v_uv;
  out vec2 v_uv1;
  out vec2 v_uv2;
  out vec2 v_uv3;
  out vec2 v_uv4;

  void main () {
    StandardVertInput In;
    CCVertInput(In);
    CC_HANDLE_GET_CLIP_FLIP(In.position.xy);
    gl_Position = In.position;
    gl_Position.y = gl_Position.y;
    v_uv = a_texCoord;

    vec2 texelSize = cc_nativeSize.zw;
    float blurOffsetX = blurParams.x * texelSize.x;

    v_uv1 = v_uv + vec2(blurOffsetX * 1.0, 0.0);
    v_uv2 = v_uv - vec2(blurOffsetX * 1.0, 0.0);
    v_uv3 = v_uv + vec2(blurOffsetX * 2.0, 0.0);
    v_uv4 = v_uv - vec2(blurOffsetX * 2.0, 0.0);
  }
}%

CCProgram blur-vert-vs %{
  precision highp float;
  #include <legacy/input-standard>
  #include <builtin/uniforms/cc-global>
  #include <common/common-define>

  uniform MyConstants {
    vec4 blurParams;
  };

  out vec2 v_uv;

  out vec2 v_uv1;
  out vec2 v_uv2;
  out vec2 v_uv3;
  out vec2 v_uv4;

  void main () {
    StandardVertInput In;
    CCVertInput(In);
    CC_HANDLE_GET_CLIP_FLIP(In.position.xy);
    gl_Position = In.position;
    gl_Position.y = gl_Position.y;
    v_uv = a_texCoord;

    vec2 texelSize = cc_nativeSize.zw;
    float blurOffsetY = blurParams.x * texelSize.y;

    v_uv1 = v_uv + vec2(0.0, blurOffsetY * 1.0);
    v_uv2 = v_uv - vec2(0.0, blurOffsetY * 1.0);
    v_uv3 = v_uv + vec2(0.0, blurOffsetY * 2.0);
    v_uv4 = v_uv - vec2(0.0, blurOffsetY * 2.0);
  }
}%

CCProgram blur-fs %{
  precision highp float;
  #include <builtin/uniforms/cc-global>

  in vec2 v_uv;
  in vec2 v_uv1;
  in vec2 v_uv2;
  in vec2 v_uv3;
  in vec2 v_uv4;

  #pragma rate outputResultMap pass
  uniform sampler2D outputResultMap;

  layout(location = 0) out vec4 fragColor;

  void main () {

    vec3 weights = vec3(0.4026,0.2442,0.0545);
    vec3 sum = texture(outputResultMap, v_uv).rgb * weights.x;

    sum += texture(outputResultMap, v_uv1).rgb * weights.y;
    sum += texture(outputResultMap, v_uv2).rgb * weights.y;
    sum += texture(outputResultMap, v_uv3).rgb * weights.z;
    sum += texture(outputResultMap, v_uv4).rgb * weights.z;

    fragColor = vec4(sum, 1.0);
  }
}%