How Rubber Duck Games developed a boss fight in Evil Wizard


Rubber Duck Games, one of the esteemed GDC 2023 Best in Play winners, uncovers how they created a compelling boss fight. This guest blog sees team members Banki and Sergio Wajswol guide you through the entire journey, from design and prototyping to animation, testing, balancing, and finalizing the visual effects and audio for Evil Wizard.
Hey, readers! I’m Banki, game designer and producer at Rubber Duck Games. Our humor-filled action RPG Evil Wizard is out now on Steam and Xbox, and I wanted to give you a behind-the-scenes look at how we developed a boss fight.
Evil Wizard is a Metroidvania-inspired game that puts you in the shoes of a defeated “final boss” on their quest for revenge against the cursed hero.
This quest for vengeance takes players through charming pixel-art environments packed to the brim with hordes of enemies that they need to overcome to reclaim what’s theirs. While the main character was once a powerful wizard, a losing battle at the hands of the hero stripped them of their powers, and they have to reclaim each as they work to infiltrate the castle and unleash devastating revenge.
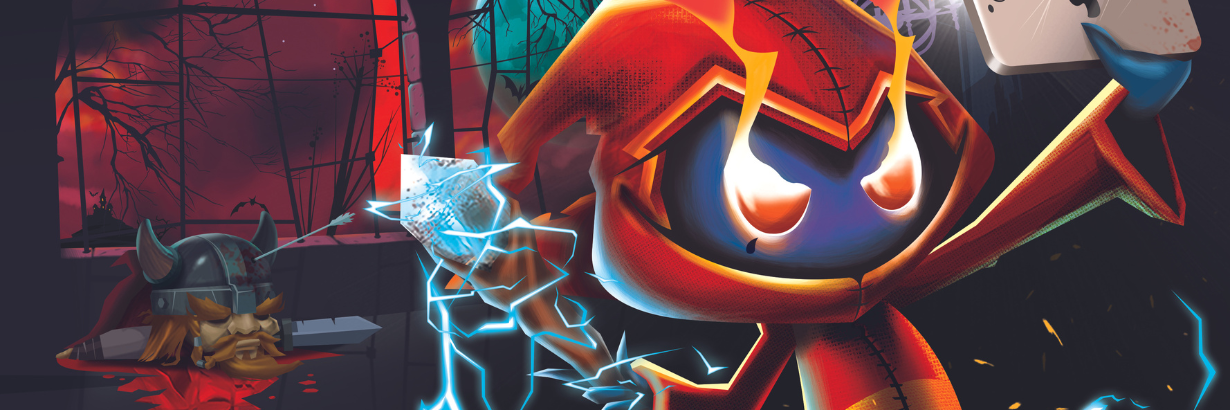
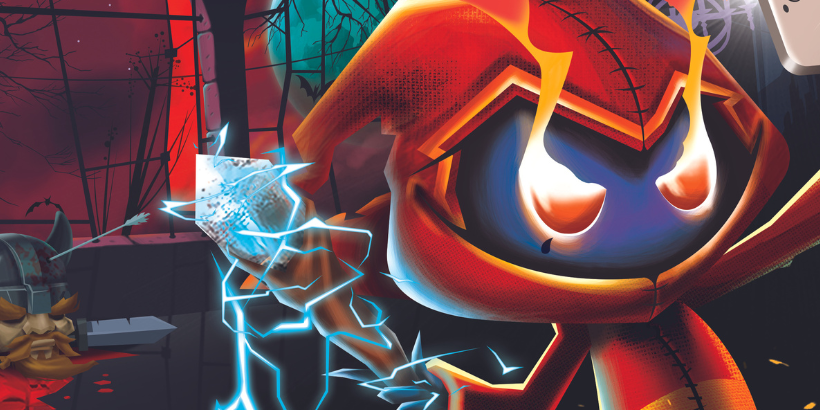
The first hero to defeat in the game is Hailga, the powerful ice sorceress. We’ll use her as the example boss for this deep dive.
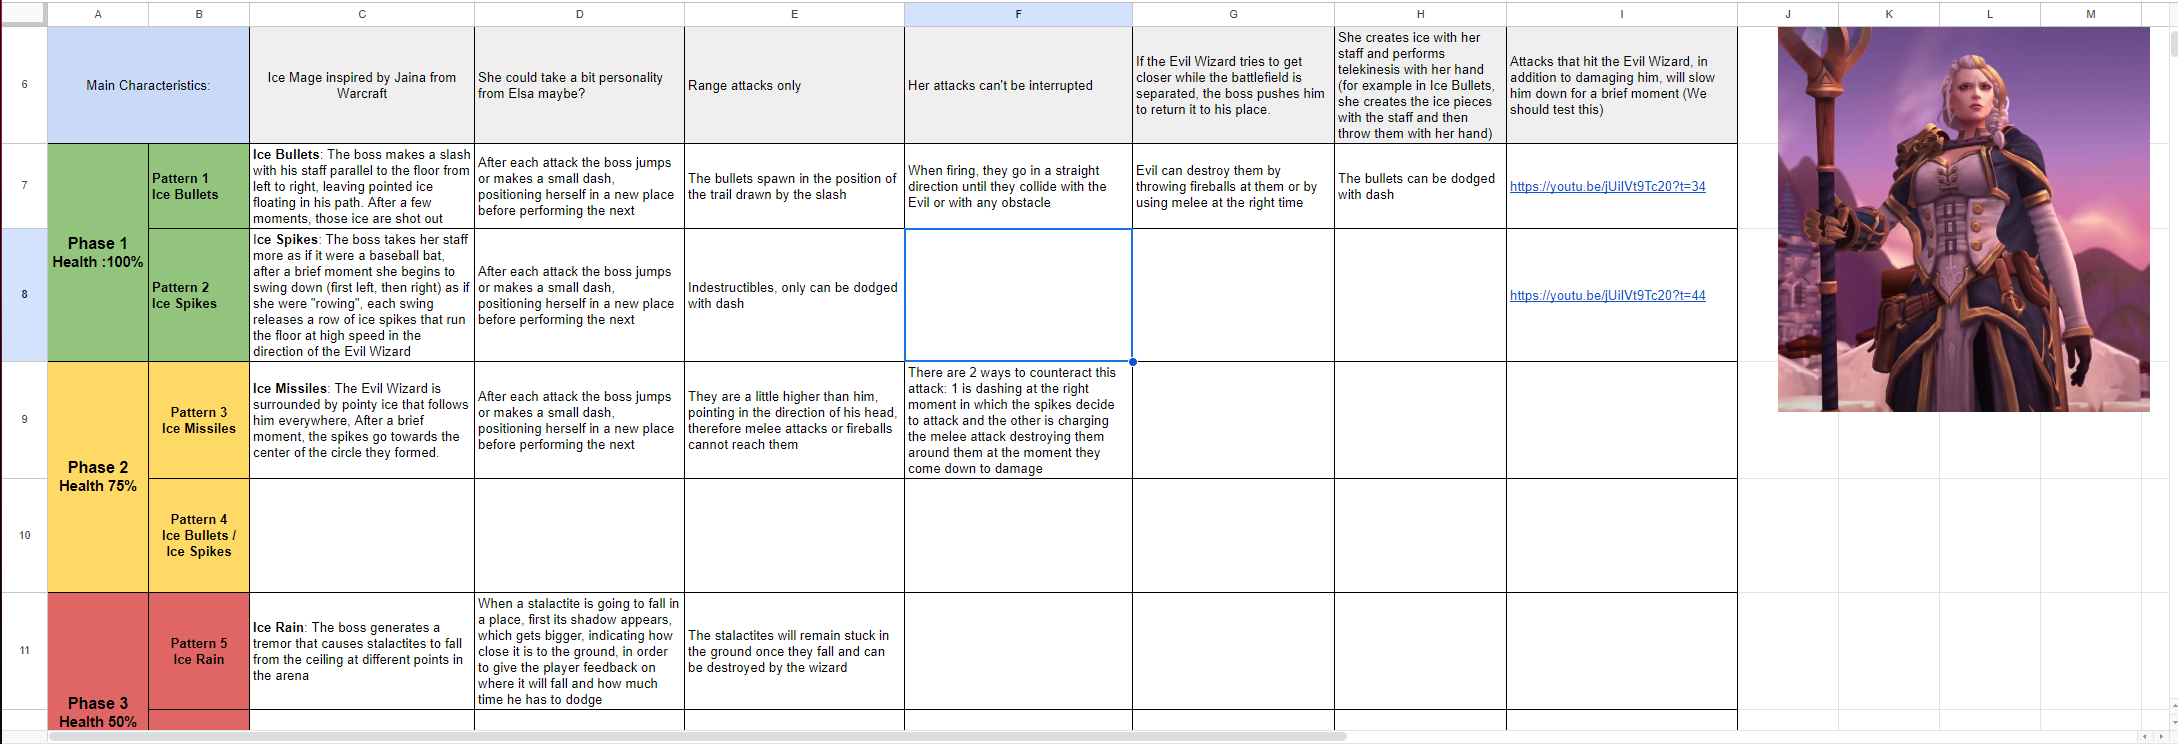
Designing Hailga
Let’s start from the beginning. Designing a boss (and every enemy) for Evil Wizard was a bit tricky. Even though players are fighting against the good guys, we knew they should still look menacing enough to be recognized as enemies.
For the bosses, we searched for inspiration and references amongst well-known games’ heroes. With Hailga, we took a lot of inspiration from Jaina of Warcraft, as both share a lot of similarities.
The first step was to prepare a spreadsheet (something we used for every boss in the game) in which we detailed the character’s main traits, mechanics, and some references.

With the mechanics designed, we could move forward to the next step: prototyping.
Prototyping Hailga
It’s time to present the team with the new boss’s design, so we jump into a meeting and I walk through the document and explain some of my decisions.
Here, we tweak the design a little – in some cases a mechanic could be too difficult to develop, or an animation too complicated to draw, etc. We try to get things done on time, so there are some things that should be in consideration to make the best boss we can in the time we have.
When it came to prototyping, here’s what our lead programmer, Diego Ordóñez, had to say: “Hailga was our first boss on Evil Wizard and the first time I was programming a boss in my life. I knew it was a difficult task, so I started by doing what every programmer does: dividing the attacks into simple tasks and doing them separately. This boss has attacks that were simple to do by reusing projectiles.”
“The ice bullet and ice missile attacks feel very different for players – one is simple to dodge, while the other represents a challenge during the fight,” he continued. “The key difference is how the attack component spawns the ice projectiles and the amount of projectiles facing the player. With simple adjustments, we were able to reuse an entire system to present two different attacks. All of this worked great until I had to start making the blizzard attack.”
Basic idea
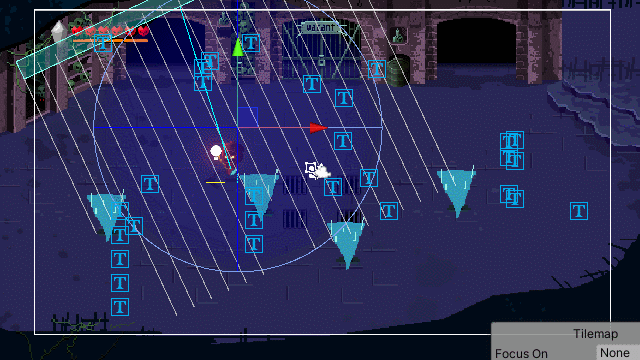
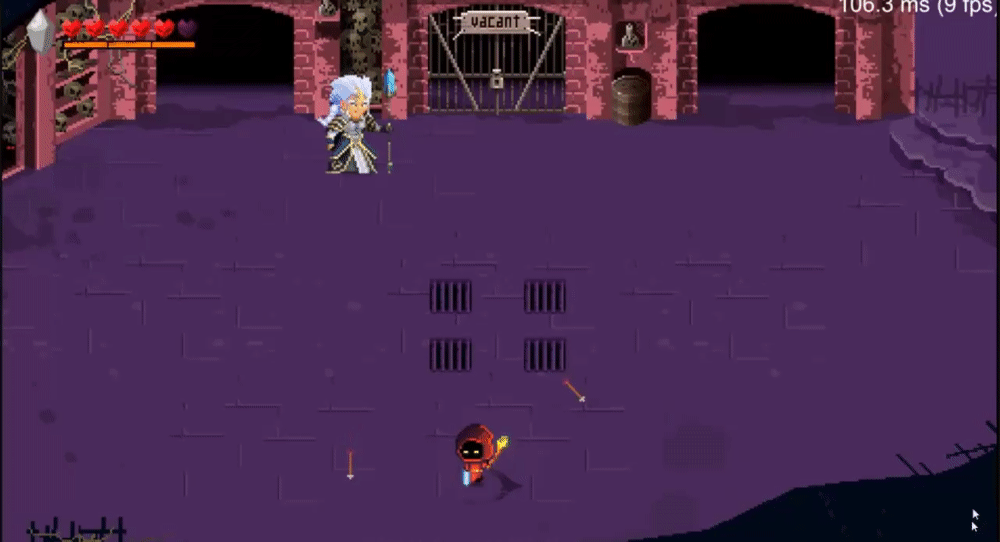
For Hailga’s fight, we wanted to bring something new to the encounter and thought wind could be interesting. This was very different from anything else we’d done on Evil Wizard, so I had to start from scratch. The basic idea was to spawn wind from a random direction in order to move the player toward a wall full of spikes that could cause damage. The best way to counter this attack is to get behind cover, so we spawn a few stalactites on the battlefield for use as wind blockers. If players get behind an ice stalactite, the wind will no longer emit force on them.
Developing wind
We started by creating an attack component to be in charge of managing the different systems we use. The systems used the stalactites, wind emitter, and blizzard VFX. I’m going to focus on the first two, and the VFX will be covered by Sergio Wajswol later in this blog post.
The stalactites are spawned using a circle collider to get random points inside it, then using those positions to create a stalactite with an offset on the Y axis. Applying a coroutine, we make the objects fall by lowering the Y axis – simple stuff. Once we had the stalactites spawned, we moved on to the wind controller. This component works as a big fan with a rectangular shape that rotates around the edge of a circle.
Since we needed to blow wind from random directions, we had to point the emitter toward the center so everything inside the area was affected. The wind controller has a wind emitter that stores the rotation, direction, and position of the wind. As we rotate the component, the emitter calculates these values and applies them to the wind (which is just a direction and a force). Basically, a Vector3 and a float.
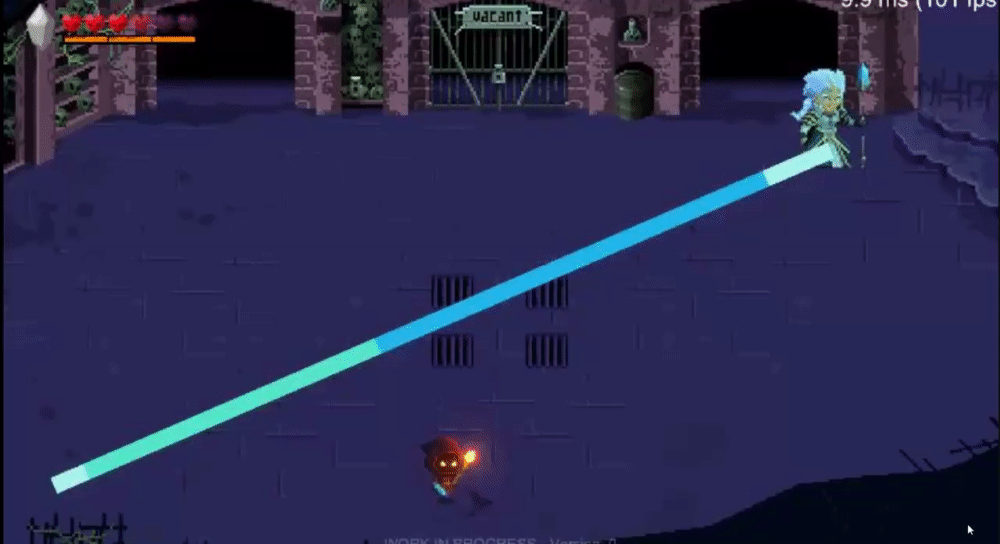
Blocking wind
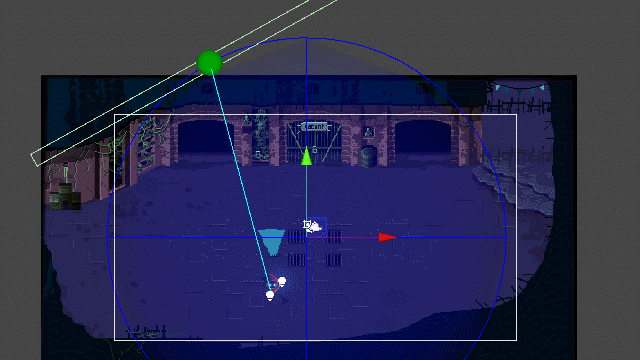
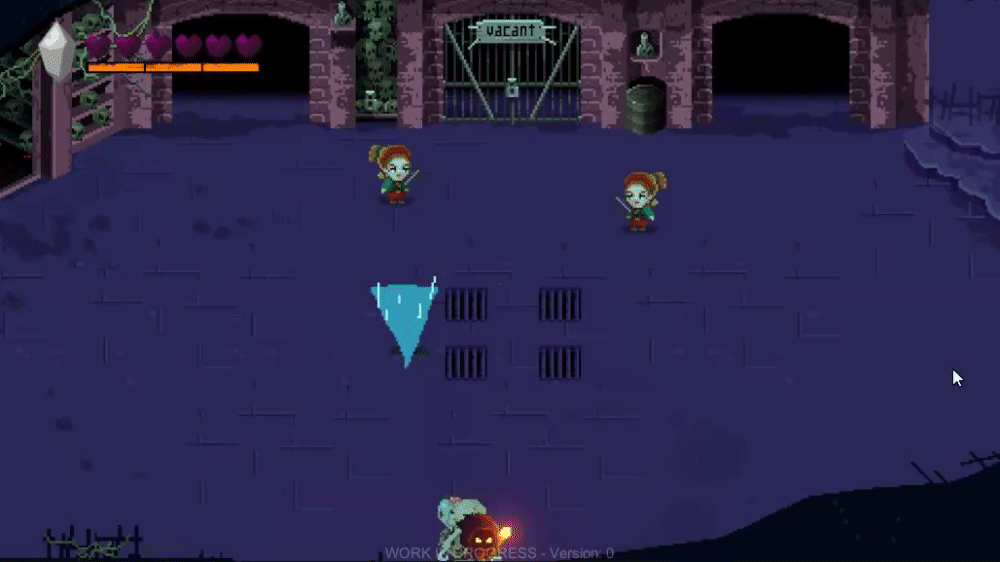
The wind can also be blocked, as mentioned, by a wind blocker. This component has a BoxCollider2D that checks collisions against the player. If the player gets near a wind blocker, the OnTriggerEnter2D will enable the wind blocker and, as the player leaves the collider, the OnTriggerExit2D will disable it. This is illustrated by the cyan line between the player and the emitter in the image below. While the line is green, the player is protected.
Receiving wind
Finally, we needed to make the player receive the wind force and move in the direction of the wind. For this, we have a WindReceiver component. This is responsible for checking how strong the wind impacts the player and from which direction. This information is gathered by doing a Raycast from the player toward the wind receiver. The information is then used to know if the wind emitter is impacting the receiver, with how much force, and from what direction. Once we have all the information, we apply the force of the wind using our own move controller and move the player in the direction we need.
Hailga’s behavior
As Diego started to commit the first attacks, I began to give Hailga some behavior.
For the AI on Evil Wizard, we used a very helpful asset called Behavior Designer. I can’t recommend it enough. It’s perfect for game designers who don’t code, so the programmer can work on the mechanics and the designer puts those on the behavior tree of the character, making it work as they need without coding. You can learn the basics here.
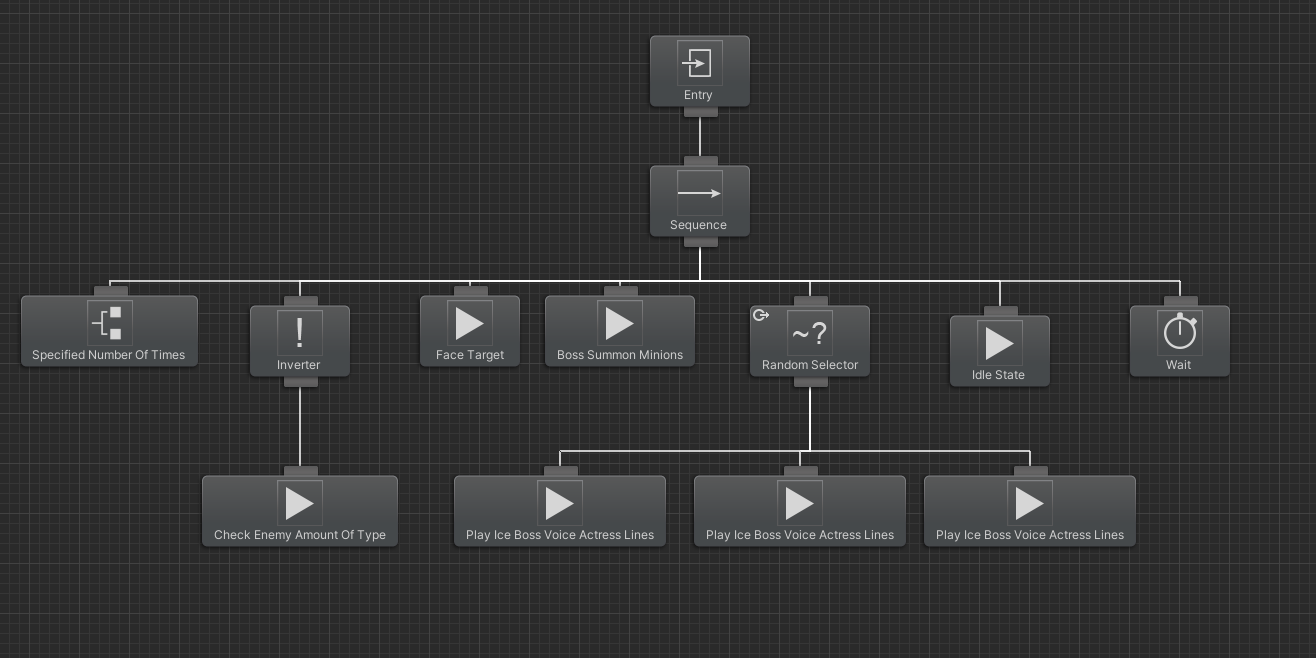
Here is Hailga’s behavior tree:
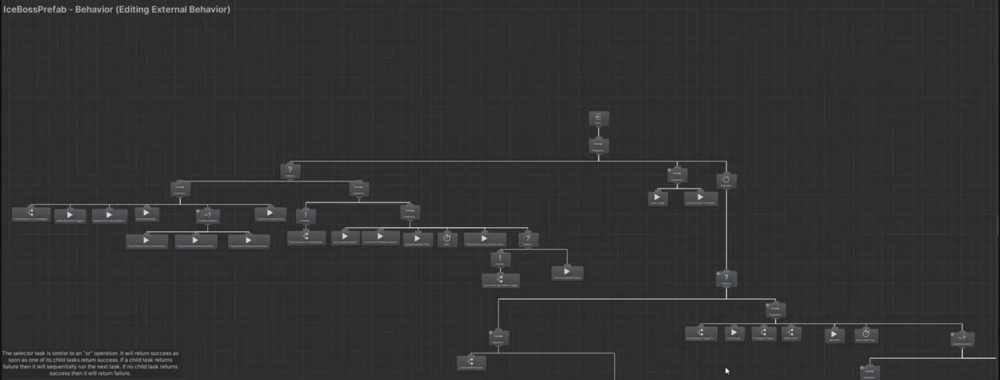
It’s a big tree, but don’t freak out – this is easier than it looks.
Basically, we used some tasks at the beginning of the tree to set up the battle. For example, to set the boss on its first phase, play intro animation, and reset some variables.

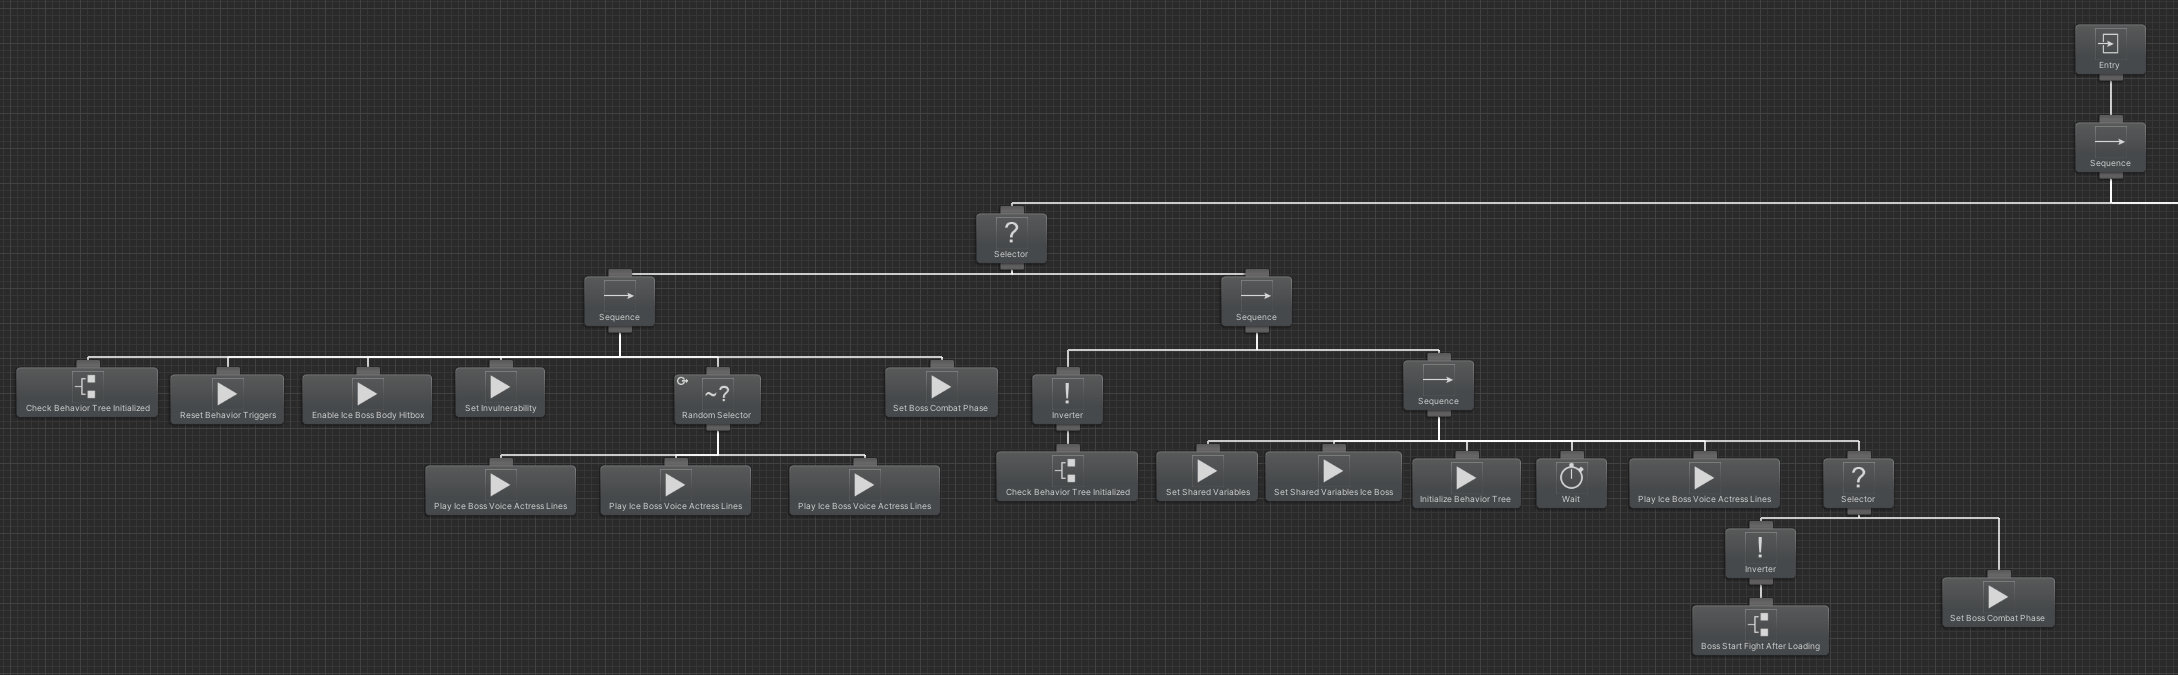
These tasks only run at the beginning of the combat, so we then added a repeater that would have the actual boss’s behavior, as you can see in the next image.

The priority of the boss’s behavior is always the health. With it, we control if the boss should change to another phase or even if it should die. So, first we ask whether the boss has more than 75% health. If so, we run the tasks of phase one, which are ice spikes, ice missiles, and summon snow slimes (boss minions). When the health of the boss drops below 75%, the tree goes to the following selector at the bottom of the image and runs the tasks corresponding to the second phase, and so on until the boss reaches its final phase and the character dies at 0 health.
Before going to the next step, I want to mention the external behavior tree feature, which is a cool way to organize big behavior trees like this one.
You already saw these on the previous image – the icons with three boxes are external behavior trees.

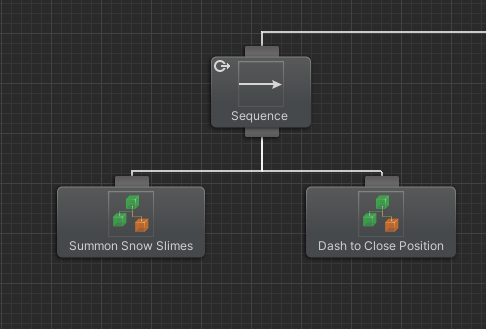
Think of external behavior trees like a method in your code: you call the method in several places around all the game’s logic and it runs the same code in each place, but you only have that code in one place. If you have to change something in that logic, you change the code of that method and it will change in every place where the method is called. Here it works the same. You have an external behavior tree, which contains the behavior to perform a specific action, for example “summon snow slimes.”
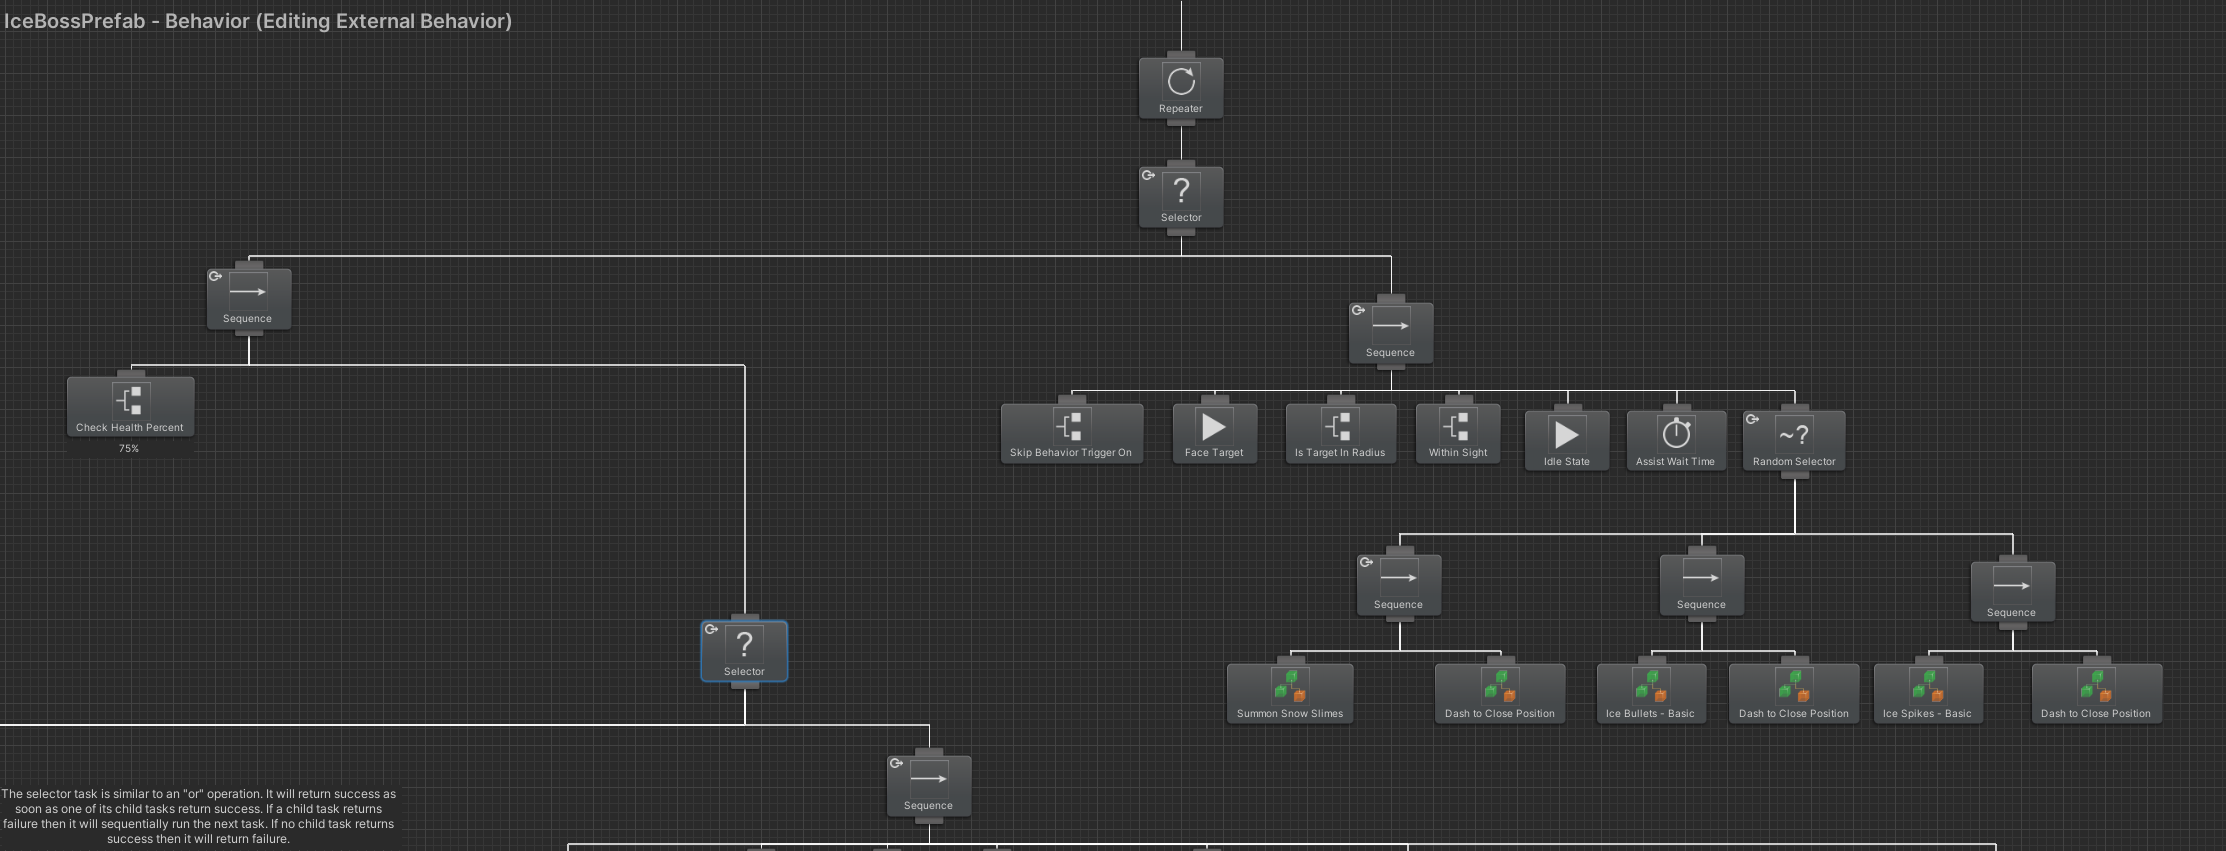
If I enter into our external behavior tree, I’ll find this:

It’s like a mini behavior tree that checks that a boss doesn’t repeat the same attack too many times and that there aren’t too many minions already on the battlefield, then summons the minions, plays Hailga’s voice lines, or finishes by setting the boss on idle.
If I want to change the amount of minions that can be on the battlefield at one time, I only have to change it on the task “Check Enemy Amount of Type” inside this external behavior tree, and this will work for every part of the tree that is used to summon minions.
Animating Hailga
For the creation of Hailga, our lead artist, Ruben Gómez, started with the premise of referencing existing characters with the hope that players would recognize them.
In this case, we used Jaina from Warcraft (as mentioned) and Elsa from Frozen as character references.
This is what Ruben has to say:
“Taking the premise in mind, I started with Hailga’s design,” said Ruben. “We took some characteristics from the clothes and hairstyles of each reference, elements that might be easily recognizable in a very small pixelated sprite, and filled the rest with imagination (no AI, just, human imagination, the same that I used when I was a child).”

During animation we needed the movements to go fast without losing the smoothness between frames, so we tried to gain time with faster iterations for each character's action. We always start from the final version, cropping, rearranging, scaling, and rotating each part of the character for each frame of the animation using the nearest interpolation with the intention of reusing some elements and avoiding antialiasing.
After that, we made a fast test of movements and adjusted in the same way.


When the animation draft was done, we refined each element, filled empty spaces, and added details.
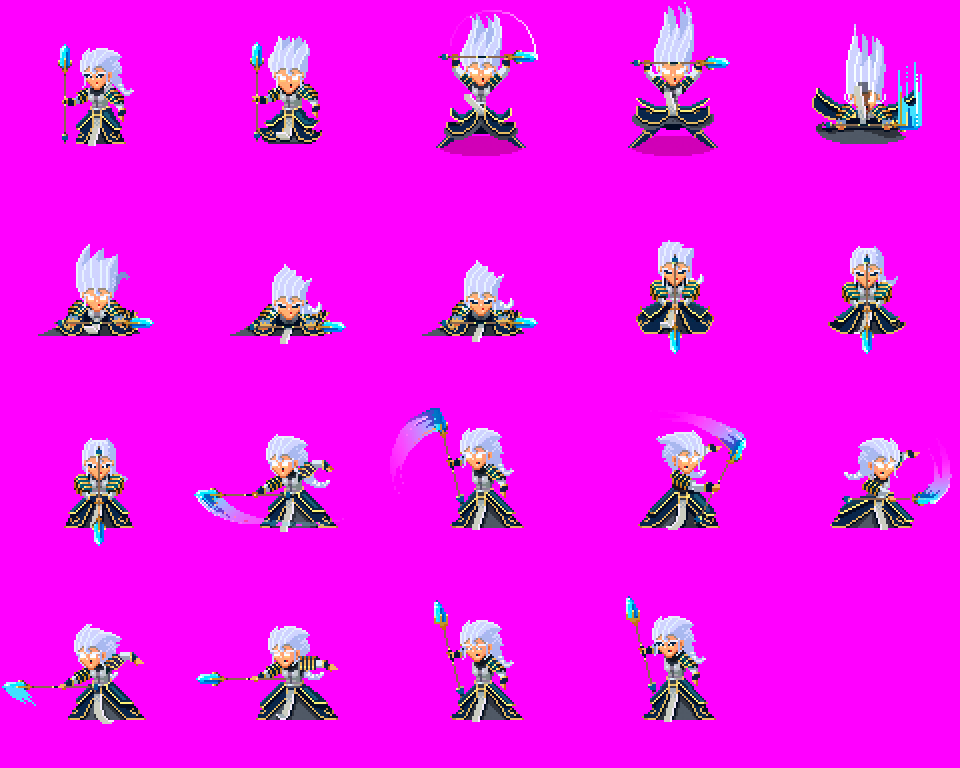
You can see the final version of each frame in the next image.

Testing and balancing
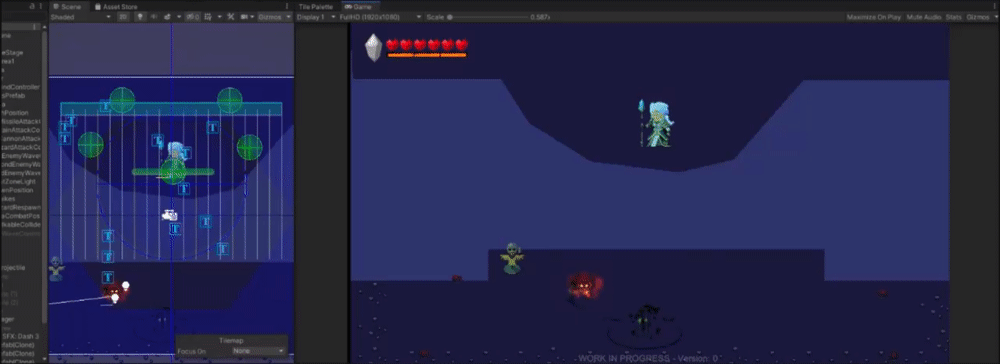
While the animations were in progress, I proceeded with testing and balancing the boss fight. For that, we created a scene called “Combat Zone,” which we used for testing bosses, enemies, spells, and more. Basically, it’s a small area that has all the tools and features we need to test without touching the actual game.
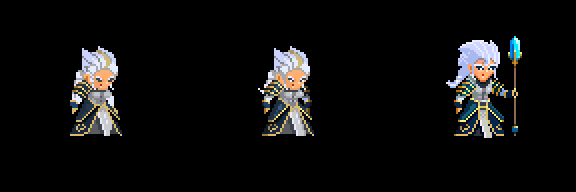
This is how the early Hailga boss looked when we tested the character in the Combat Zone scene:
Finally, when we were happy with its behavior, functionality, and difficulty, we integrated Hailga into her place in the actual game.
Time for VFX
As we finished the behavior and animations for Hailga, we started to integrate the boss’s animations using AnimatorImporter, which is a great tool for integrating pixel art animations made in Aseprite. With it, in just a few steps you have everything done.
Now it’s time to give the boss some flavor, which is when our VFX artist, Teky, came into play. Take it away, Teky:
Hey! Sergio Wajswol (a.k.a. Teky) here, programmer and VFX artist for Evil Wizard.
Hailga’s VFX was really challenging, not only because it was the team's first boss, but because it was also one of my first tasks on the game. There are several VFX sequences employed during the boss fight – at least one per attack – but I will center my attention on just a few.
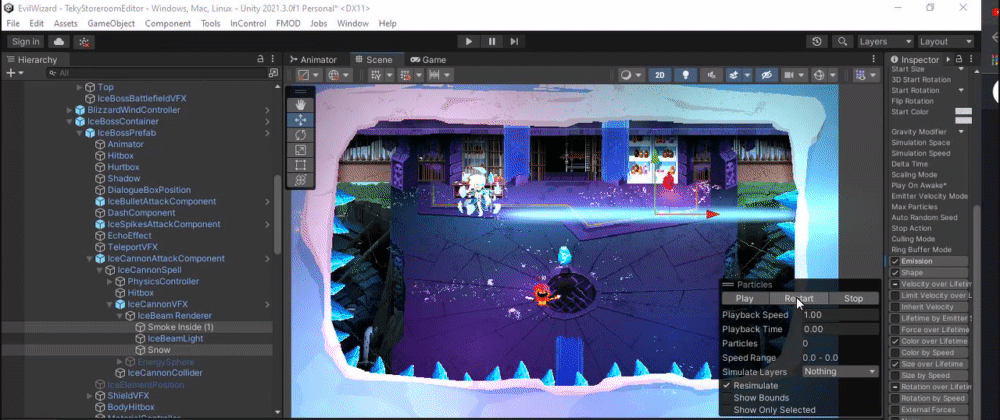
One of the peak moments during the battle is the last phase transition in which Hailga gets mad and casts an ice beam toward the Evil Wizard, leaving the battlefield frozen.
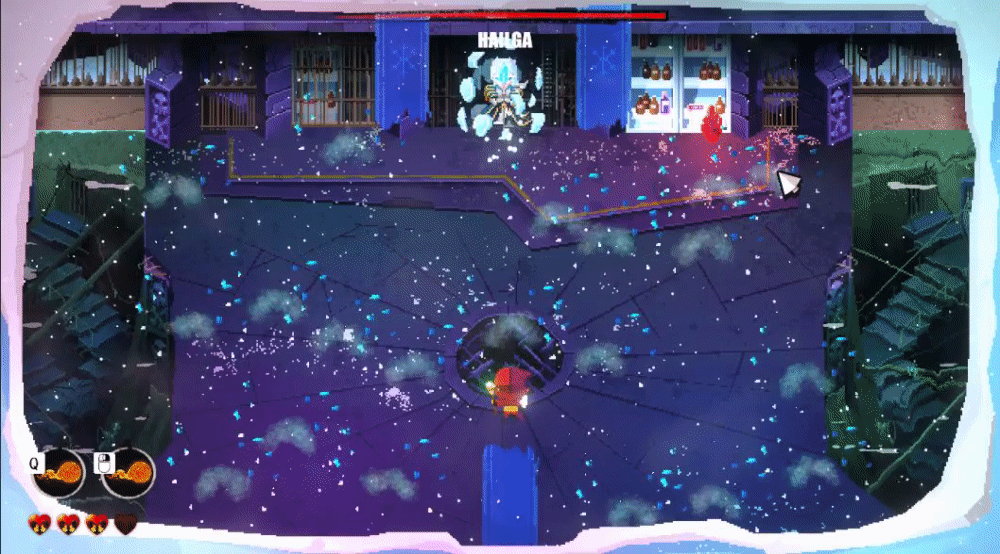
I believe this is a really nice effect to pull apart and show the pieces that made the magic happen. To do this, we divided the transition into two VFX pieces: ice beam and floor freezing.
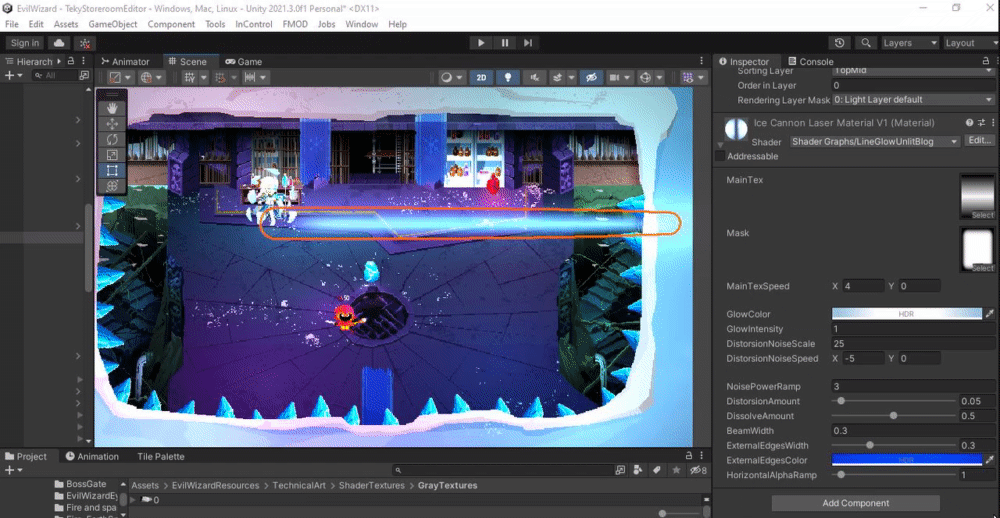
For the first piece, my job began once Diego finished programming the attack and usually came with a nice-looking placeholder (in this case, an elongated rectangle) – plus him wishing me the best of luck. From here, I dove in using the tools I knew I already had in my toolbox. But, since it was the start of development, I was short on those. In the past, I’d used Unity’s Line Renderer component to have a line rendered between any two points controlled via script, so I started with that, then combined it with a basic shader to add color to the edges and center of the line.
Not quite there, as you can see above. Something I understood quickly in VFX is that (contrary to classic philosophy), “the whole is the sum of the parts.” With this I mean that it could take several systems to make a desired effect, not just one shader or one particle.
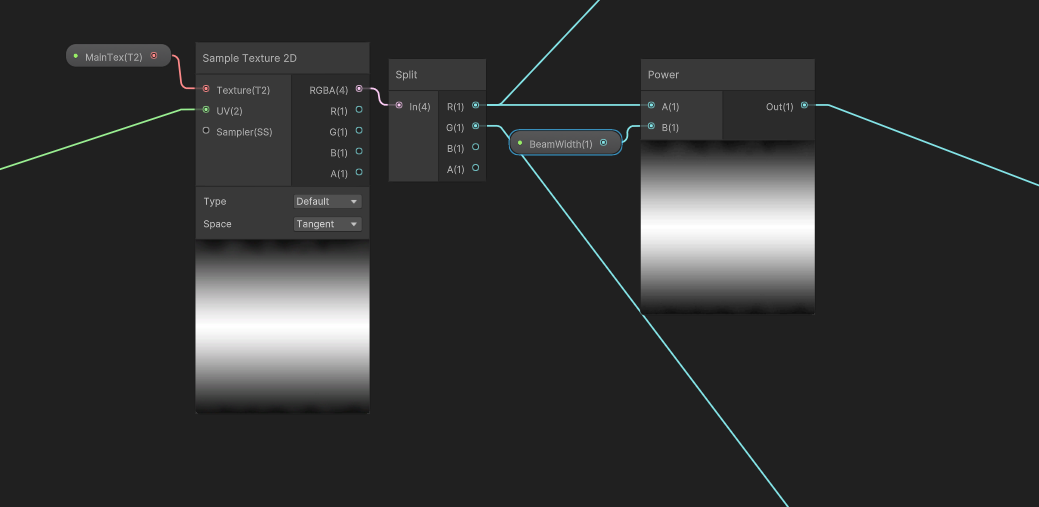
Next, I needed the effect to look more like a beam (and to be less solid), so I played with Shader Graph in order to achieve this. I’ll try to explain this briefly.
To accomplish what I wanted, the shader needed three main parts. First, I used a previously drawn texture that was merely a horizontal mirror gradient (you can see it in the next image as MainTex). By using the node “Pow,” I could easily control the width of the beam (the texture multiplies itself and, since it's a gradient, shrinks the beam).

Then, I used Simple Noise animated with the Tiling And Offset node for two purposes:
- To dissolve the beam in certain parts (always controlled by a public variable)
- To modify the UV of the beam, making it look distorted

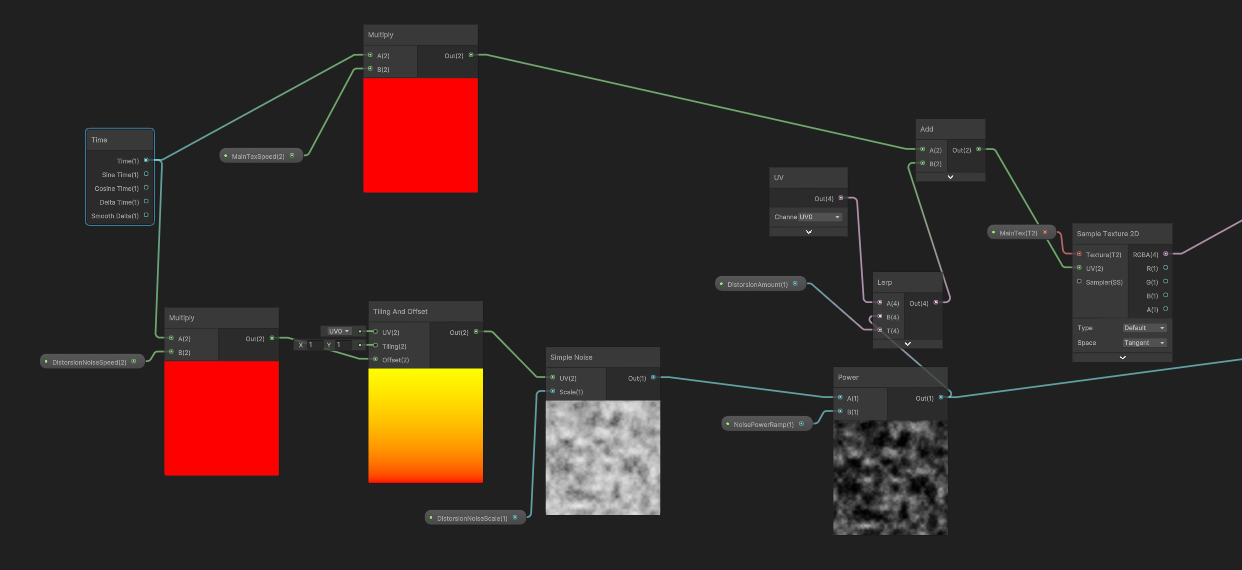
Continuing on, I multiplied the resulting beam by an HDR color in order to control the emitting glow. Finally, I took the edges of the beam using the step node and multiplied them to get a different color, leaving the center of the beam to stand out.
Once I finished, I had something like this to play with different colors and variables.
This is when I started to feel like I was getting somewhere, but I noticed that I was missing something: the beam was being cast from the middle of nowhere.
So, with the help of particles, I made an ice sphere so it could be the casting point for the beam:
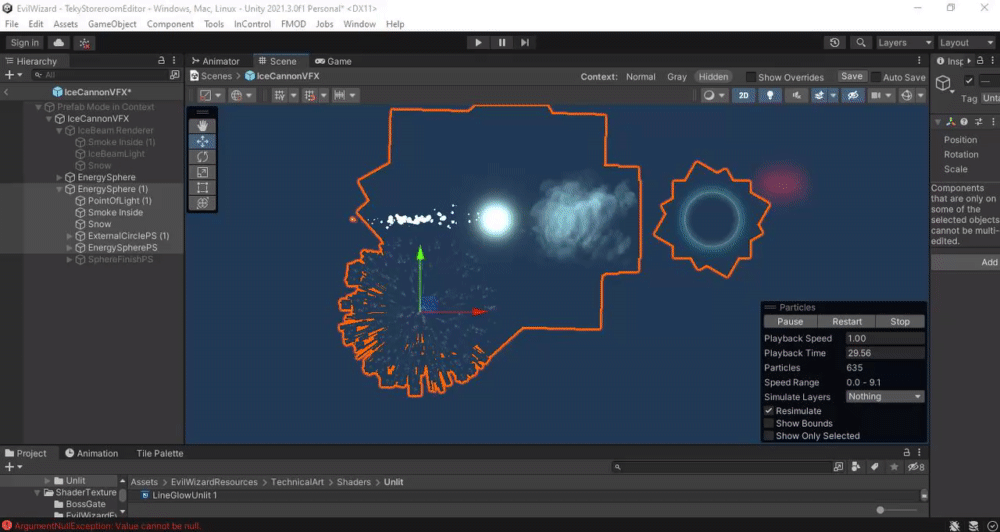
Finally, we needed particles along the beam to integrate it to the rest of the area.
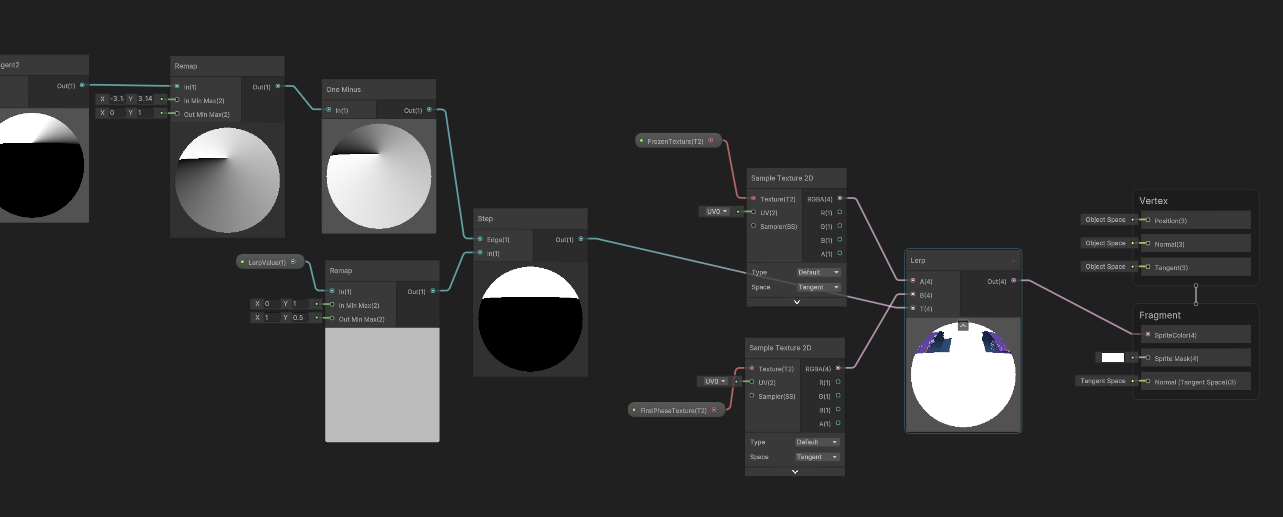
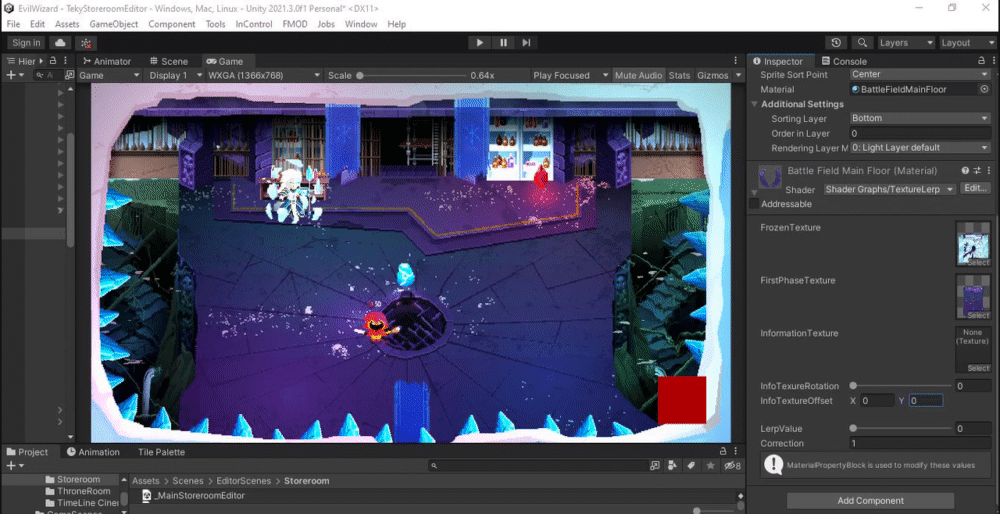
The second part of this is shorter, but trickier. To complete the main effect, we needed to be able to lerp between two textures – a non-frozen and frozen floor – but at a radial angle following the trajectory and speed of the beam.
To match the speed, we used regular scripting to control the speed of the beam against a variable of 0 to 1, i.e., how much the floor should be frozen according to the current rotation of the beam. For lerping the textures, we needed a short shader. Take a look at how we divided the shader into two parts to get a radial gradient and actual lerping.

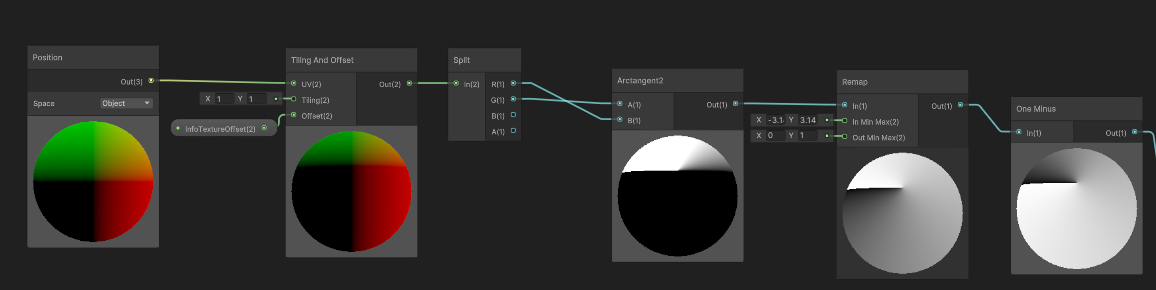
Below is a look at the formula applied to calculate the radial gradient, taking into account the UV position and going exactly from 0 to 1. This syncs the beam’s movement with the frozen value.

This is how it looks on the scene:
To complete the scene, we added everything together and achieved a cool effect, serving as both a transition to the final phase and also as one of this boss’s attacks.
Wrapping up
After everything was finished, Haakon Davidsen, the game’s composer, added the final touch – mind-blowing music that makes players feel the “heat” of the battle. You can hear it here. And, of course, a voice actress – Breanna MacDowall – did an amazing job giving a voice to Hailga.
We hope you enjoyed this blog!
Experience Hailga’s boss fight for yourself when you check out Evil Wizard on Steam or Xbox – and stay tuned for its release on even more platforms. Read more Made with Unity stories straight from the developers here.
Is this article helpful for you?
Thank you for your feedback!
- Unity Labs
- Copyright © 2024 Unity Technologies