Happy Harvest demo: See the latest 2D techniques


There’s no limit to how innovative today’s 2D games can be. With so many creative possibilities and the evolution of Unity’s 2D rendering and tools, we’ll keep you up to date on best practices for making 2D games in Unity.
Happy Harvest, now available on the Unity Asset Store, shows developers how to harness the latest capabilities for creating 2D lights, shadows, and special effects with the Universal Render Pipeline (URP) in Unity 2022 LTS. It incorporates best practices any 2D creator can use, including not baking shadows into a sprite, keeping sprites flat, moving shadow and volume information to secondary textures, advanced Tilemap features, and much more.
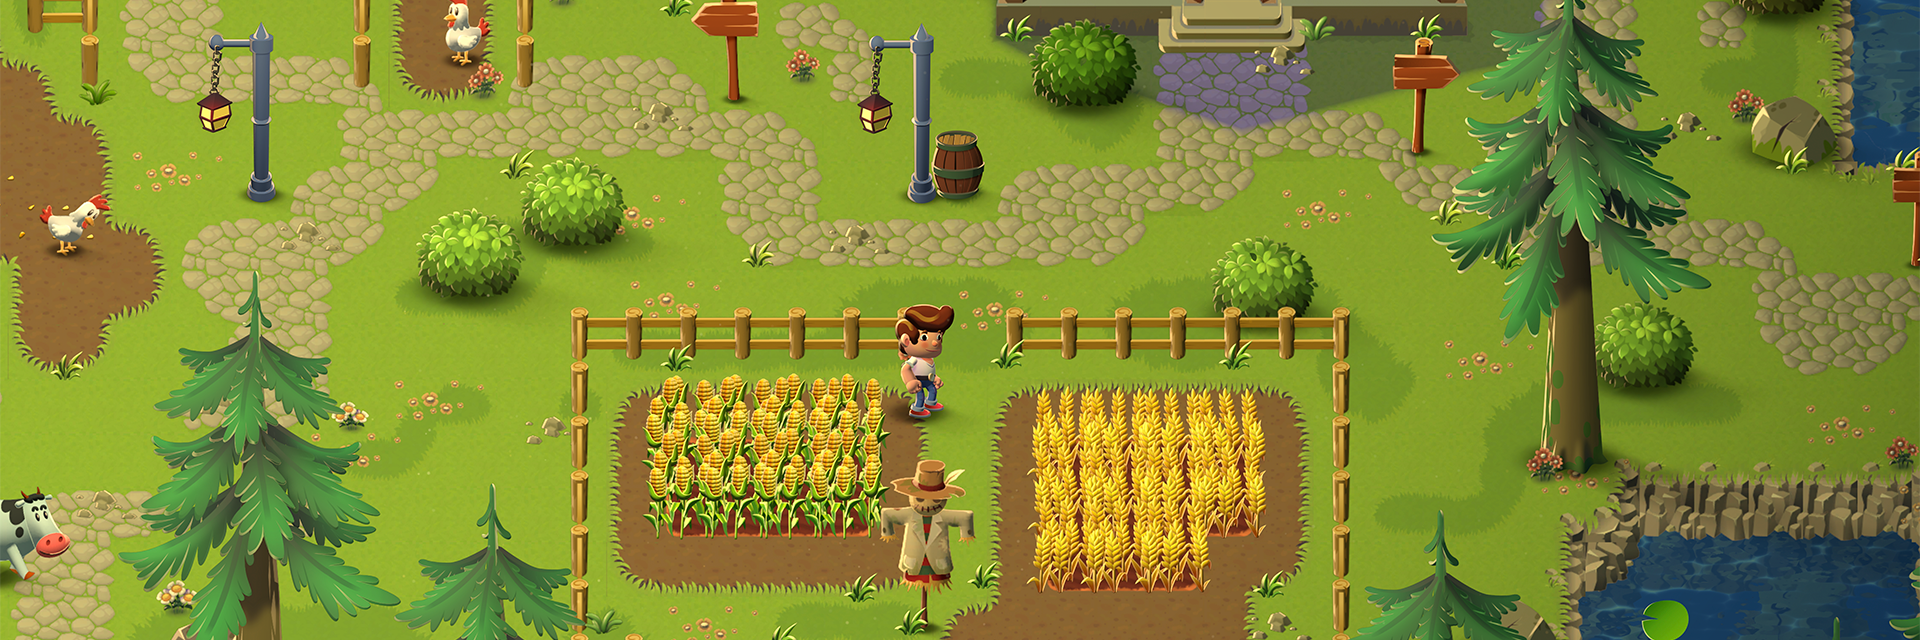
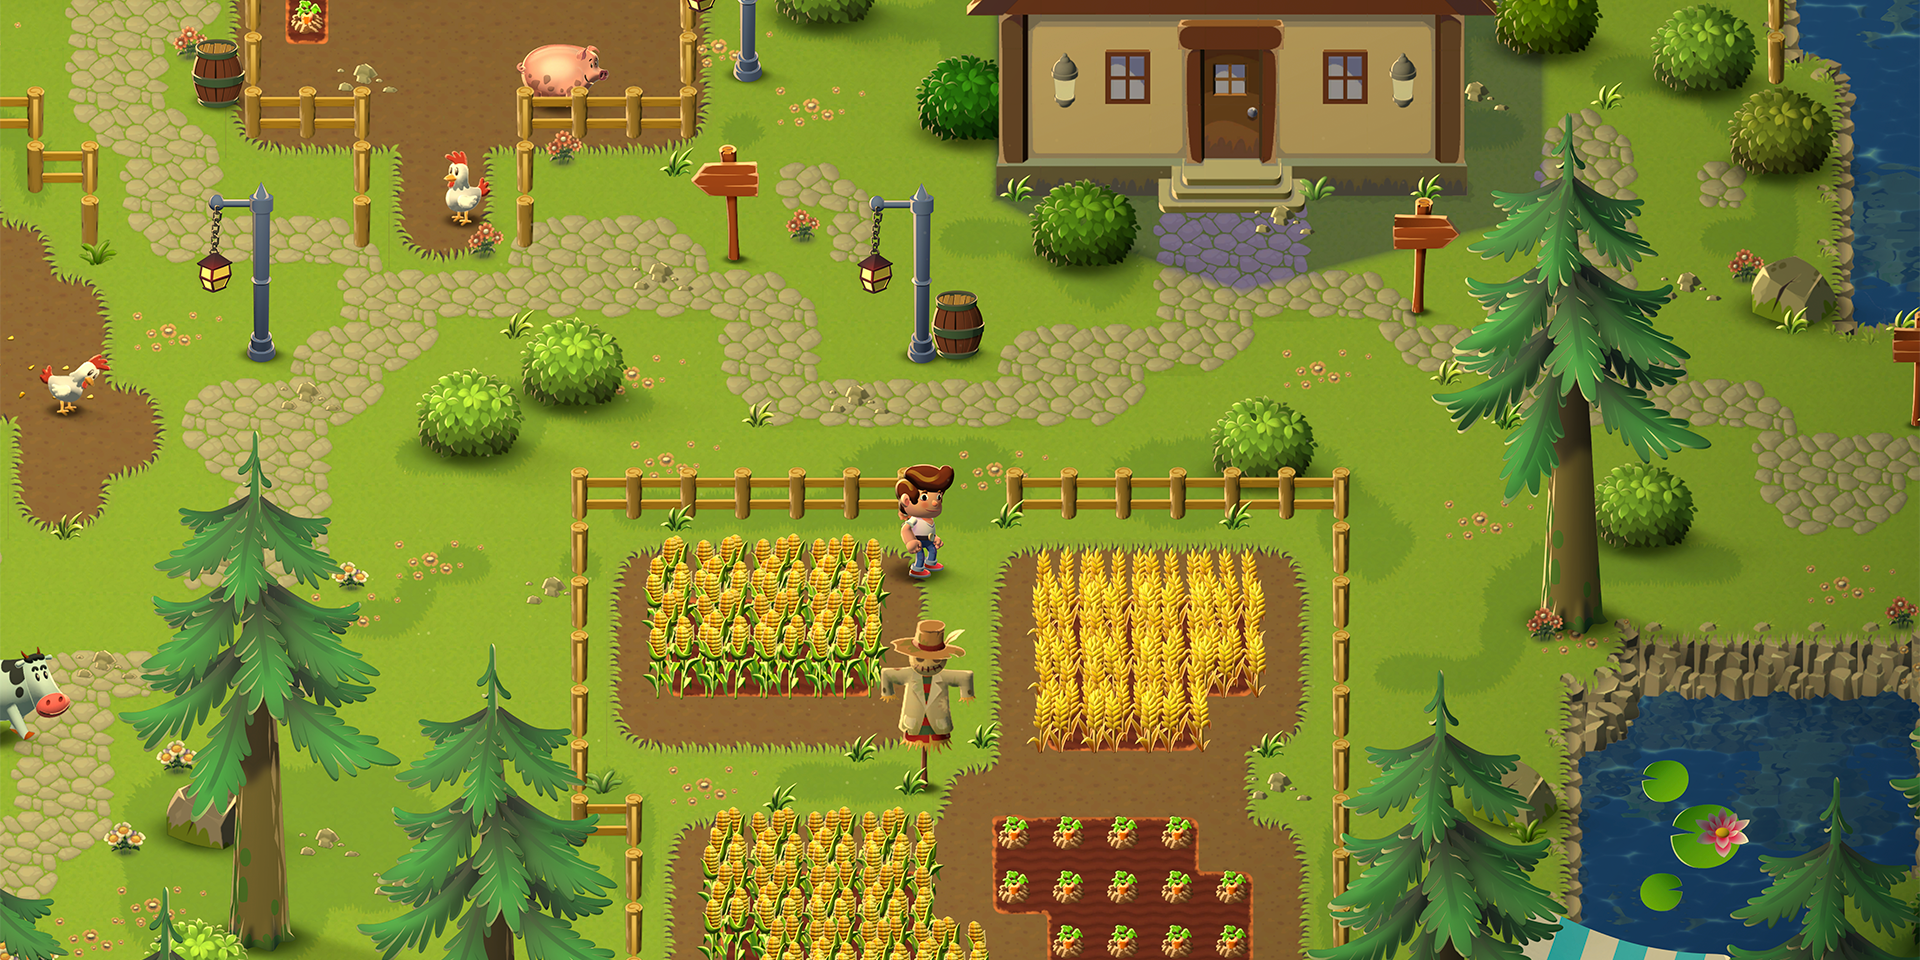
A top-down view of a hardworking farmer

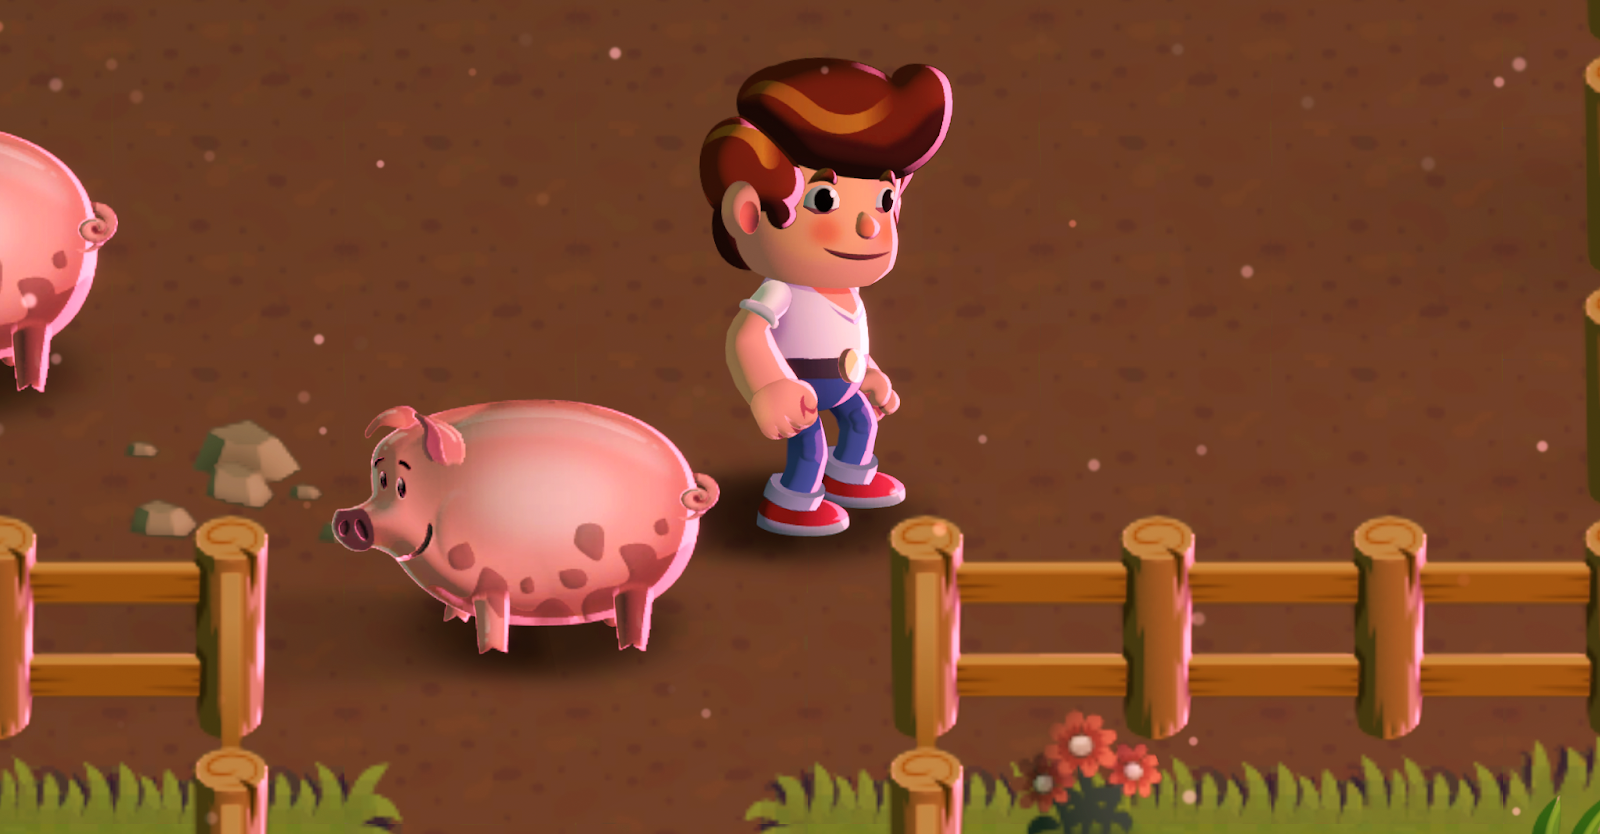
Happy Harvest is a top-down demo with cheerful cartoon art. The sample takes you through a day in the life of an industrious farmer. Stepping from his farmhouse, he makes his way along cobblestone paths lit by lanterns. He tends to wheat, carrot, and corn crops, picks apples, and feeds his pigs and cows. His farmstead is dotted with ponds, there’s a barn in the back, and it’s all ringed by verdant pine trees.
A top-down perspective comes with challenges like how to project the character, manage overlapping objects, and create shadows in an imaginative way. These were handled by using features included in Unity 2022 LTS for shadows, sprite libraries, and Tilemap 2D.
All of these assets are free to use in your personal or commercial projects, and you can also modify the demo with your own ideas. Download it today to start exploring this bucolic scene and its many details.
Explore techniques used in the demo

The demo is accompanied by a collection of instructional articles. These technical walkthroughs will help you understand how the lights, shadows, environment, and animations were created, so you can use the same steps in your own 2D project.
The following pages are available with the demo:
- 2D light and shadow techniques in URP
- How to create art and gameplay with 2D tilemaps
- How to animate 2D characters in Unity 2022 LTS
- Create 2D special effects in Unity with the VFX Graph and Shader Graph
You can find these articles in the description on the Unity Asset Store page and in the in-Editor tutorial window in the demo.
Let’s take a brief look at what you’ll learn from each page.
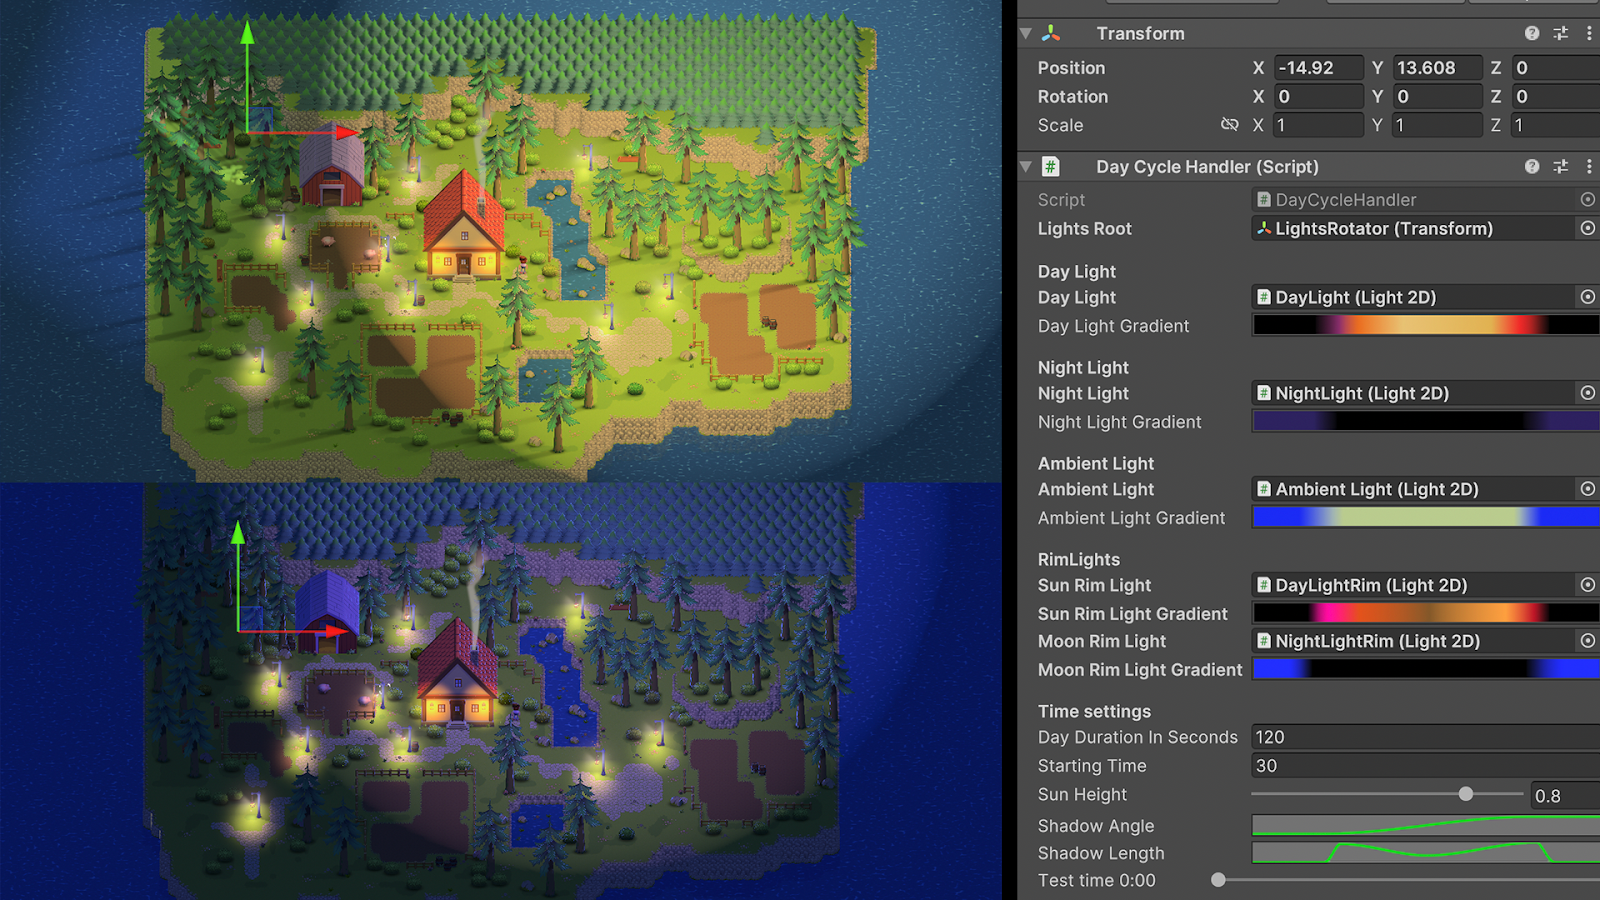
Create depth illusion, shadows, and a day-to-night cycle
There are plenty of cute details in Happy Harvest, from fields of ripened corn and golden wheat, to gently swaying lanterns and the red-shingled farmhouse. But it’s the lighting and shadows that are the most immersive part of this cozy world, featuring an all-over glow and late afternoon shadows.
By moving light and shadow information to separate textures (which does require some extra steps during the art creation process), you can create optimized real-time 2D lights and shadows.
Read the article “2D light and shadow techniques with the Universal Render Pipeline” to learn how to:
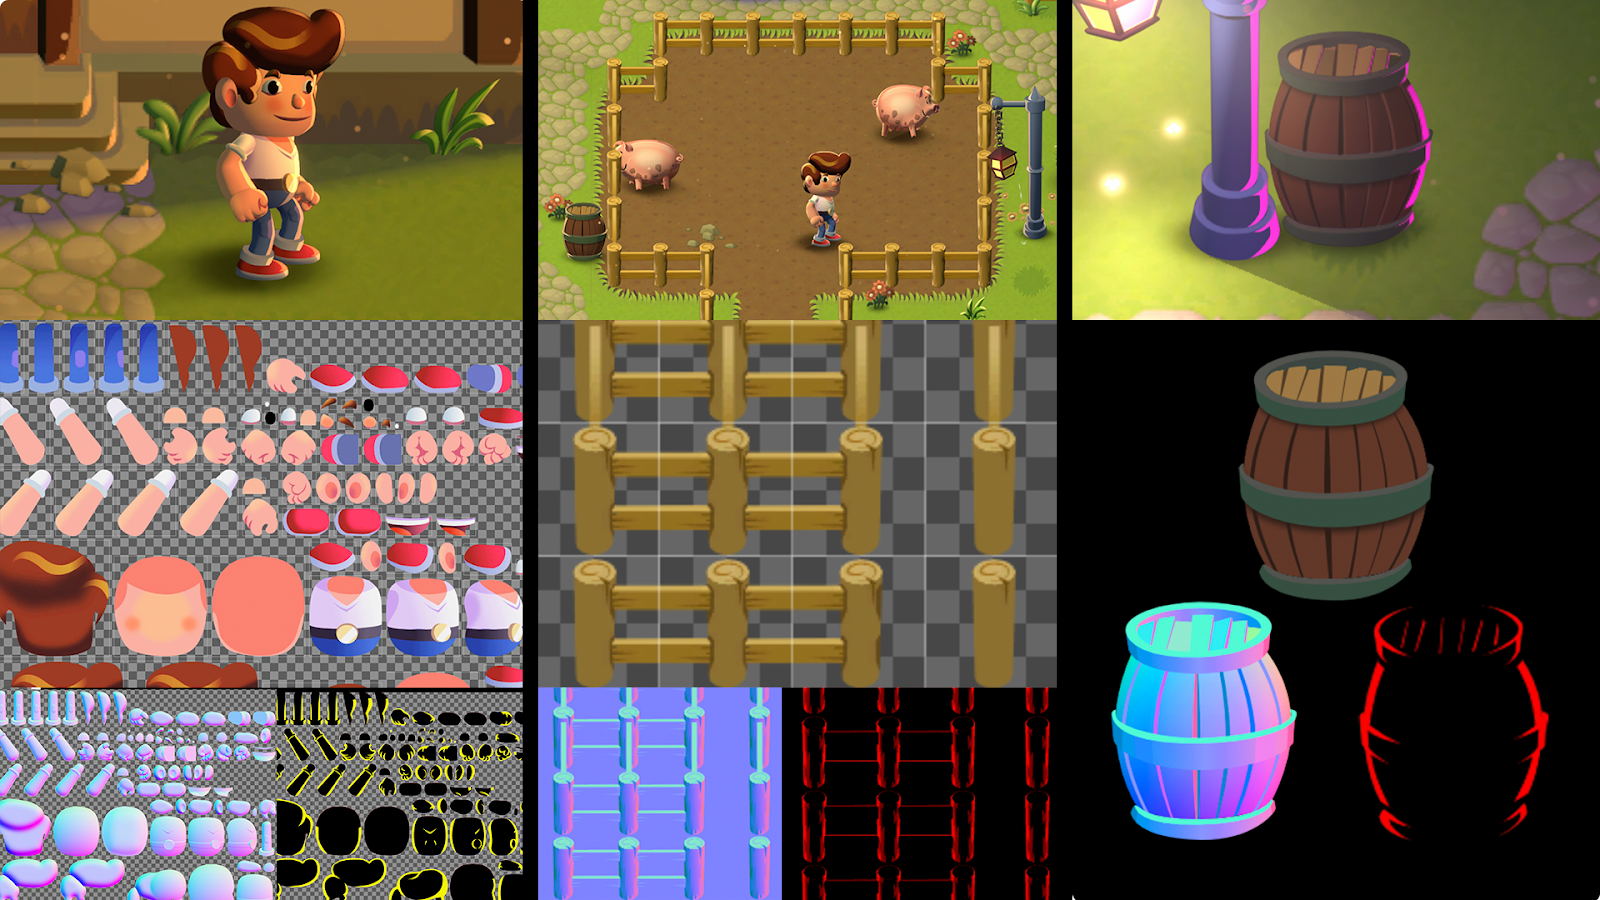
- Create and work with normal maps and mask maps (Secondary Textures) to add rich details like rim lighting on the main character, barrels, lamp posts, and other props.
- Use ambient and spot lighting to set the mood with tinting and effects that mimic the sun’s movement throughout the day.
- Create the illusion of volume, like the effects used on the bushes, by enabling normal maps on the lights.
- Create shadows for any shape and time of day using blob shadows and infinite shadows with the Shadow Caster.
- Control the movement of time and changing of the light with a day-to-night script.
- Optimize your 2D lights with tips from the Unity team.
Design environments for large landscapes with 2D Tilemaps
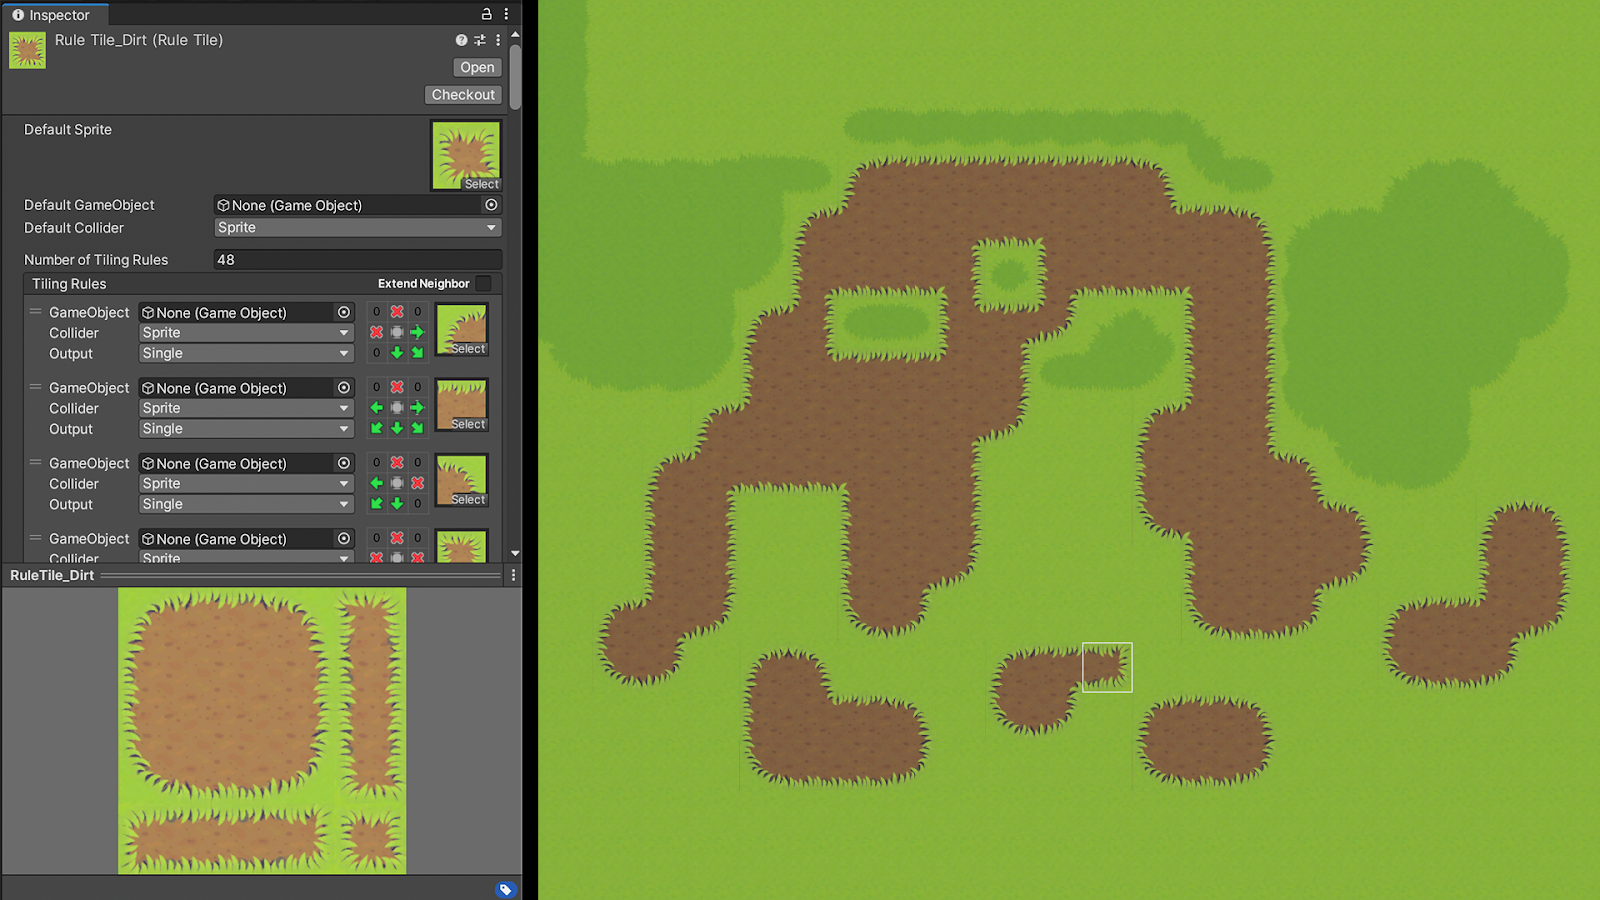
What do the cobblestone paths, ponds, grass, and background forest have in common? They were all made with Unity’s Tilemap system, which provides a way to create a game world with tiles – small sprites placed on a grid. Instead of designing a level as one big image, you can split it into brick-like pieces that are repeated throughout a whole level.
Tilemaps can help save time on art creation as well as memory and CPU power. This is because tiles can be rendered by a dedicated renderer and the tiles that are not visible on the screen can be disabled. A brush tool makes it efficient to paint tiles on a grid, and they can be scripted to use painting rules. They also come with automatic collision generation for more efficient testing and editing. Additionally, you can place GameObjects or use the API for game logic.
You can find tips for using the Tilemap system in the article “Create art and gameplay with 2D Tilemaps in Unity,” including how to:
- Use secondary textures for tilemaps: Every tilemap in the sample has counterparts called normal map and mask map textures that share the same dimensions and layout, but are painted for displaying the lighting.
- Use the Rule Tile feature, which is part of the 2D Tilemap Extras package. This package contains reusable 2D and Tilemap editor scripts you can use in your own projects and as the basis for custom Brushes and Tiles.
- Organize tiles in your project hierarchy:
- In the sample, the tiles are all contained in one GameObject called Grid.
- We created as few tilemaps as possible inside the Grid to prevent overlapping pixels and help keep overdraw low.
- Use the Tilemap API based on how it was used in the sample.
Learn about character rigging, skeletal animation, and sprite swapping
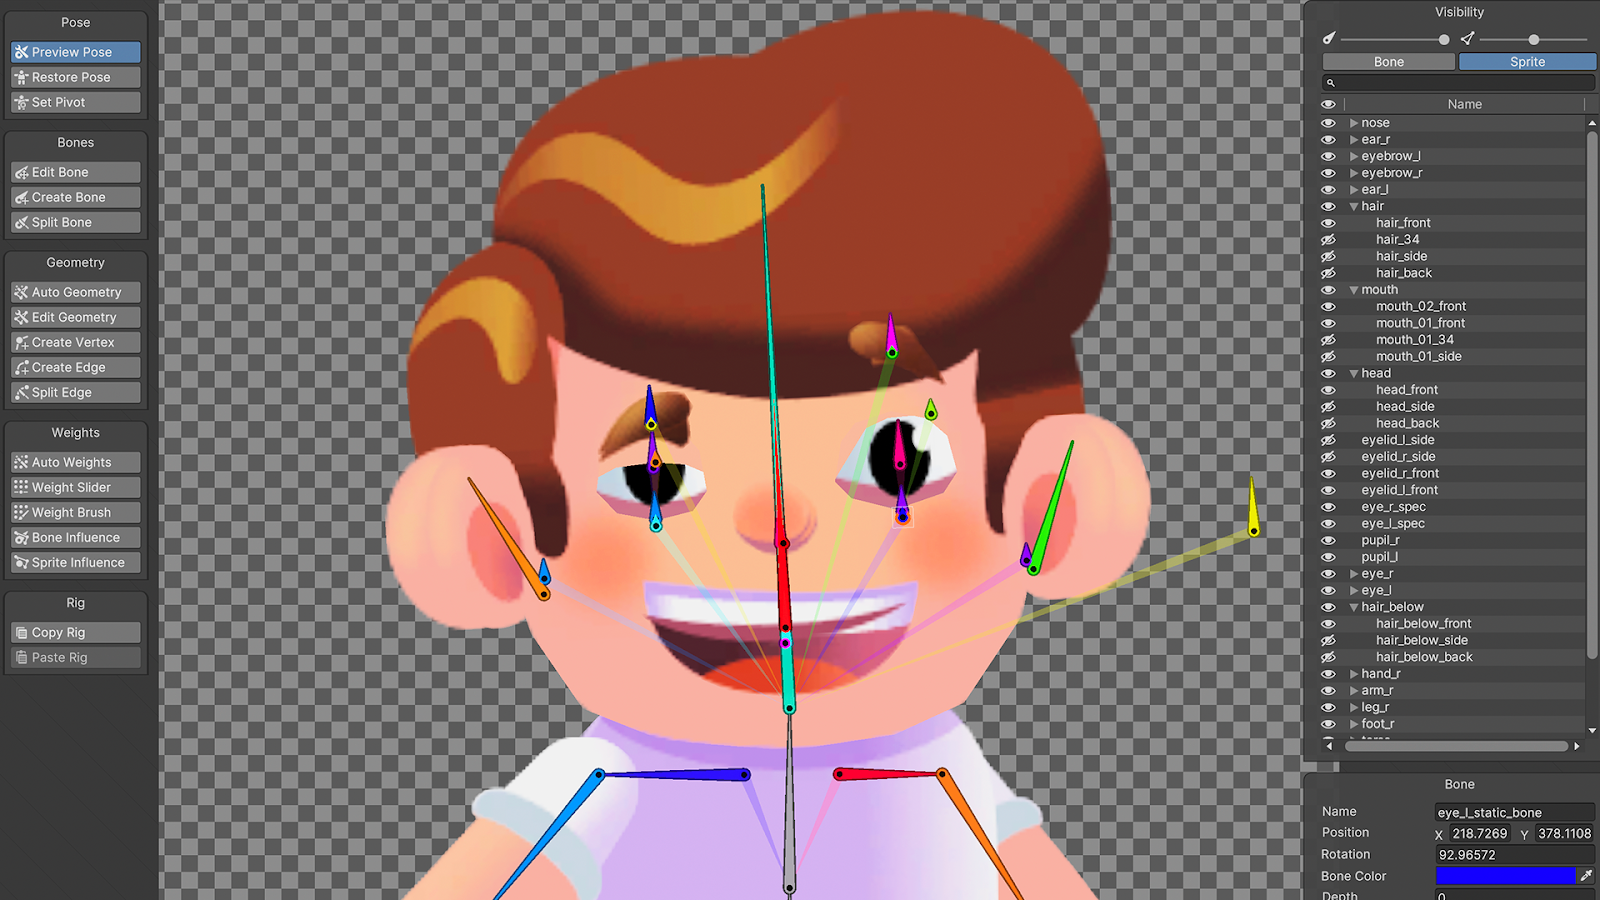
With his rolled-up sleeves and pompadour hairstyle, the farmer in Happy Harvest is ready to work. To get him moving around the scene, we used techniques like rigging his face to create different expressions, sprite libraries for character variations, and Sprite Swap for switching between sprites attached to the same bone during the animation process.
In the article “2D characters and animation in Happy Harvest,” we break down these and other techniques used to create the animations. You’ll get tips on how to:
- Draw and animate characters from different angles to suit a top-down perspective. In Happy Harvest, good-looking visuals are achieved with four directions.
- Work with skeletal animation in Unity using the 2D Animation and PSD Importer packages. These enable you to import your character artwork directly from Photoshop into Unity by importing all of the character’s layers as sprites and placing them exactly as they were painted in the app.
- Rig a character in the Sprite Editor.
- Connect sprites to bones, geometry, and weights.
- Use the Sprite Library Editor and Sprite Swap to manage types of animations other than those that can be achieved with bone rotations. This includes facial expressions when the character changes the direction they’re facing.
- Use the 2D Inverse Kinematics (2D IK) tool, which is a part of the 2D Animation package. It calculates the rotations and allows a chain of bones to move them to target positions.
Make rain, a cozy fire, smoke, and swaying leaves

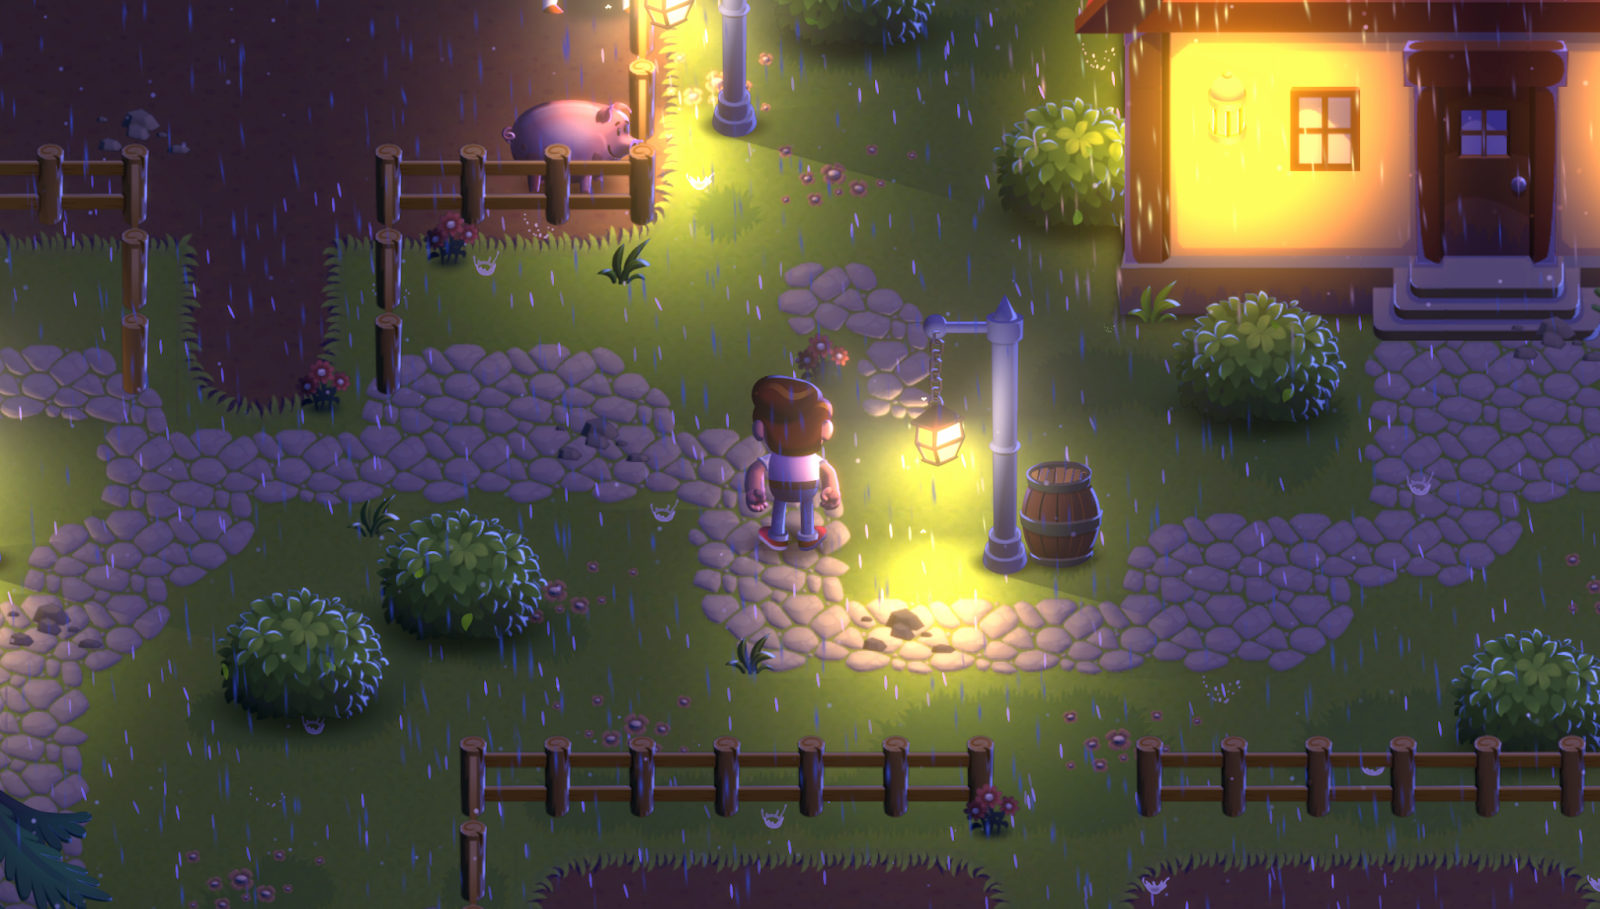
The farmer’s crops need both sunshine and rain. Luckily, the evening brings rainfall, and our hard-working farmer can retire to his little home with a cozy fire in the hearth.
There are different options for creating 2D visual effects like these in Unity. You can animate an explosion frame-by-frame or spawn particles and cloud sprites. Use the Built-in Particle System for particle spawning on the CPU. Alternatively, you can leverage the GPU and use the VFX Graph and Shader Graph to spawn millions of particles or apply post-processing effects with URP Volumes.
In the article “2D special effects with the VFX Graph and Shader Graph,” you’ll learn about the different techniques used to create the special effects in Happy Harvest, including:
- Simple particle effects created with the Built-in Particle System, like falling leaves from the bushes, or the farmer’s footprints
- Flipbook particles to create moths around the lamps at night using the Built-in Particle System, or water splashes from the rain spawned by the VFX Graph
- Common effects like a shader applied to the water tiles to make the waves move, the fire in the fireplace, and the smoke from the chimney
- Weather effects like rain and thunder made in the VFX Graph – the rain particles use the 2D Lit shader so they blend nicely with the environment and react to lights
- Shaders to move the trees and other vegetation to simulate a light breeze
- Tint and bloom post-processing effects applied to the whole scene to set a warm, cheerful mood
Learn more about creating visual effects in our e-book The definitive guide to creating advanced visual effects in Unity. The e-book provides a complete overview of how to use visual effects authoring tools in Unity to create advanced effects, including water and liquid, smoke, fire, explosions, weather, impact, magic, electricity, and much more.
Download, play, and get best practices
Happy Harvest is a playground for 2D creators who want to pick up new visual techniques in Unity. Expand on the sample, reuse its elements and scripts in your own projects, and test it on your mobile and desktop devices. This sample and its supporting content is designed to provide useful tips for everyone, from beginners to experienced 2D developers. Happy harvesting!


If you haven’t yet, be sure to download these advanced e-books that cover 2D game development as well as rendering and visual effects (3D and 2D) in Unity:
- 2D game art, animation, and lighting for artists
- Introduction to the Universal Render Pipeline for advanced Unity creators
- The definitive guide to lighting in the High Definition Render Pipeline in Unity
- The definitive guide to creating advanced visual effects in Unity
Plus, check out our other 2D demos, The Lost Crypt and Dragon Crashers.
You’ll find many more resources for advanced programmers, artists, technical artists, and designers in the Unity best practices hub.
Got feedback? Please share your thoughts on the demo in the dedicated forum.
Is this article helpful for you?
Thank you for your feedback!
- Unity Labs
- Copyright © 2024 Unity Technologies